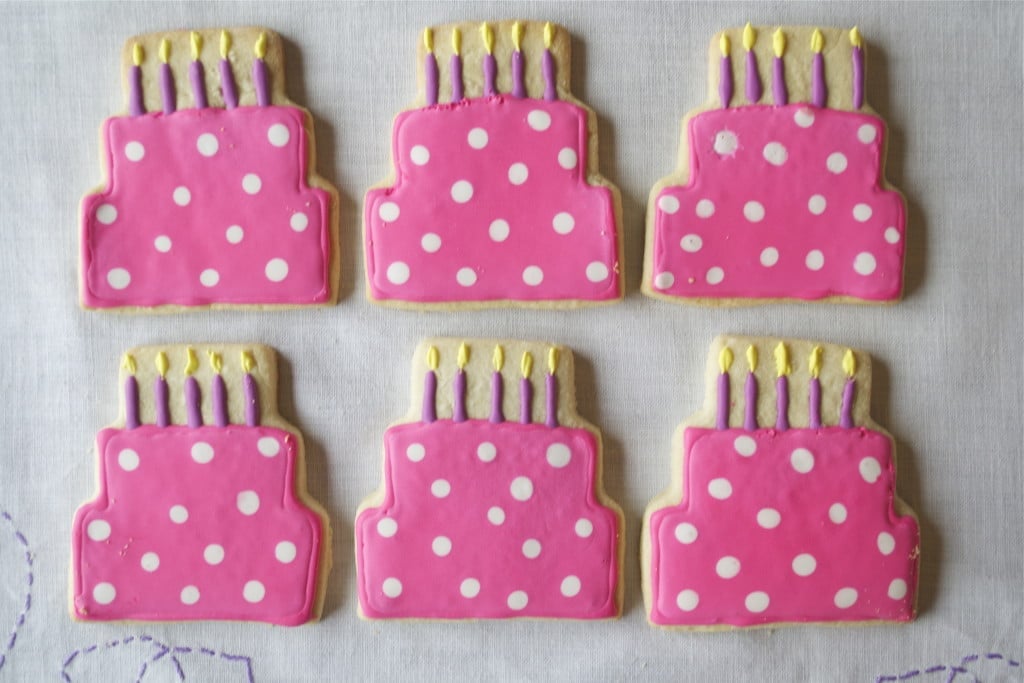
These gluten-free birthday cake sugar cookies are decorated to look like little birthday cakes with candles and sprinkles. They’re made with my gluten-free sugar cookie recipe and decorated with royal icing. They’re perfect for birthday parties and the colors are completely customizable.
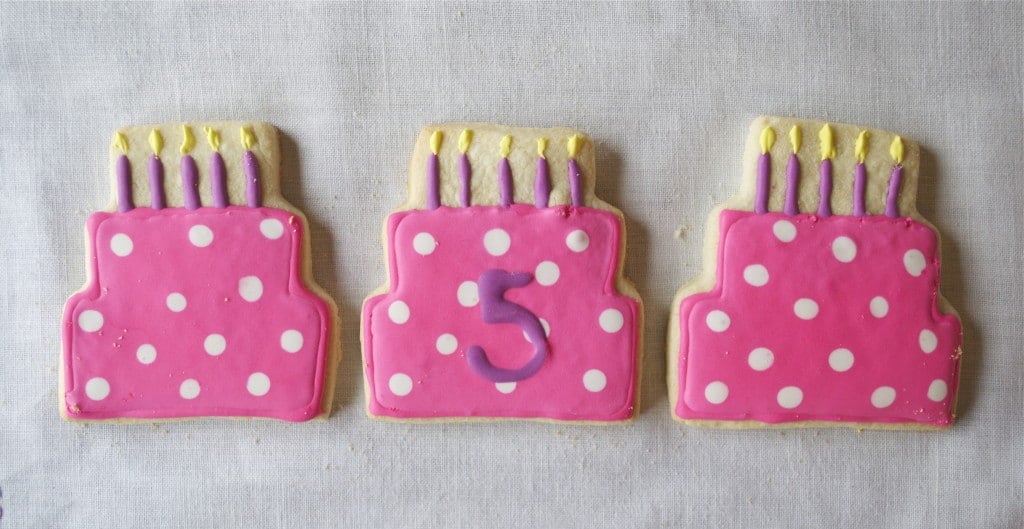
I originally made these birthday sugar cookies for my cousin’s 5th birthday in her favorite pink and purple colors. You can easily switch up the icing colors to match any birthday theme or the recipient’s favorite colors.
Why You’ll Love this Recipe
Searching for more gluten-free sugar cookie recipes? Snowflake Sugar Cookies / Ugly Christmas Sweater Cookies / Gluten-Free Christmas Cookies / Gluten-Free Easter Egg Sugar Cookies
Ingredient Notes
- Gluten-Free Flour Blend: Use Bob’s Red Mill 1:1 Gluten-Free Baking Flour. This blend already contains xanthan gum, so you don’t need to add any.
- Butter: Use softened butter (room temperature) so it creams properly with the sugar. Cold butter won’t incorporate well and the cookies will be dense.
- Almond Extract: Gives these cookies their signature flavor. You can use all vanilla if you prefer, but the almond extract makes them taste like classic sugar cookies.
- Powdered Sugar (for dough): Keeps the cookies tender and prevents them from spreading. Don’t substitute granulated sugar or the texture will be different.
- Meringue Powder: Essential for royal icing that dries hard and smooth. Find it in the baking aisle or cake decorating section. You cannot substitute egg whites.
Royal Icing Consistency
You’ll need two consistencies – outline icing (10-second) and flood icing (4-second). The “second test” means when you drizzle icing over the bowl, it flows back in and blends completely within that timeframe.
Recipe FAQs
The cookies should be set all the way through but not browned. They’ll look slightly puffy and dry on top with maybe just a hint of light golden color on the edges. They’ll firm up as they cool on the wire rack.
Cookies spread when the dough is too warm going into the oven. Always freeze the cut cookies for 10-15 minutes before baking so they hold their shape. Also make sure you’re using Bob’s Red Mill 1:1 Gluten-Free Baking Flour, as other blends may not work the same way.
Outline icing dries in about 15 minutes. Flood icing (the filled-in base) takes 2-3 hours to form a crust but should dry overnight (6-8 hours) before stacking or packaging. Humid weather can extend drying time.
Expert Tips
Storage Instructions
Make Ahead: Cookie dough can be made up to 3 days ahead. Wrap tightly in plastic wrap and refrigerate, or freeze for up to 3 months. Thaw frozen dough in the refrigerator overnight before rolling. Royal icing can be made up to 2 weeks ahead and stored in an airtight container at room temperature.
Room Temperature: Store decorated cookies in an airtight container at room temperature, layered between parchment paper, for up to 1 week. The royal icing will stay hard.
Refrigerator: Not recommended for decorated cookies as condensation can make the icing weep.
Freezer: Freeze undecorated baked cookies for up to 3 months in an airtight container. Thaw at room temperature before decorating. Do not freeze decorated cookies.
Serving Suggestions
These gluten-free birthday cake sugar cookies pair perfectly with Gluten-Free Sprinkle Sugar Cookies for a colorful cookie platter, or serve alongside Gluten-Free Chocolate Chip Cookies to give guests variety. For a complete birthday dessert spread, add Gluten-Free Chocolate Cake or Gluten-Free Cookie Cake.
More gluten-free cookies to try

Did you make this recipe?
I’d love to know! Please rate it and leave a comment below. You can also share your pictures and tag @adashofmegnut on Instagram.

Gluten Free Birthday Cake Cookies
Equipment
- Birthday cake cookie cutter (3-tier shape)
- Piping bags or squeeze bottles
- Piping tips (number 2 and 3)
- Toothpick
Ingredients
For the Sugar Cookies:
- 1 cup unsalted butter - softened
- 1 cup powdered sugar
- 1 large egg
- 2 teaspoons almond extract
- 1 teaspoon vanilla extract
- 1 teaspoon salt
- 2 ¼ cups gluten-free flour blend - Bob's Red Mill 1-to-1 Gluten-Free Baking Flour (in the blue bag), which contains xanthan gum
For the Royal Icing:
- 4 cups powdered sugar - sifted
- 2 tablespoons meringue powder
- 5 tablespoons water - plus more as needed to thin out the icing
- 1 teaspoon vanilla extract - or almond extract
**Use the toggle button above to turn the instruction photos on and off!
Instructions
Make the Cookie Dough:
- Cream butter and sugar: In a large bowl with an electric mixer, beat softened 1 cup unsalted butter and 1 cup powdered sugar on medium-high speed until light and fluffy, about 2-3 minutes.
- Add wet ingredients: Beat in 1 large egg, 2 teaspoons almond extract, 1 teaspoon vanilla extract, and 1 teaspoon salt until well combined.
- Add flour gradually: Add 2 ¼ cups gluten-free flour blend, ½ cup at a time, mixing on low speed after each addition. Use the electric mixer for the first 2 cups, then stir in the last ½ cup by hand to avoid overmixing.
- Chill the dough: Wrap dough in plastic wrap and refrigerate for 1 hour until firm. (Or freeze for 20-30 minutes, but watch carefully so it doesn't get too hard to roll.)
Roll and Cut:
- Prepare work surface: Sprinkle your work surface and rolling pin generously with powdered sugar (not flour).
- Roll dough: Roll chilled dough to ¼ inch thickness. If dough cracks, let it warm up at room temperature for 5 minutes.
- Cut shapes: Cut cookies using a birthday cake cookie cutter. A 3-tier wedding cake cutter works perfectly.
- Freeze before baking: Place cut cookies on a parchment-lined baking sheet. Freeze for 10-15 minutes while the oven preheats.
- Bake: Preheat oven to 375°F. Bake cookies for 8-10 minutes, until set all the way through but not browned. Edges may be lightly golden. Cool completely on a wire rack.
Make the Royal Icing:
- Mix icing: In a stand mixer with whisk attachment, combine sifted 4 cups powdered sugar, 2 tablespoons meringue powder 5 tablespoons water, and 1 teaspoon vanilla extract. Beat on medium-high speed for 7-10 minutes until well blended with a matte finish. This is your base (stiff) consistency.
- Create outline icing: Transfer some icing to a bowl. Add water a few drops at a time until it reaches 10-second consistency. (When you drizzle icing over the bowl, it flows back in and blends completely in 10 seconds.)
- Create flood icing: Thin more icing with water to 4-second consistency for flooding. (It flows back in and blends in 4 seconds when drizzled.)
- Color the icing: Divide icing into separate bowls and tint with gel food coloring (pink, purple, white, yellow). Keep outline and flood consistencies separate for each color.
Decorate:
- Outline the cookie: Using pink outline icing (10-second) in a piping bag fitted with tip #3, outline the birthday cake shape. Let dry for 15 minutes.
- Flood with base color: Fill the outlined area with pink flood icing (4-second) using a squeeze bottle or piping bag. Use a toothpick to spread into corners if needed.
- Add polka dots: While the pink is still wet, use white flood icing (4-second) to make small dots on the cake. Squeeze gently and release quickly for evenly-sized dots.
- Dry completely: Let the base dry completely, at least 2-3 hours or overnight, before adding candles.
- Pipe candles: Using purple outline icing (10-second) in a piping bag fitted with tip #2, pipe 4-5 vertical lines above the cake for candles.
- Add flames: Dip a toothpick in stiff yellow icing. Starting at the top of each purple line, place a dot and drag upward to create a flame shape (like an upside-down teardrop).
- Final drying: Let cookies dry completely, 3-4 hours or overnight, before stacking or packaging.
Notes
- Yield varies by cutter size. This recipe makes about 18 cookies with a 3-inch cutter. Larger cutters will make fewer cookies.
- Royal icing consistency is key. The “second test” means icing drizzled over the bowl flows back in within that timeframe – 10 seconds for outlining, 4 seconds for flooding. Add water drop by drop to thin, or powdered sugar to thicken.
- Customize the colors. Keep the same decorating technique but swap pink/purple for any color combination. Birthday colors, team colors, or seasonal colors all work.
- Storage: Store decorated cookies in an airtight container at room temperature, layered between parchment paper, for up to 1 week. The icing stays hard.
- Freezing: Freeze undecorated baked cookies for up to 3 months. Thaw and decorate when ready. Do not freeze decorated cookies as the icing may sweat when thawing.
These are super fun! Thanks for linking up with our Gluten Free Fridays party! I pinned this!
-Cindy
Thanks Cindy!! And thank you for hosting!
What a great way to make a kid feel special! Love these 🙂
Thank you Barbara!!
These cookies are so adorable! Thanks for sharing them at Gluten-Free Wednesdays! (I love your blog name too.)
Thank you Linda!!