


Why I love this recipe
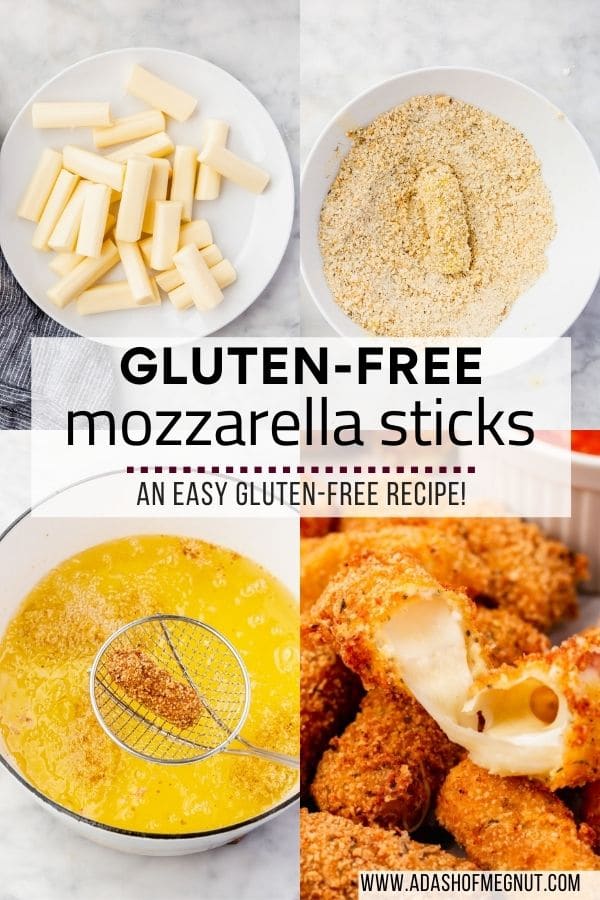
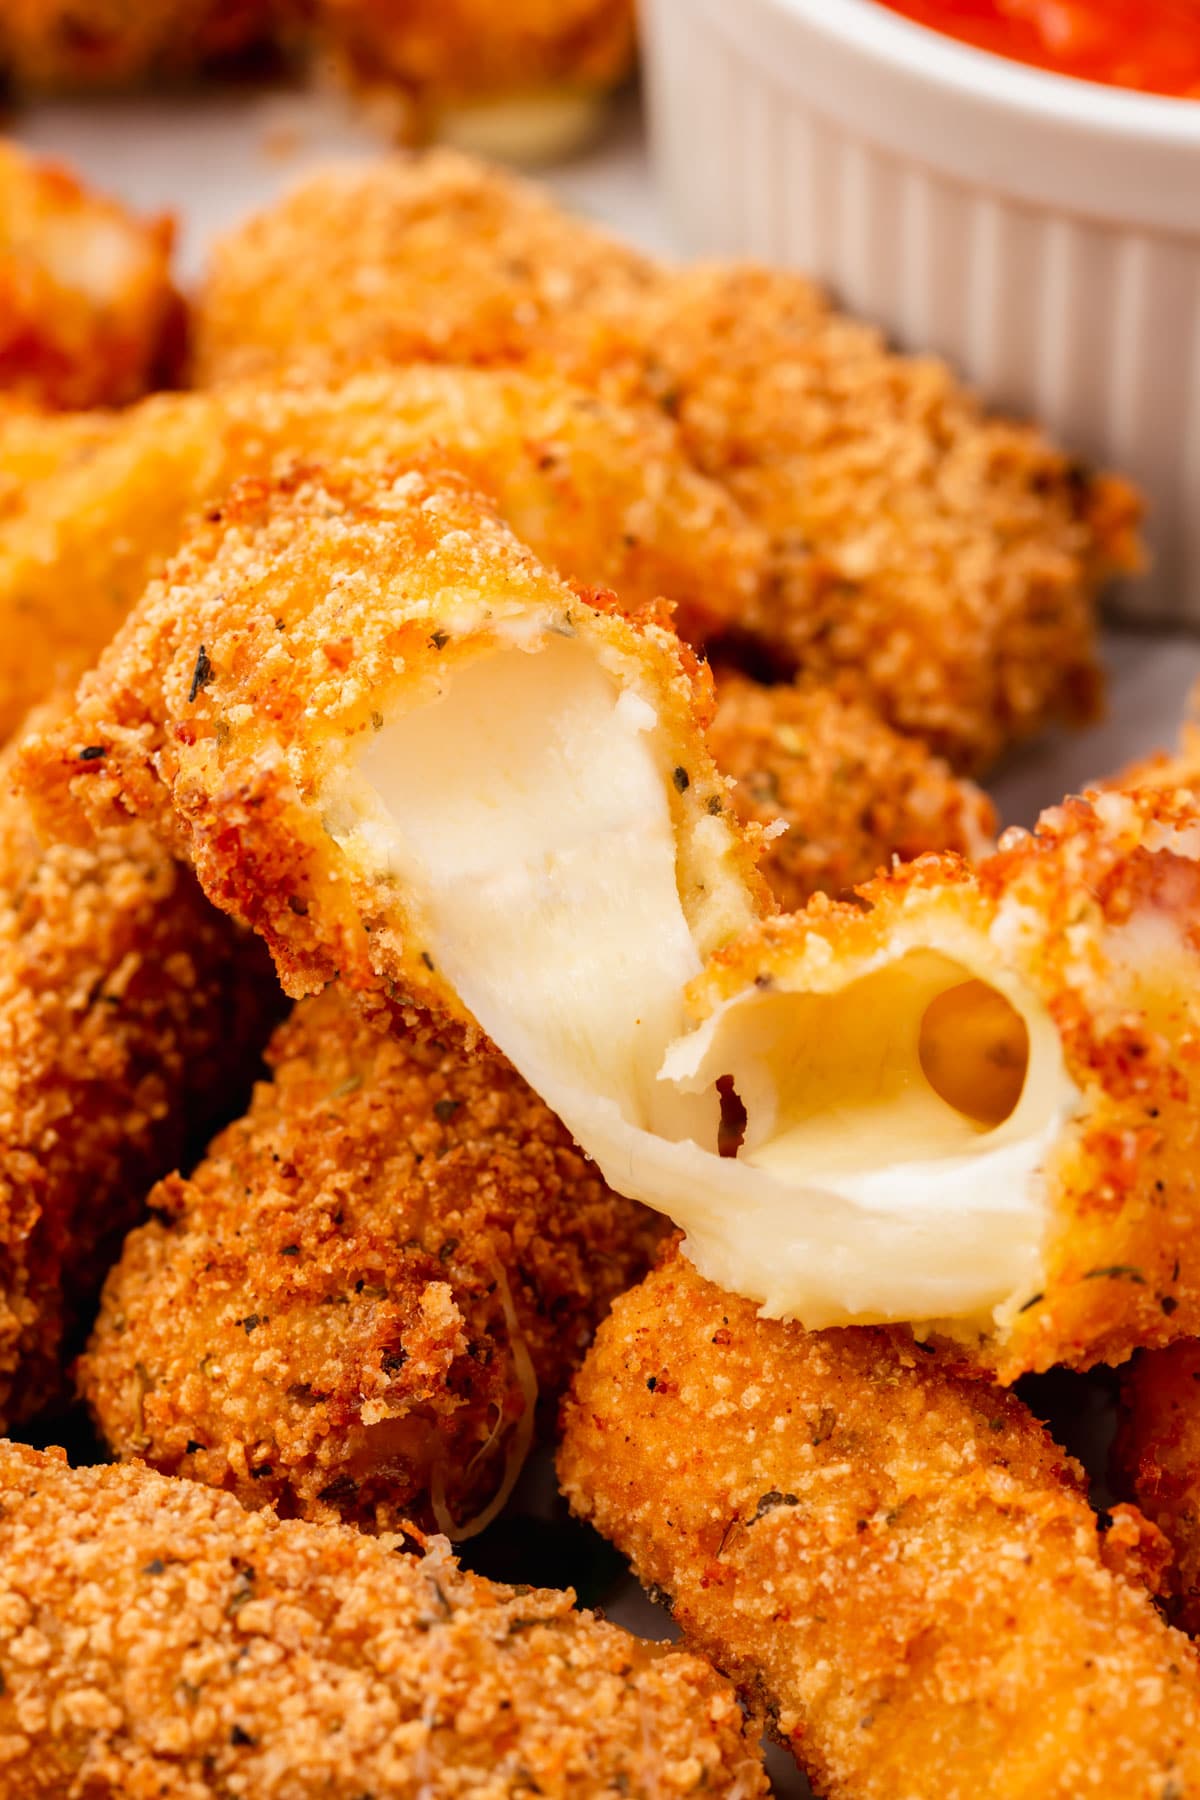
Each bite of these crispy, golden gluten-free mozzarella sticks contains crunchy gluten-free breadcrumbs, creamy mozzarella cheese, and rich Italian seasonings. If you’re like me and mozzarella sticks used to be your go-to appetizer order at a restaurant before celiac disease or living gluten-free, then this recipe is for you!
There’s no need to limit this tasty treat to a night out when you can easily be making it for weeknight dinners or your next party. It can even be made ahead of time, making entertaining prep that much easier.
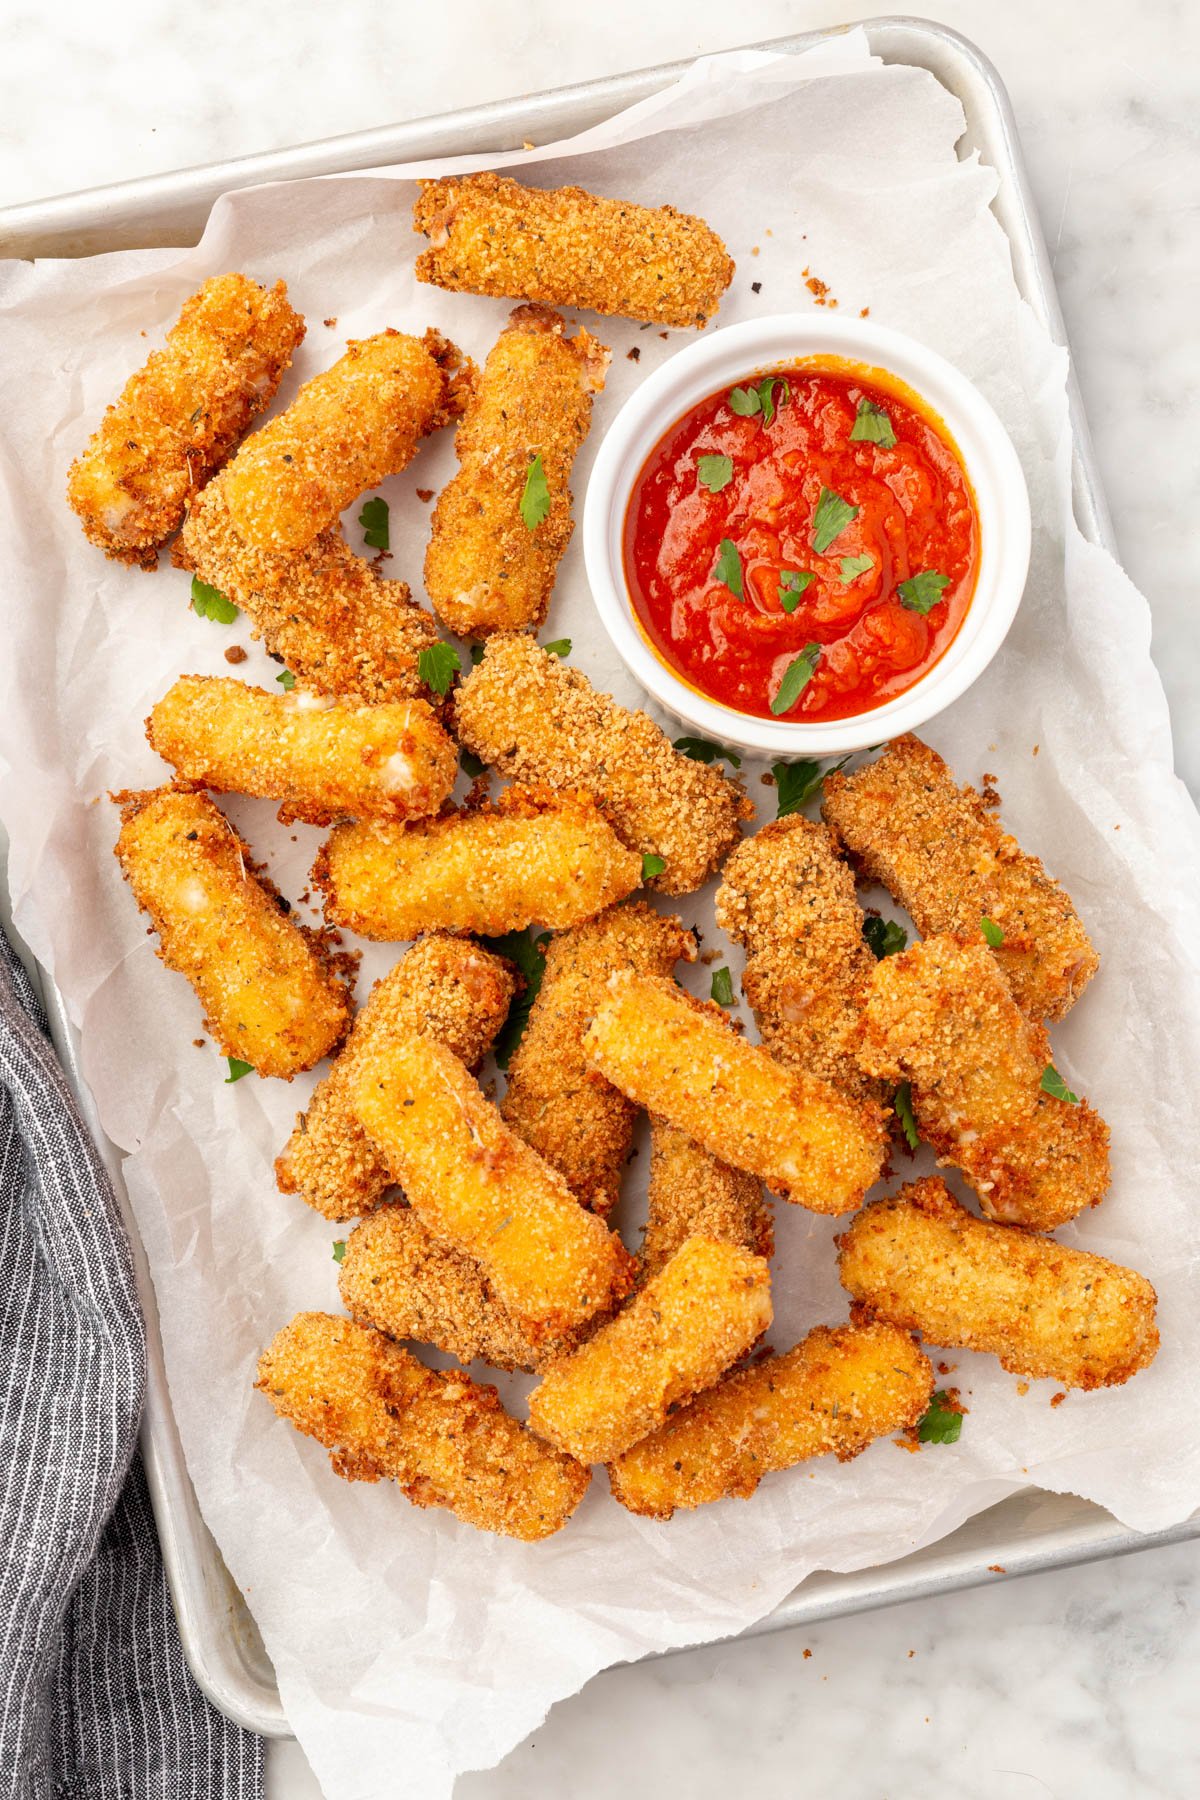
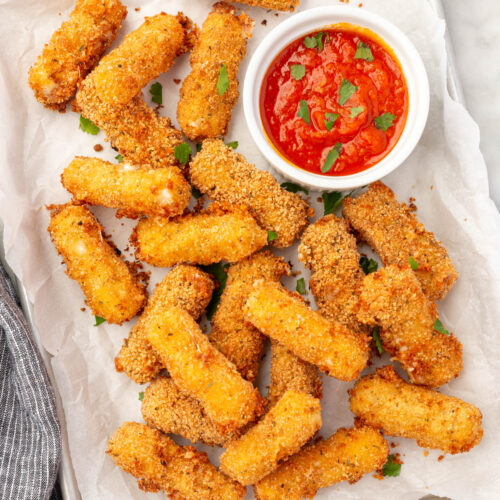
Whether you’re at home watching the big game on TV with friends or looking for a fun activity with the family over the weekend, these crispy mozzarella sticks are the perfect snack or appetizer. Serve with your favorite dipping sauce, like marinara, and you cannot go wrong with this recipe!
Ingredients
A Dash of Megnut is a participant in the Amazon Services LLC Associates Program, an affiliate advertising program designed to provide a means for us to earn fees by linking to Amazon.com and affiliated sites.
Ingredient Notes
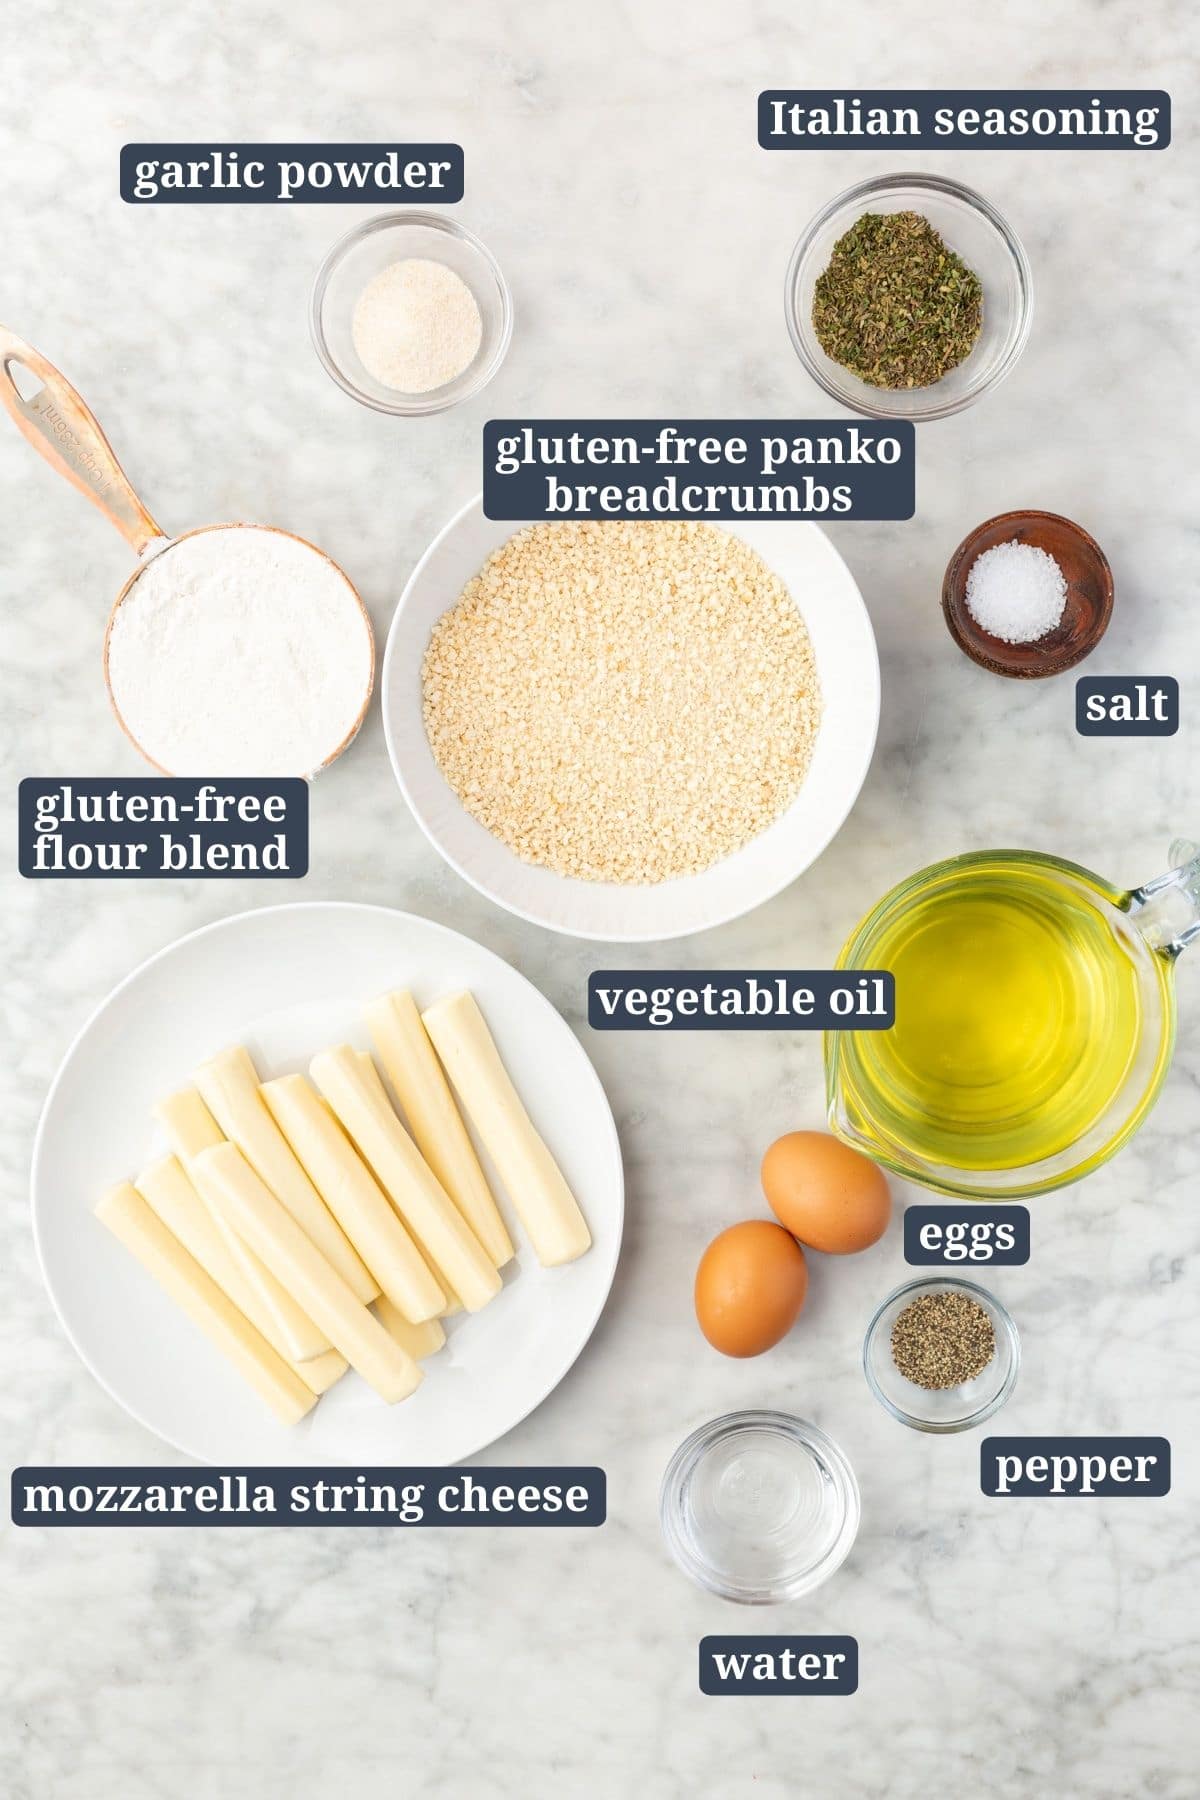
- Gluten-free panko breadcrumbs – I like the crunch that gluten-free panko breadcrumbs give to these gluten-free mozzarella sticks, but you also use plain gluten-free breadcrumbs in this recipe. My favorite brand for gluten-free panko is Ian’s Panko Breadcrumbs. Unlike other brands, the panko size is not too large, so it adheres to the mozzarella sticks better. If you find your panko crumbs are too large, process them in a food processor or place in a bag and smash with a rolling pin to get them a bit finer.
- Eggs – This recipe calls for four large eggs total, however, I like to use two at a time and split my egg mixture into two separate batches. If you try to do all of your mozzarella sticks in one go, your egg mixture will likely get clumpy with panko crumbs.
- Mozzarella string cheese – I find that it’s just so easy to use mozzarella string cheese for this recipe, but if you can only find a block of mozzarella cheese, you can easily go that route. Just cut them into sticks about 3 inches long and a half inch wide.
Are mozzarella sticks gluten-free?
Typically, no. Mozzarella sticks that you find at restaurants or the frozen section of your grocery store are NOT gluten-free. Even if restaurants do have gluten-free mozzarella sticks, you have to be weary of cross contamination if they are frying their sticks in the same oil as gluten-containing foods.
So what makes my mozzarella sticks recipe gluten-free? Well a few key ingredients is all you need. First, we use gluten-free flour to coat the mozzarella sticks before it goes into the egg wash. This helps the egg adhere to the mozzarella sticks. I used Bob’s Red Mill 1-to-1 Gluten-Free Baking Flour, but any gluten-free flour blend will work here.
Next, we use gluten-free panko breadcrumbs for breading the mozzarella sticks. You can find gluten-free breadcrumbs at your local grocery store or online. I’ve used both panko and regular gluten-free breadcrumbs in this recipe, and both have worked out great. I prefer panko since it adds a little more crunch.
As you can see, it is simple to make mozzarella sticks gluten-free with a few simple gluten-free ingredient substitutions!
Step-by-Step instructions
- Slice the mozzarella string cheese sticks in half so that you get 32 individual sticks. If you’re using a block of mozzarella cheese instead of string cheese, you will want to cut your block into uniform sticks approximately 3 inches long and 0.5 inches wide.
- Place the gluten-free flour blend in a shallow bowl.
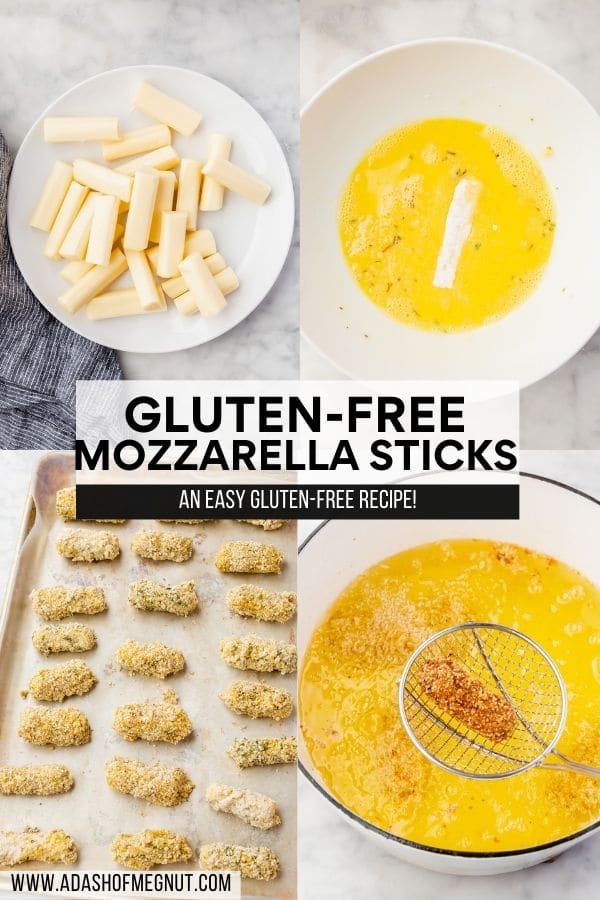
- Place the eggs and water in a separate bowl and whisk until combined. For best results and less mess, I like to only use two eggs at a time and have two batches of the egg mixture. Once you’ve gotten through Steps 5-10 on half of your cheese sticks and see that your egg mix needs a refresh, add in your final two eggs and a tablespoon of water.
- Place the gluten-free panko breadcrumbs, Italian seasoning, salt, garlic powder, and black pepper in a third bowl. Whisk until combined and all ingredients are evenly distributed.
- Take a cheese stick and place it into the gluten-free flour blend bowl, making sure to cover it on all sides including the edges. Tap off any excess.
- Dip the flour-coated cheese stick in the egg mixture so that it is completely covered in the egg, and then tap off any excess egg mixture.
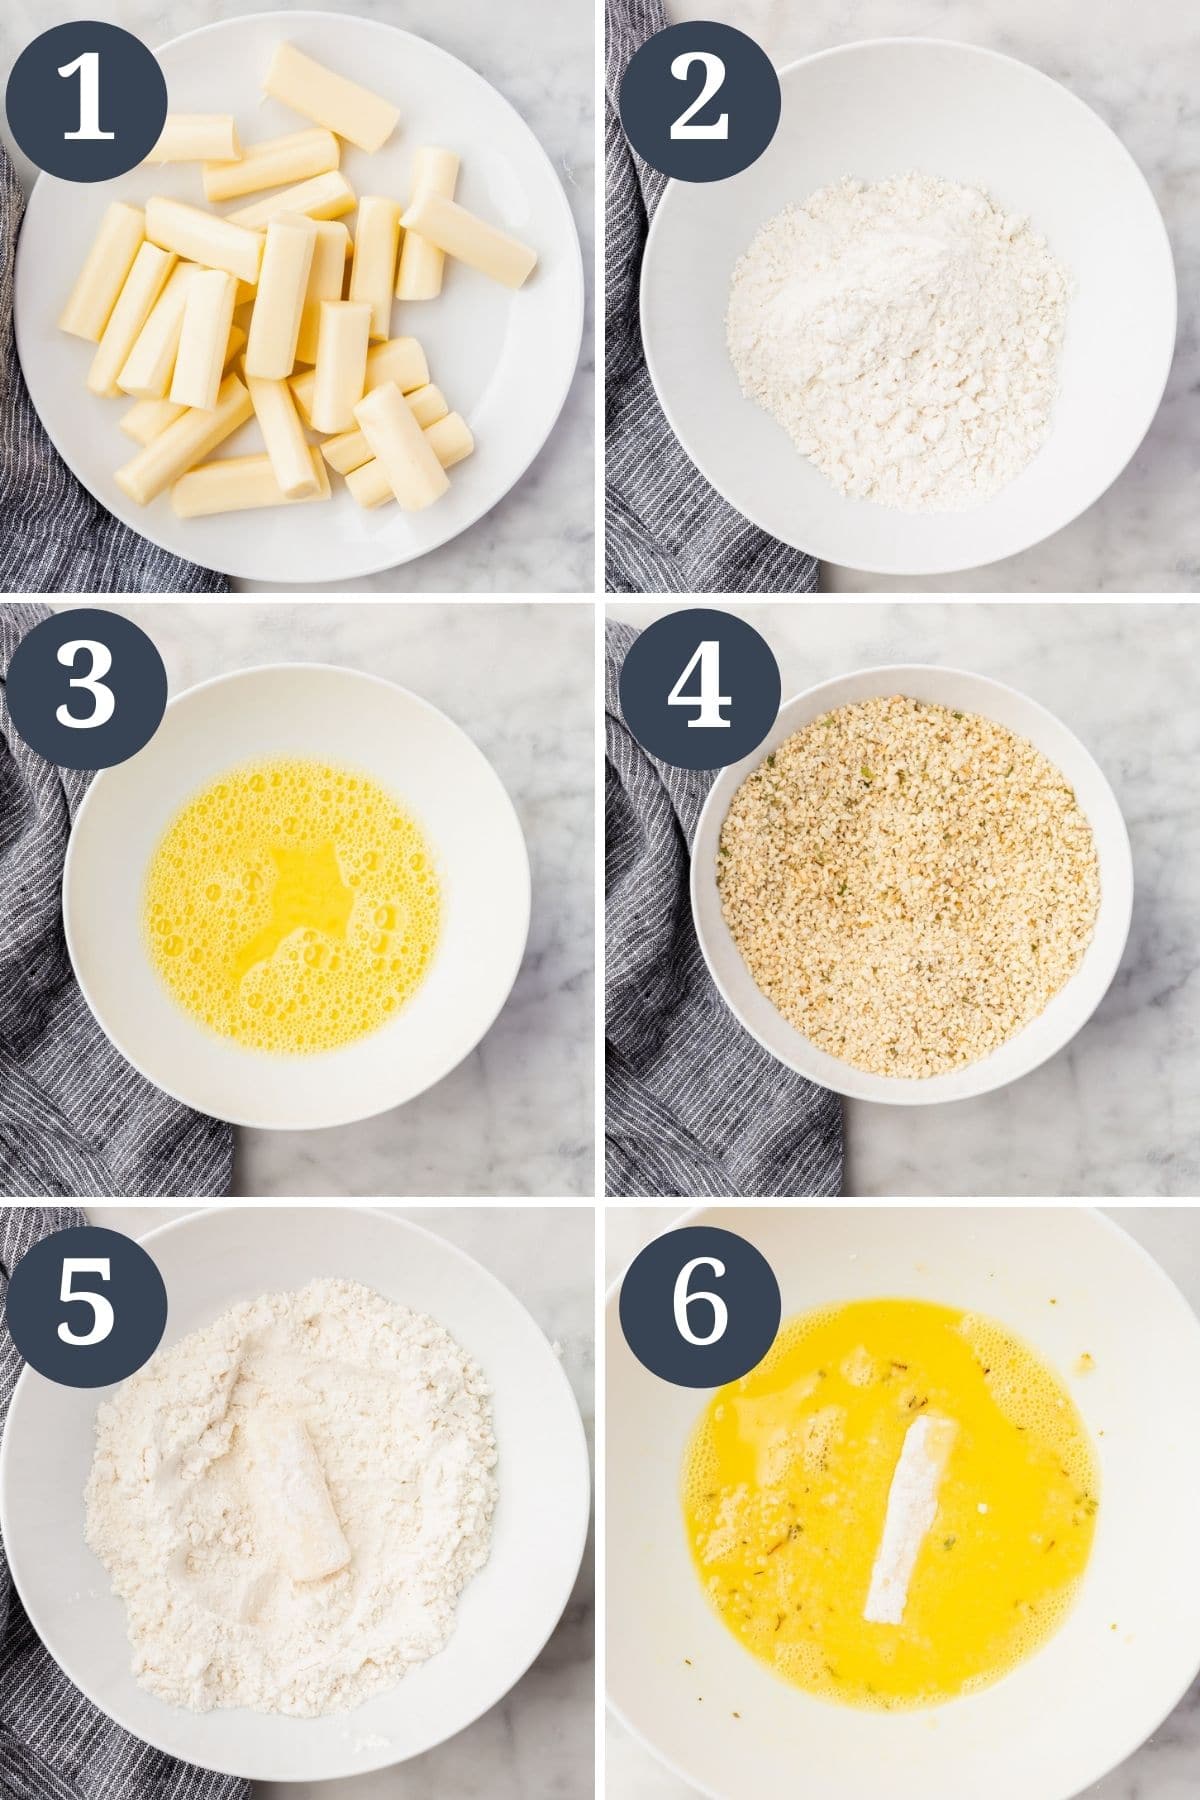
- Place the flour and egg coated cheese stick in the panko mixture and coat evenly with the breadcrumbs, ensuring that you coat even the tops and bottoms of the cheese stick.
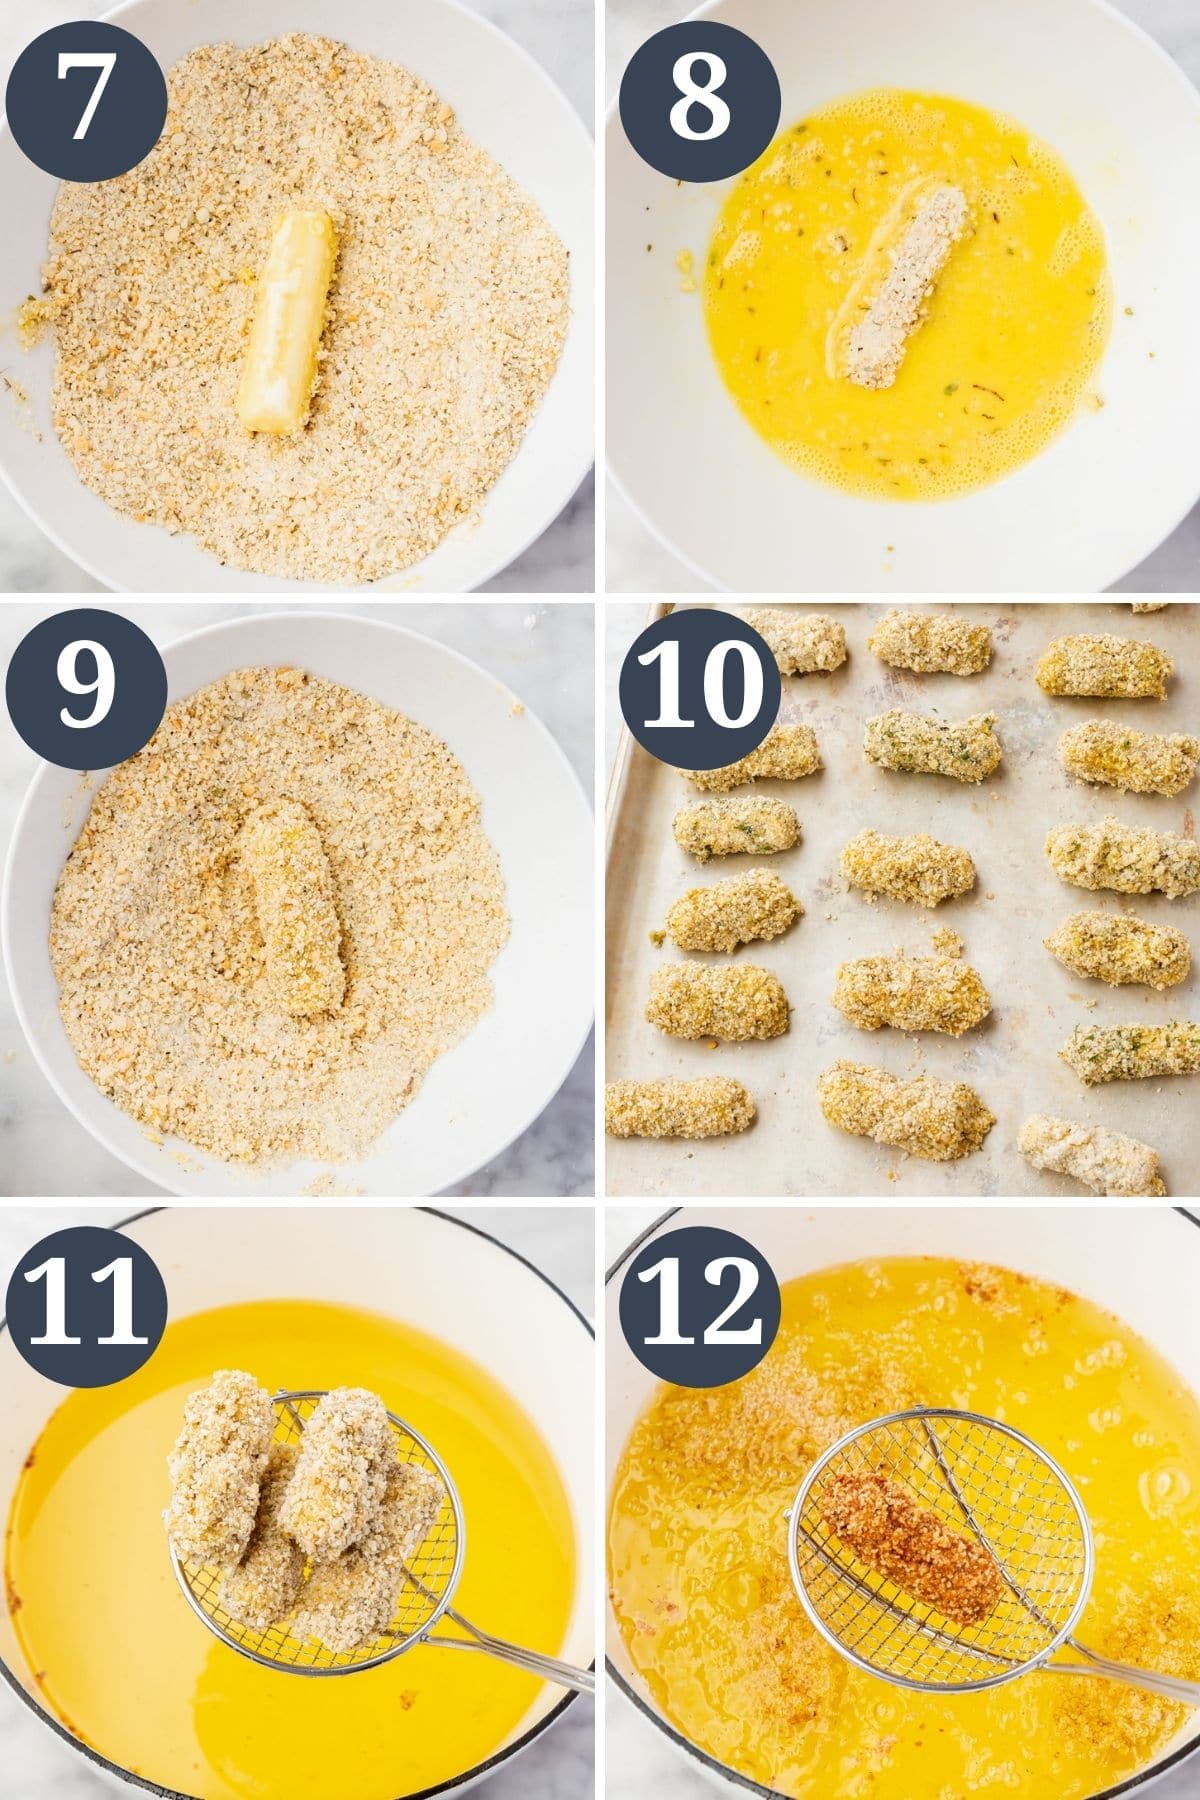
- Dip the cheese stick back into the egg mixture and coat evenly once again.
- Then dip and coat the cheese stick in the panko mixture one last time ensuring that it is entirely coated and no cheese is showing. To recap, the cheese stick will go in the gluten-free flour, then egg, then panko, back into the egg, and finally again in the panko. You will have two layers of panko breadcrumbs.
- Place the covered cheese stick on a baking sheet lined with wax paper or parchment paper. Repeat with remaining cheese sticks, and then freeze the mozzarella sticks on the baking sheet for at least 1 hour.
- Once cheese sticks have been freezing for at least 1 hour, heat the vegetable oil in a deep, heavy bottomed Dutch oven until the oil reaches 370F. I use approximately one quart of oil, which reaches 2-inches up the side of my Dutch oven. Use more oil if needed.
- Fry the mozzarella sticks in batches of 3-4 for about 2 minutes, until golden brown. Place the mozzarella sticks on a plate lined with paper towels to drain any excess oil. Monitor the oil in between each batch to make sure it remains at 370F. Top mozzarella sticks with fresh parsley and serve with marinara sauce for dipping.
Expert Tips
- The freezing step in the recipe is essential. I know it may seem pointless, but it will keep your mozzarella sticks from turning into a gooey mess and instead give them the perfect stringy, melty texture. I promise this step is worth the extra time! The freezing step also has the bonus of making this the perfect “make-ahead” recipe so you can make a bunch of these, freeze them, and then whenever the craving strikes for a few gluten-free mozzarella sticks, all you have to do is start at step 11.
- Make sure all of your sticks are totally coated from end to end with the panko crumb mixture. Any places where you can see cheese on your sticks is a place where you will have cheese oozing out. You want to keep the cheese INSIDE the breading, so make sure it’s completely covered!
- In an effort to not have a total mess on my hands, I find it’s best to use my left hand for dipping the sticks in to the egg mixture and my right hand for dipping into the panko. You’ll still have a mess, but it won’t be as gunky and frustrating.
- As I mentioned above, I like do only do half of the egg mixture at once. If you do all of it at once, you will have clumps of panko breadcrumbs in your mix about halfway through, which can be really frustrating. By refreshing the egg mixture halfway through, the second half of your mozzarella sticks will be just as smooth as at the beginning.
Recipe FAQs
You can use regular gluten-free breadcrumbs. I just find that the panko breadcrumbs give these gluten-free mozzarella sticks are really nice crunch.
Yes! I cannot stress the importance of this step enough. Freezing your mozzarella sticks after coating them will ensure that your mozzarella sticks are the proper texture and don’t come out all gooey with the coating falling off. The freezing step also allows you to make plenty and fry up your sticks whenever the mood strikes. I love a recipe with make-ahead potential!
You can store any leftover gluten-free mozzarella sticks in an airtight container in the refrigerator for up to 5 days, or in the freezer for 2 months. When you’re ready to eat them, simply preheat the oven to 350F and bake for 10 minutes. Alternatively (and my favorite way), you can reheat these in the air fryer at 380F for about 4-5 minutes until heated through.
Related Recipes
- Gluten-Free Mac and Cheese
- Instant Pot Lemon Risotto
- Instant Pot BBQ Pulled Pork
- Meyer Lemon Rosemary Bees Knees Cocktail
Did you make this recipe?
I’d love to know! Please rate it and leave a comment below. You can also share your pictures and tag @adashofmegnut on Instagram.
Gluten-Free Mozzarella Sticks
Ingredients
- 16 count mozzarella string cheese - cut in half
- 1 cup gluten-free flour blend
- 4 large eggs
- 2 tablespoons water
- 3 cups gluten-free panko crumbs
- 1 tablespoon italian seasoning
- 1 teaspoon salt
- 2 teaspoons garlic powder
- 1/2 teaspoon black pepper
- 1 quart vegetable oil - for frying
- 1 tablespoon fresh parsley - for topping
- marinara sauce - for serving
**Use the toggle button above to turn the instruction photos on and off!
Instructions
- Slice the mozzarella sticks in half so that you get 32 individual sticks.
- Place the gluten-free flour blend in a shallow bowl.
- Place the eggs and water in a separate bowl. Whisk to combine.
- Place the gluten-free panko crumbs, Italian seasoning, salt, garlic powder, and black pepper in a third bowl. Whisk to combine.
- Take a cheese stick and place it into the gluten-free flour blend bowl, making sure to cover it on all sides including the edges. Tap off any excess.
- Next, dip the cheese stick in the egg mixture and tap off any excess.
- Then, place the cheese stick in the panko mixture.
- Dip the cheese stick back in the egg mixture and then again in the panko mixture one last time. To recap, the cheese stick will go in the gluten-free flour, then egg, then panko, back into the egg, and finally again in the panko. You will have two layers of panko breadcrumbs.
- Place the covered cheese stick on a baking sheet lined with wax paper or parchment paper. Repeat with remaining cheese sticks. Freeze the mozzarella sticks on the baking sheet for at least 1 hour.
- Heat the vegetable oil in a deep, heavy bottomed dutch oven until it reaches 370F. I used about a quart of oil which reached 2-inches up the side of my dutch oven. Use more oil if needed.
- Fry the mozzarella sticks in batches of 3-4 for about 2 minutes, until golden brown. Place the mozzarella sticks on a plate lined with paper towels to drain any excess oil. Monitor the oil in between each batch to make sure it remains at 370F.
- Top mozzarella sticks with fresh parsley and serve with marinara sauce for dipping.
Video
Notes
- Do not skip the freezing step! It is essential to get the proper texture and ensure that your mozzarella sticks don’t fall apart.
- Make sure that all ends of your mozzarella sticks are completely covered by the panko mixture. If you see any part of the cheese stick, it will ooze out when it is frying in the oil.
- I find it easiest to use my left hand for dipping the stick in the eggs and my right hand for dipping in the panko to try to keep my hands from getting too messy and the mixtures from getting too gunky. It’s not completely mess-free, but it helps!
- I prefer to make only half of the egg mixture at a time because I find that the egg mixture easily gets really thick and messy from the panko being mixed in. If you find that the egg mixture is getting too much panko in there, crack some new eggs with water for better dipping. My preference is to start with 2 eggs and 1 tbsp water and then make more halfway through dipping.
- You could use gluten-free breadcrumbs, but I like the crunch that you get from panko.
- Store leftovers in an airtight container in the fridge for up to 5 days or in the freezer for 2 months. To reheat, bake in the oven at 350F for 10 minutes.
- Nutrition notes below are an estimate as you will likely not use all of the breadcrumbs or frying oil.
Can’t wait to try this! Can you air fry the mozz sticks???