

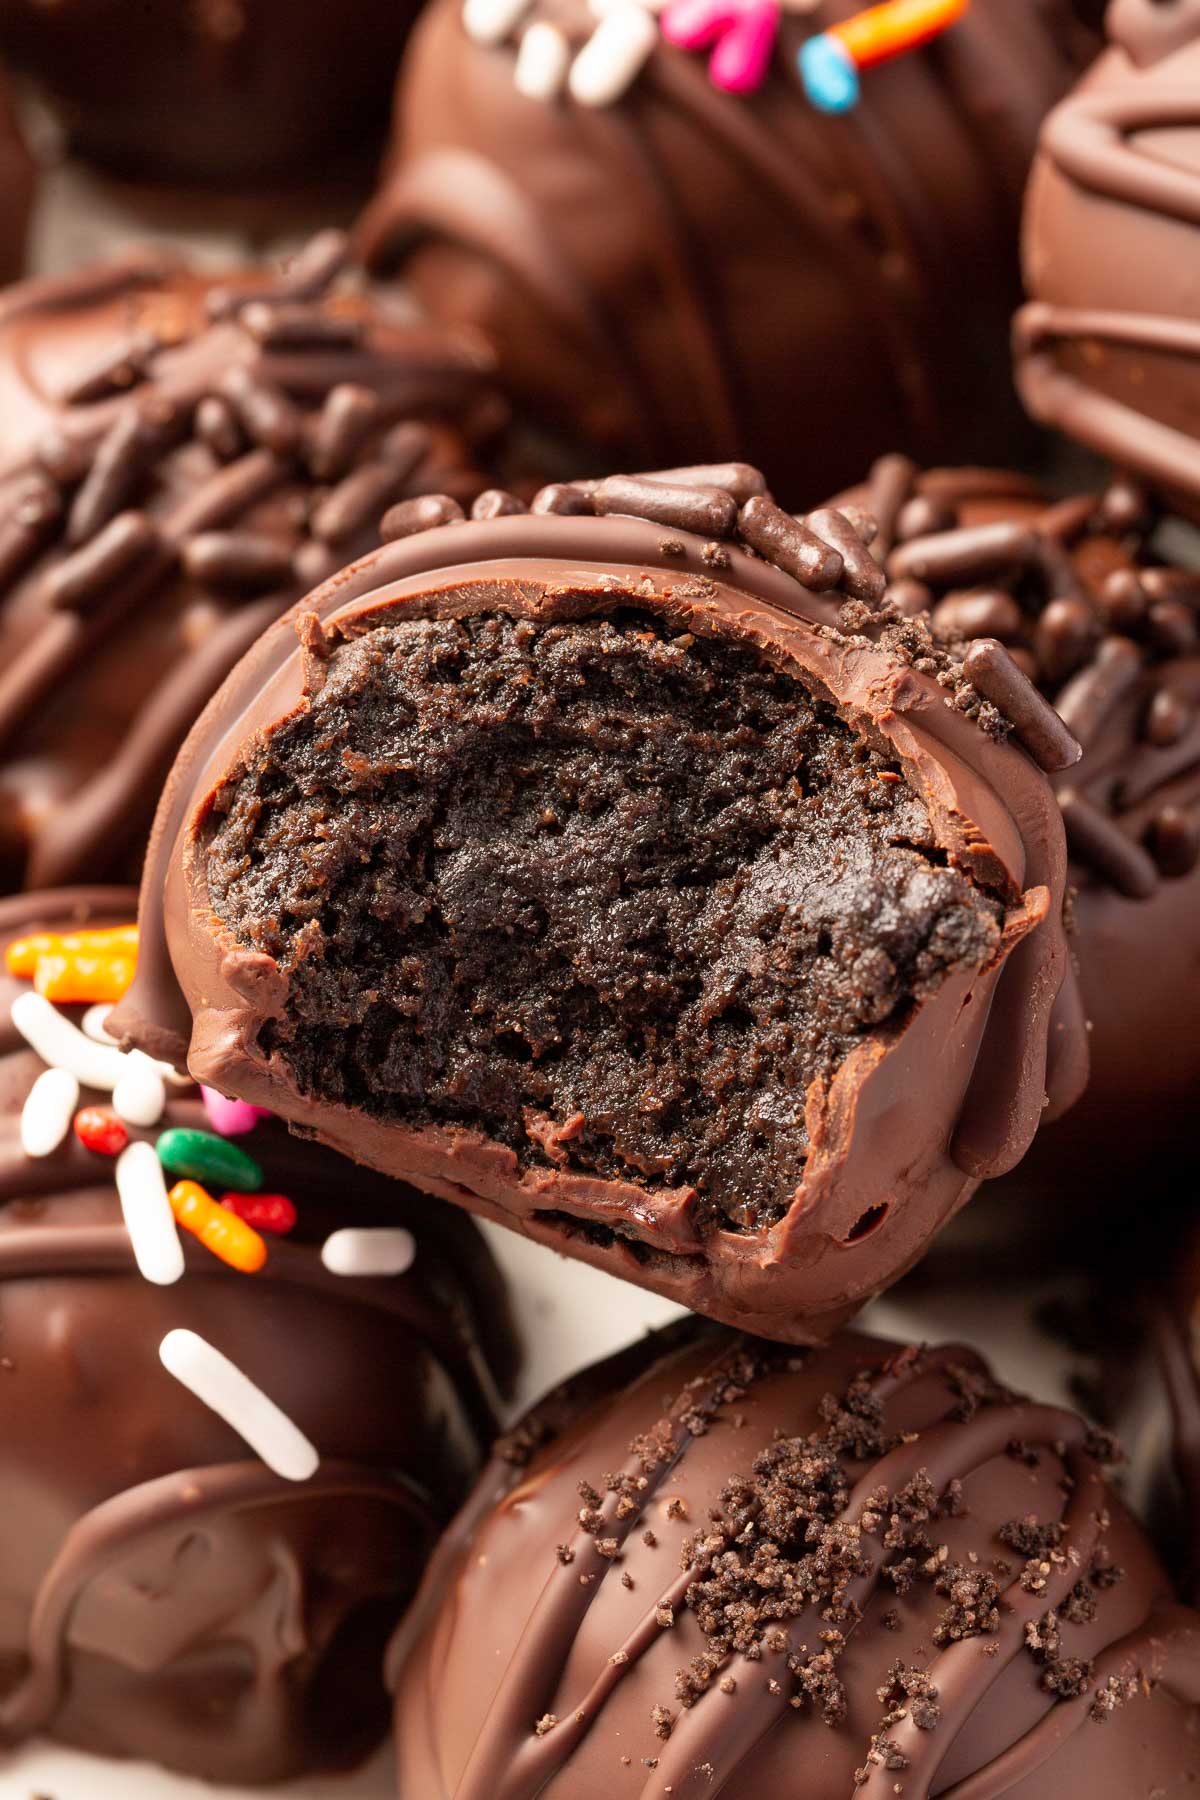
These gluten-free Oreo balls are one of the easiest no-bake treats you’ll ever make. Just crush up gluten-free Oreos, mix them with cream cheese, roll into balls, and dip in chocolate. They’re rich, creamy, and perfect for parties, holidays, or any time you need a crowd-pleasing dessert that comes together in under an hour.
This recipe uses exactly one bag of gluten-free Oreos. Most Oreo ball recipes call for 36 cookies, but gluten-free Oreos only come 30 to a bag. I’ve adjusted the cream cheese ratio so you get the perfect chocolate-to-cheesecake balance without opening a second package. Customize them with sprinkles for any occasion, from Christmas to birthdays to Halloween.
Why You’ll Love this Recipe
Ingredients
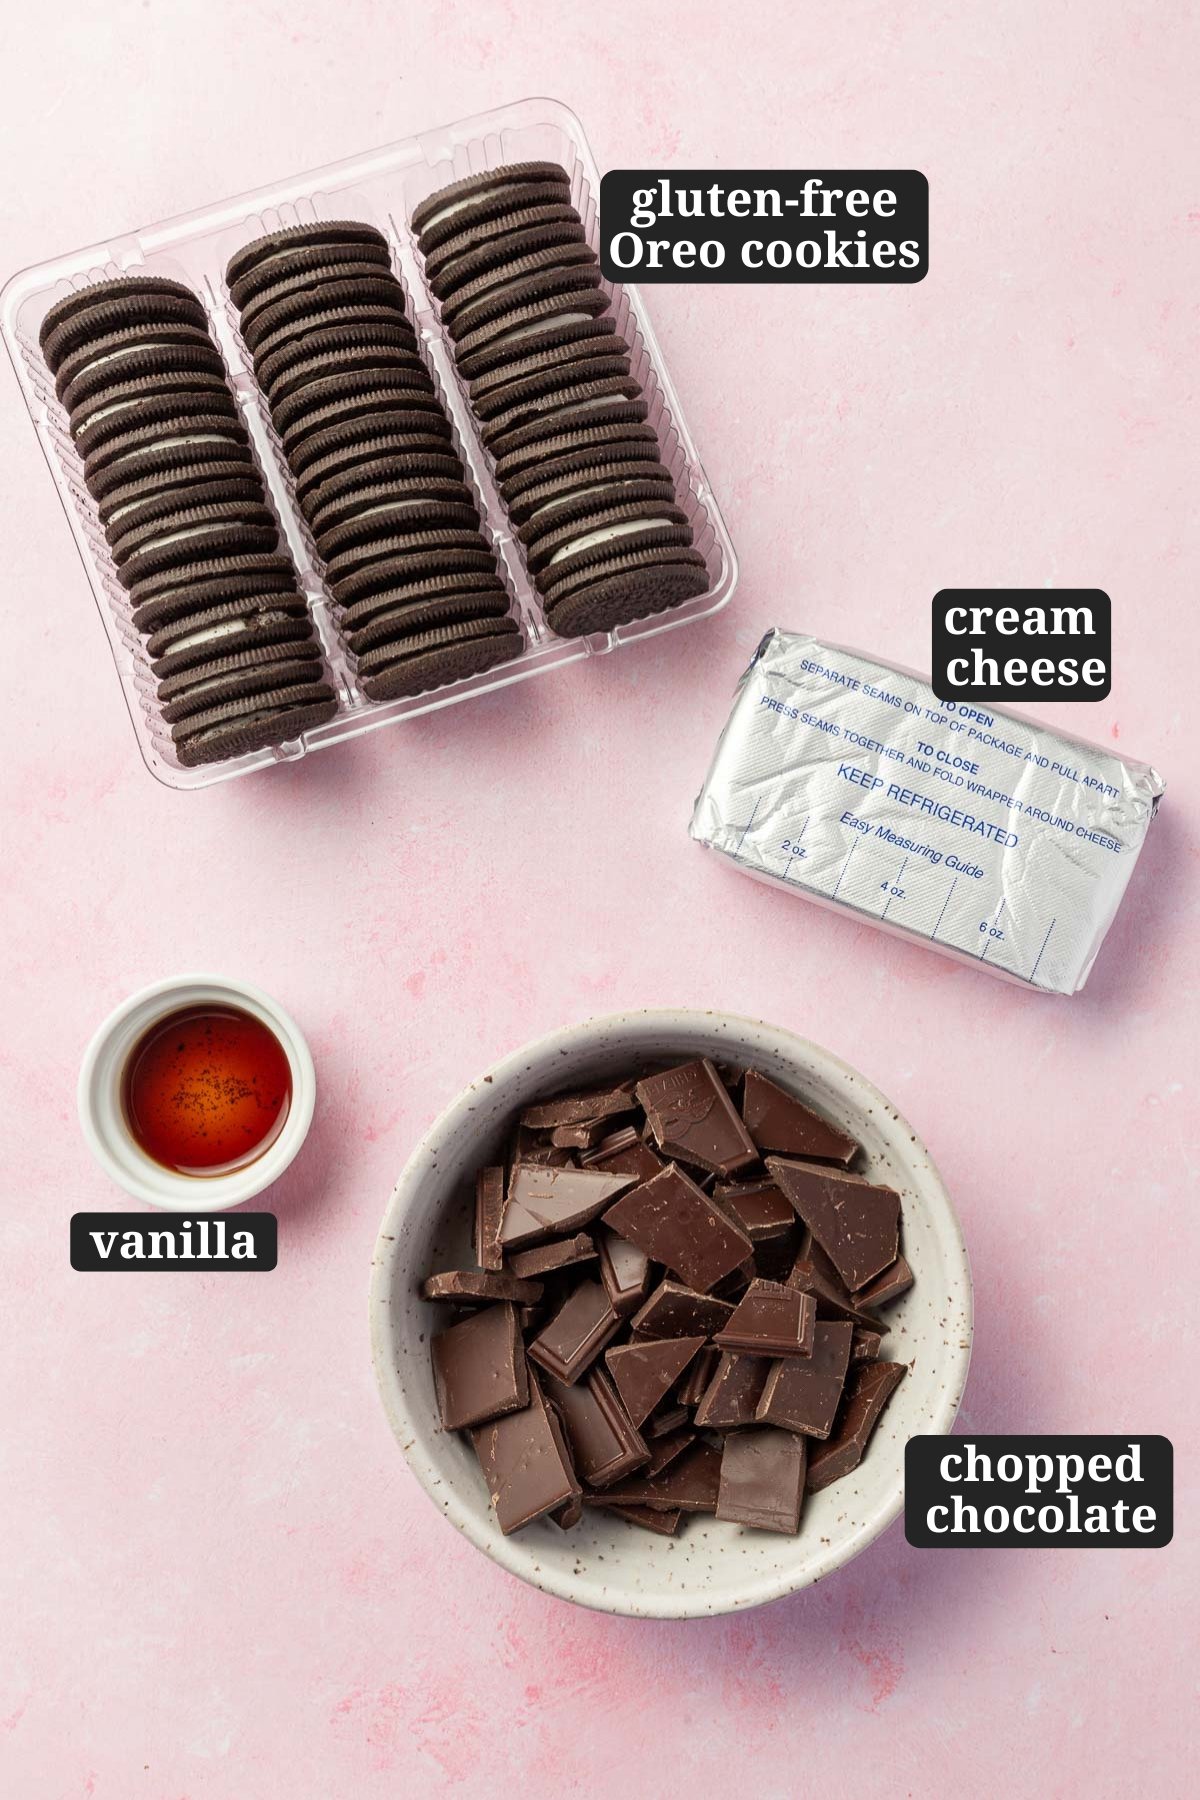
Ingredient Notes
- Gluten-free Oreos: Ensure you use a certified gluten-free brand of Oreos to keep the recipe gluten-free. Other brands besides the Oreo brand that I like for chocolate sandwich cookies include Goodie Girl, Glutino, and Kinnikinnick.
- Cream Cheese: Use full-fat cream cheese for the best texture and flavor. Make sure it is softened at room temperature for easier mixing. You’ll notice I only use 6 ounces of the cream cheese, not the entire brick of cream cheese. Do not use whipped cream cheese as the texture will be very off in your Oreo truffles.
- Vanilla Extract: A lot of recipes don’t include vanilla extract, but I think just a touch of vanilla adds extra flavor to the truffles. You can also substitute with vanilla bean paste or the seeds from a vanilla bean for a more intense vanilla flavor.
- Semi-sweet Chocolate: Use good-quality chocolate for melting, such as a chocolate bar chopped into small pieces. Be sure to make sure your chocolate bar is gluten-free, as there are a few brands that add barley to their chocolate. I prefer to go for something like Baker’s chocolate. If you only have chocolate chips, you can use those, but I would recommend adding a teaspoon of neutral oil (vegetable oil or canola oil) or shortening to help the chocolate melt down smoothly and stay thin enough for dipping. You can change up the type of chocolate, using white chocolate, milk chocolate or dark chocolate instead of semi-sweet chocolate.
- Sprinkles (optional): Select sprinkles that are gluten-free as not all brands are. Choose colors or shapes that complement the occasion or theme of your truffles.
Chocolate Tip
When melting the chocolate for coating the truffles, microwave it in short intervals and stir frequently to prevent overheating. Overheating can cause the chocolate to seize, making it difficult to coat the truffles smoothly.
Step-By-Step Instructions
It’s so easy to make gluten-free Oreo cheesecake balls at home with just 4 ingredients. The below steps with matching photos are not meant to be the full recipe, but are there to help you see the recipe made at various stages. Pay special attention to the consistency of the Oreo ball mixture, the size of the truffles, and the ways to decorate the Oreo truffles.
For the ingredient list with measurements, full instructions, printable recipe, and additional notes, please scroll down to the recipe card.


Recipe FAQs
If you want these truffles to be gluten-free, then you should use gluten-free Oreos. However, if you don’t follow a gluten-free diet, you can use regular Oreos. Increase the cream cheese to the full 8 ounces and use the full pack of regular Oreos (36 Oreos).
Yes, you can use milk chocolate if you prefer a sweeter coating, dark chocolate for a more intense chocolate flavor, or white chocolate for a different look!
You can decorate them with crushed nuts, cocoa powder, or even drizzle them with melted white chocolate for a decorative touch. Sometimes I like to save a tablespoon of the crushed Oreos before mixing with the other ingredients and sprinkle them on top.
Expert Tips
Storage Instructions
Refrigerator: Store the Oreo truffles in an airtight container in the refrigerator for up to 1 week.
Freezer: For longer storage, place the truffles in a freezer-safe container or bag and freeze for up to 1 month.
Serving: Enjoy truffles chilled directly from the refrigerator. If frozen, let them thaw in the refrigerator overnight before serving for best texture.
Serving Suggestions
Serve these Oreo balls on a platter with Chocolate Coconut Balls, Gluten-Free Chocolate Cake Balls, and Peppermint Hot Chocolate. The variety of chocolate treats on one dessert board creates a beautiful presentation for parties, while the hot chocolate is perfect for dipping or sipping alongside the truffles during holiday gatherings.

More gluten-free desserts to try
Did you make this recipe?
I’d love to know! Please rate it and leave a comment below. You can also share your pictures and tag @adashofmegnut on Instagram.

Gluten-Free Oreo Balls
Ingredients
For the Oreo Balls:
- 12 oz (340 g) package gluten-free Oreos - about 30 cookies
- 6 oz (170 g) cream cheese - softened to room temperature
- ½ teaspoon vanilla extract
For the Coating:
- 8 oz (225 g) semi-sweet chocolate - roughly chopped
- sprinkles for topping - for toppig, optional
**Use the toggle button above to turn the instruction photos on and off!
Instructions
Make the Oreo Mixture:
- Crush the Oreos. Add 12 oz (340 g) package gluten-free Oreos to a food processor. Pulse until the cookies are finely crushed into uniform crumbs with no large pieces remaining. This should take about 30-45 seconds of pulsing.
- Beat the cream cheese. In a large mixing bowl, add the softened 6 oz (170 g) cream cheese and ½ teaspoon vanilla extract. Use an electric mixer to beat on medium speed for 1-2 minutes until smooth and creamy with no lumps.
- Combine the mixture. Add all of the crushed Oreo crumbs to the cream cheese mixture. Mix on low speed (or stir with a spatula) until completely combined. The mixture should look like wet sand and hold together when pressed.
Shape and Chill:
- Portion the truffles. Line a baking sheet with parchment paper or wax paper. Use a tablespoon-sized portion scoop (#60 scoop) to scoop out 24 equal portions of the Oreo mixture onto the prepared baking sheet. If you don't have a portion scoop, use a tablespoon measure.
- Roll into balls. With clean hands, roll each portion into a smooth ball. Place them back on the parchment-lined baking sheet.
- Chill the balls. Refrigerate the Oreo balls for 15-20 minutes until firm. This makes them much easier to dip in chocolate without falling apart.
Coat with Chocolate:
- Melt the chocolate. While the Oreo balls chill, add 8 oz (225 g) semi-sweet chocolate to a microwave-safe bowl. Microwave in 30-second intervals, stirring well between each interval, until completely melted and smooth. This should take 60-90 seconds total. Do not overheat or the chocolate will seize.
- Dip the truffles. Remove the chilled Oreo balls from the refrigerator. Use a fork to dip each ball into the melted chocolate, allowing excess chocolate to drip off. Tap the fork gently on the edge of the bowl to remove extra chocolate. Place the coated truffle back onto the parchment-lined baking sheet.
- Add toppings. Immediately sprinkle the tops with sprinkles for topping or crushed Oreo crumbs while the chocolate is still wet. Work quickly so the chocolate doesn't set before you add the decorations.
- Set the chocolate. Once all truffles are coated and decorated, refrigerate for 15-20 minutes until the chocolate is completely set and firm.
- Serve and enjoy. Store in an airtight container in the refrigerator until ready to serve. These taste best chilled.
Notes
- Gluten-Free Oreos: Use certified gluten-free Oreo cookies. Other brands like Glutino, Kinnikinnick, and Goodie Girl also work well. Do NOT use double-stuffed Oreos, they have too much filling.
- Cream Cheese: Use full-fat brick-style cream cheese, not whipped. Make sure it’s softened to room temperature for easier mixing. This recipe uses only 6 oz, not the full 8 oz block.
- Chocolate: Use good-quality chocolate bars chopped into small pieces. If using chocolate chips, add 1 teaspoon of neutral oil or shortening to help thin the chocolate for easier dipping.
- Portion Scoop: A #60 scoop (1 tablespoon size) creates perfectly uniform truffles. This makes 24 truffles.
- Storage: Store in an airtight container in the refrigerator for up to 1 week, or freeze for up to 1 month. Thaw frozen truffles in the refrigerator overnight before serving.