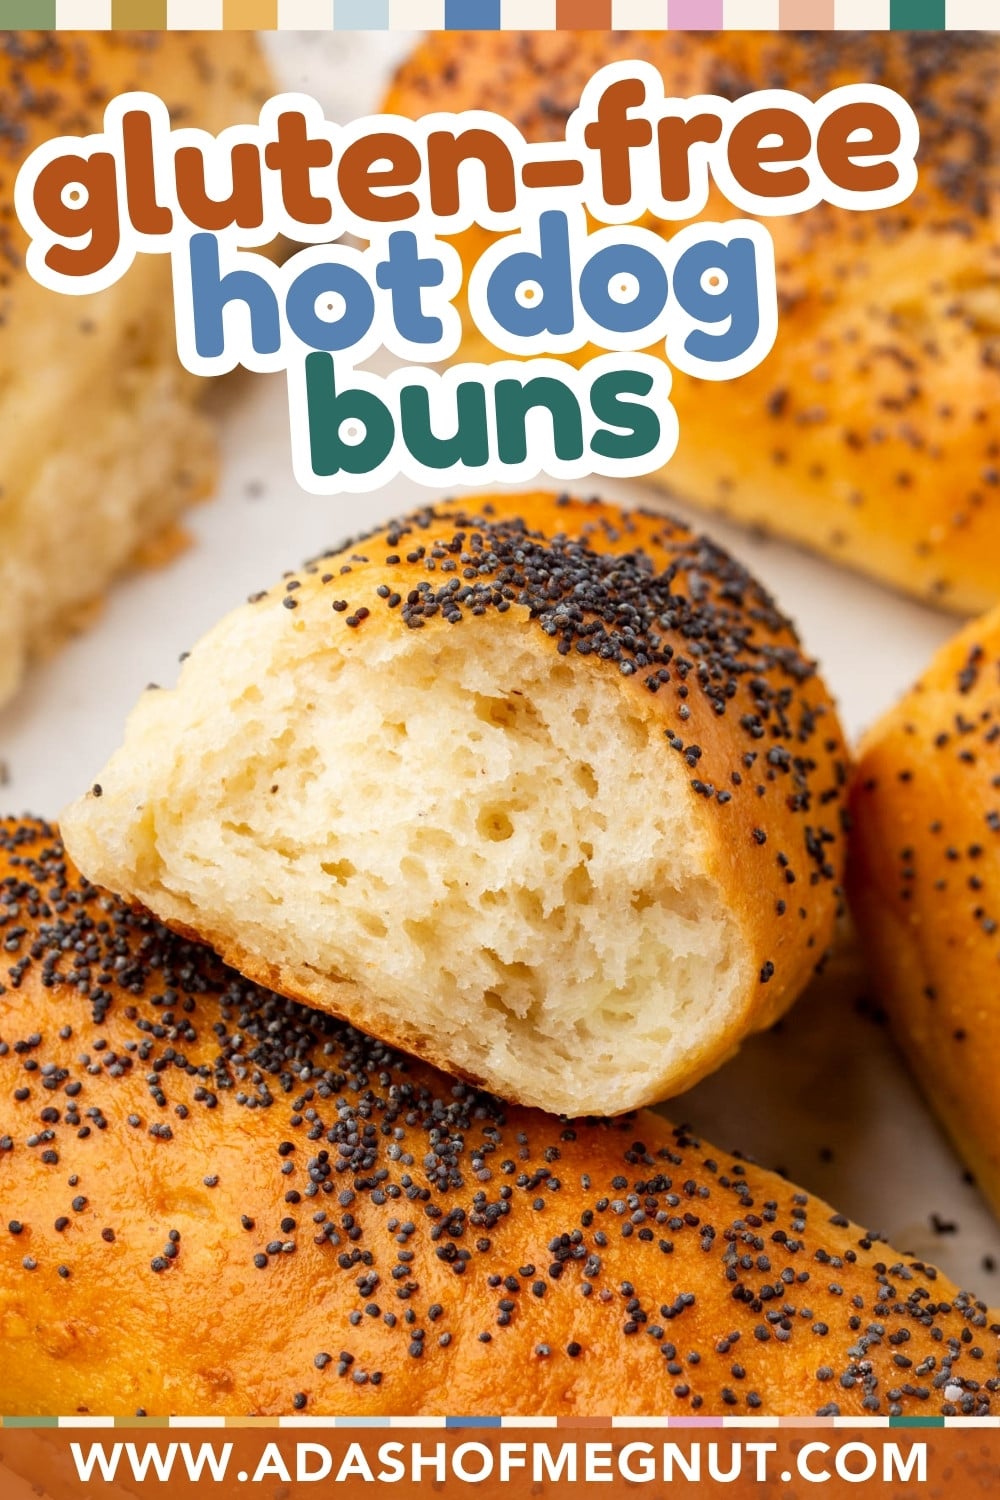
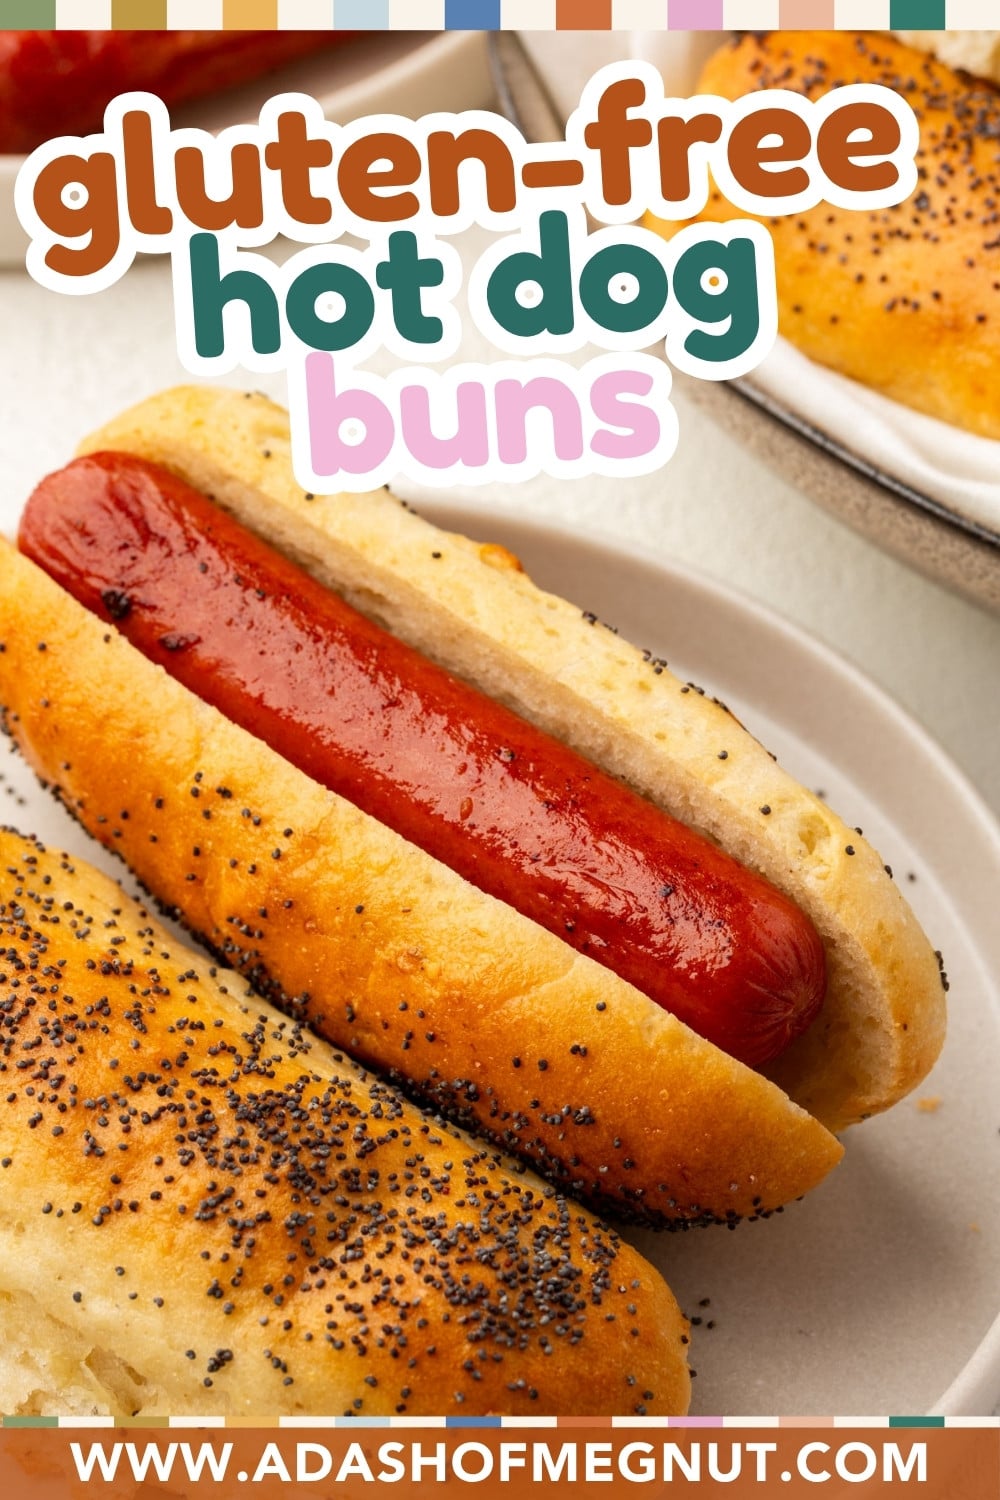
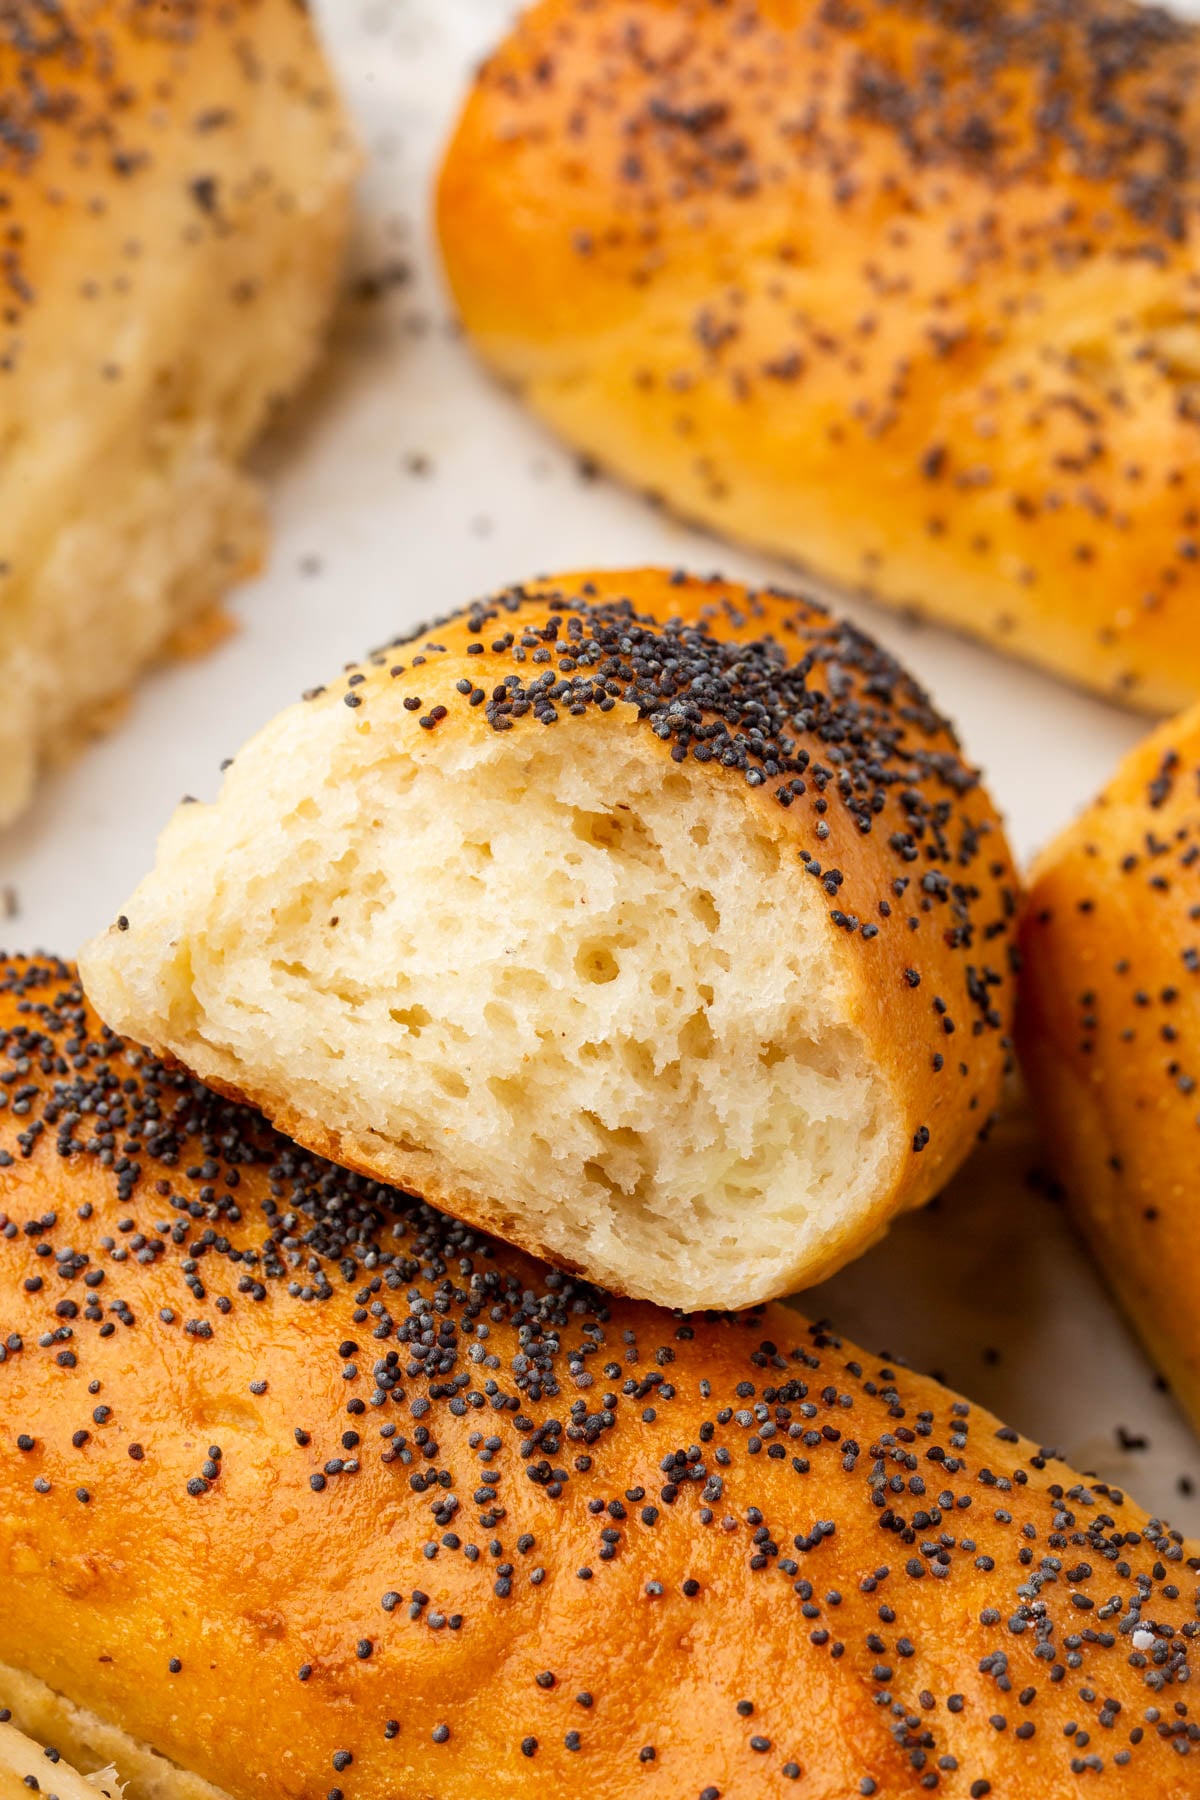
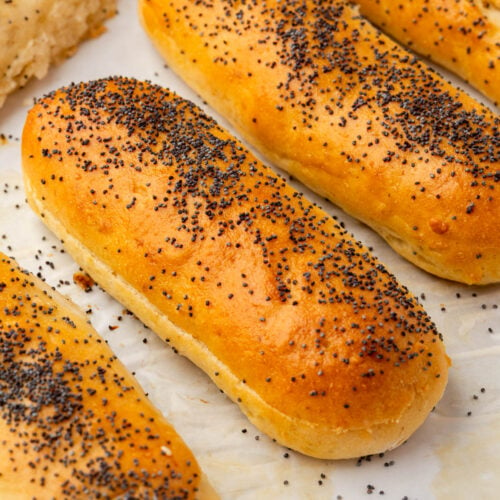
Gluten-free hot dog buns from the store are usually one of two things: too dense, or so soft they fall apart the second you pick them up. These are neither. They use the same enriched yeast dough as my Gluten-Free Hamburger Buns, which is a version of the enriched dough I use for my dinner rolls, cinnamon rolls, and fried donuts, adapted with avocado oil in place of butter to keep the crumb soft.
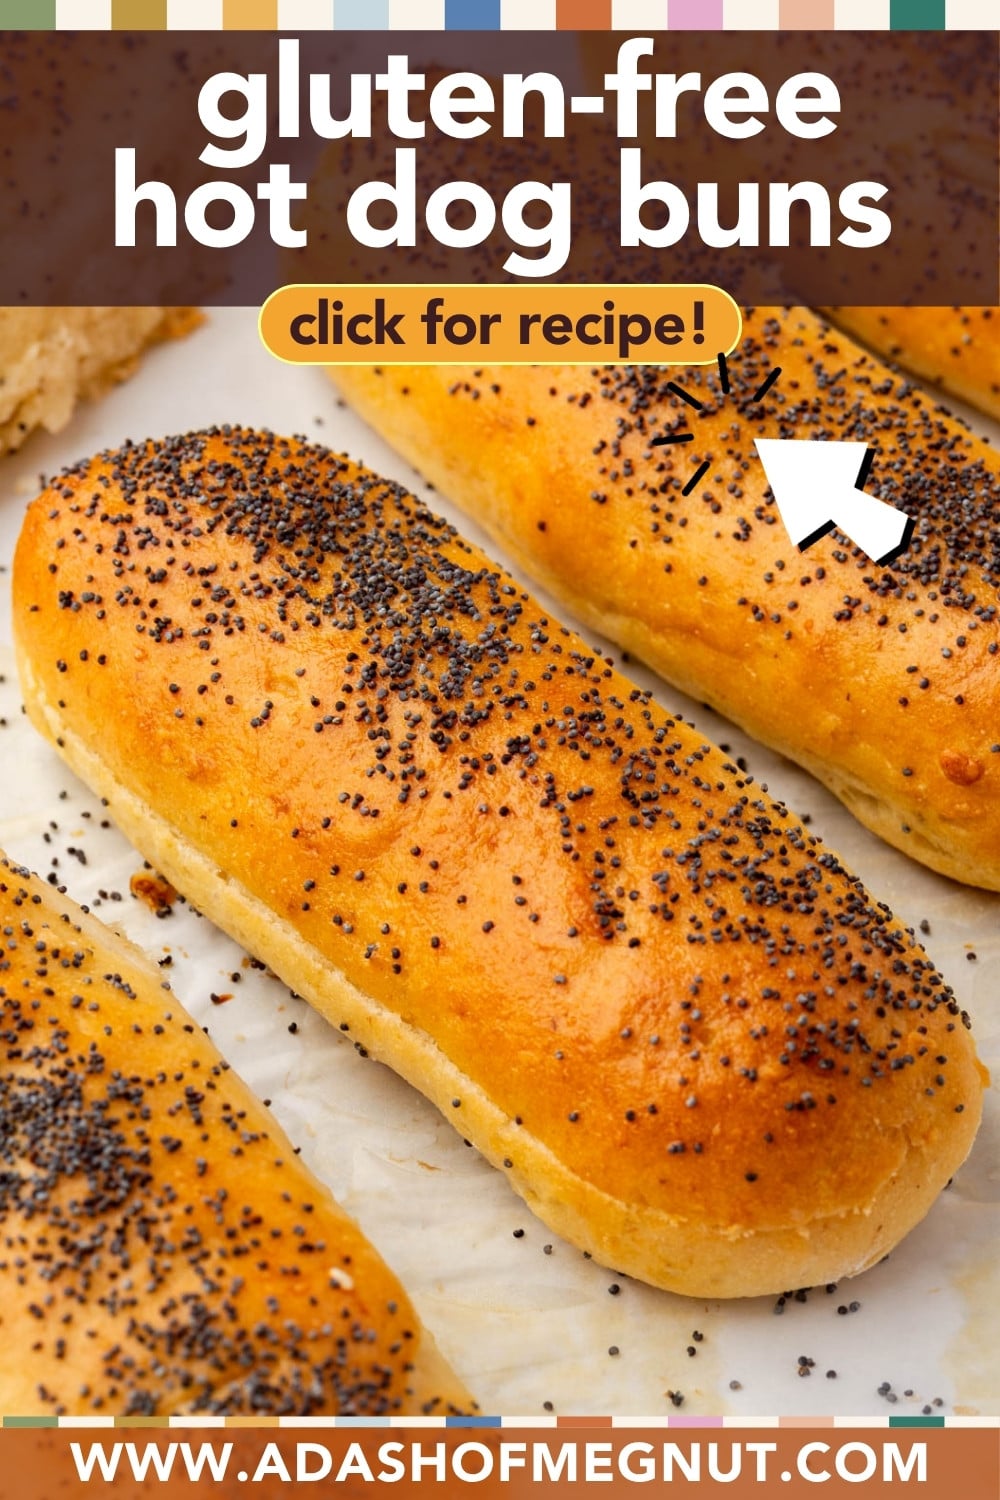
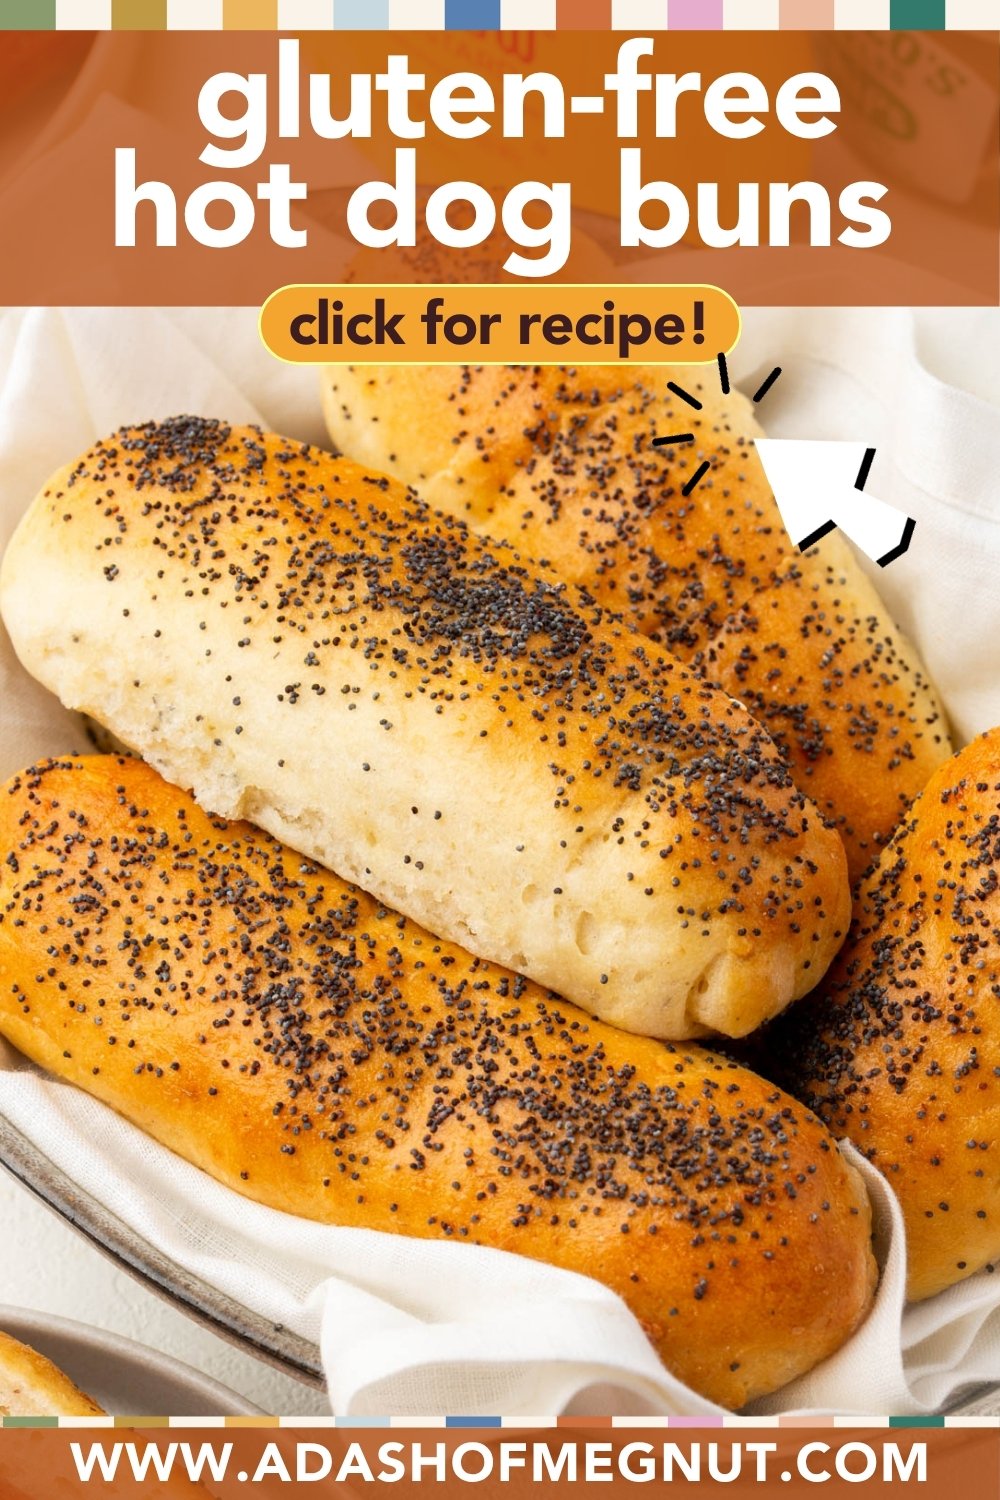
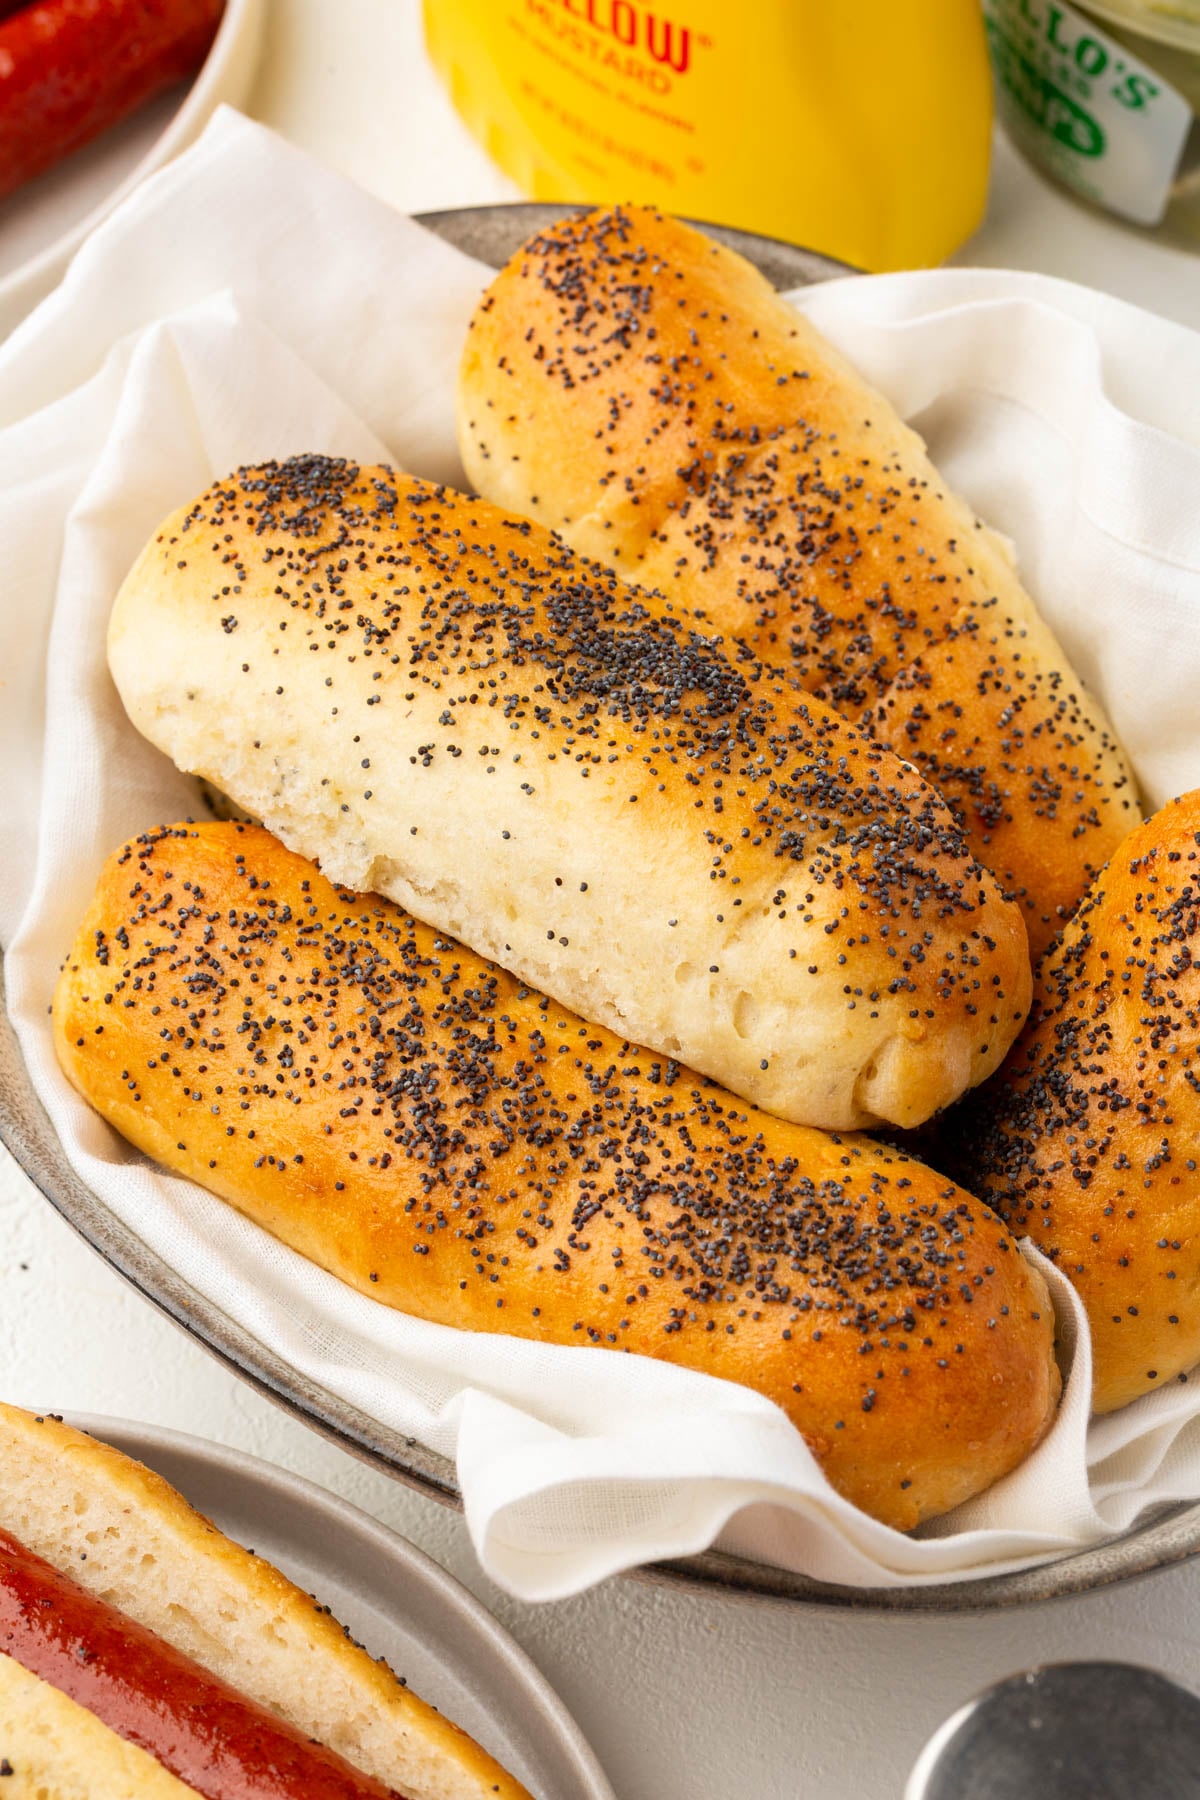
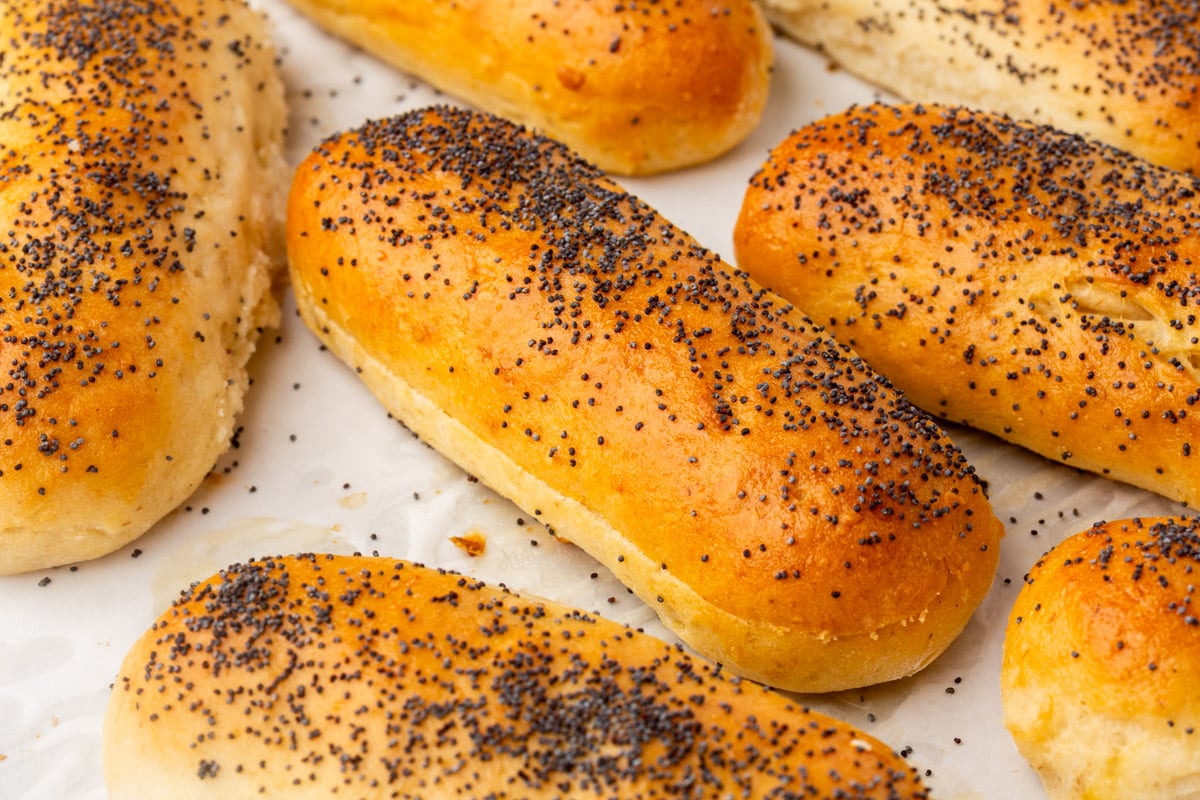
The shaping is what makes these different from the hamburger buns. Each piece of dough gets patted into a roughly 3×5 inch rectangle, rolled up from the short side into a cylinder, seams pinched closed, and then rolled out to about 5 inches long. You get 8 buns from one batch, and they go on the baking sheet in two groups of four, placed close together so they’re almost touching. As they proof and bake, they push up against each other and rise up instead of out, which gives you a bun that’s the right shape for a hot dog rather than spreading flat.
Why You’ll Love This Recipe
How I Tested This Recipe
The hot dog buns came together more easily than the hamburger buns did. Since I had already worked through the dough on the hamburger bun post, I knew what to expect. The main thing I needed to figure out was the shaping and how to get a bun that was the right proportions for a hot dog.
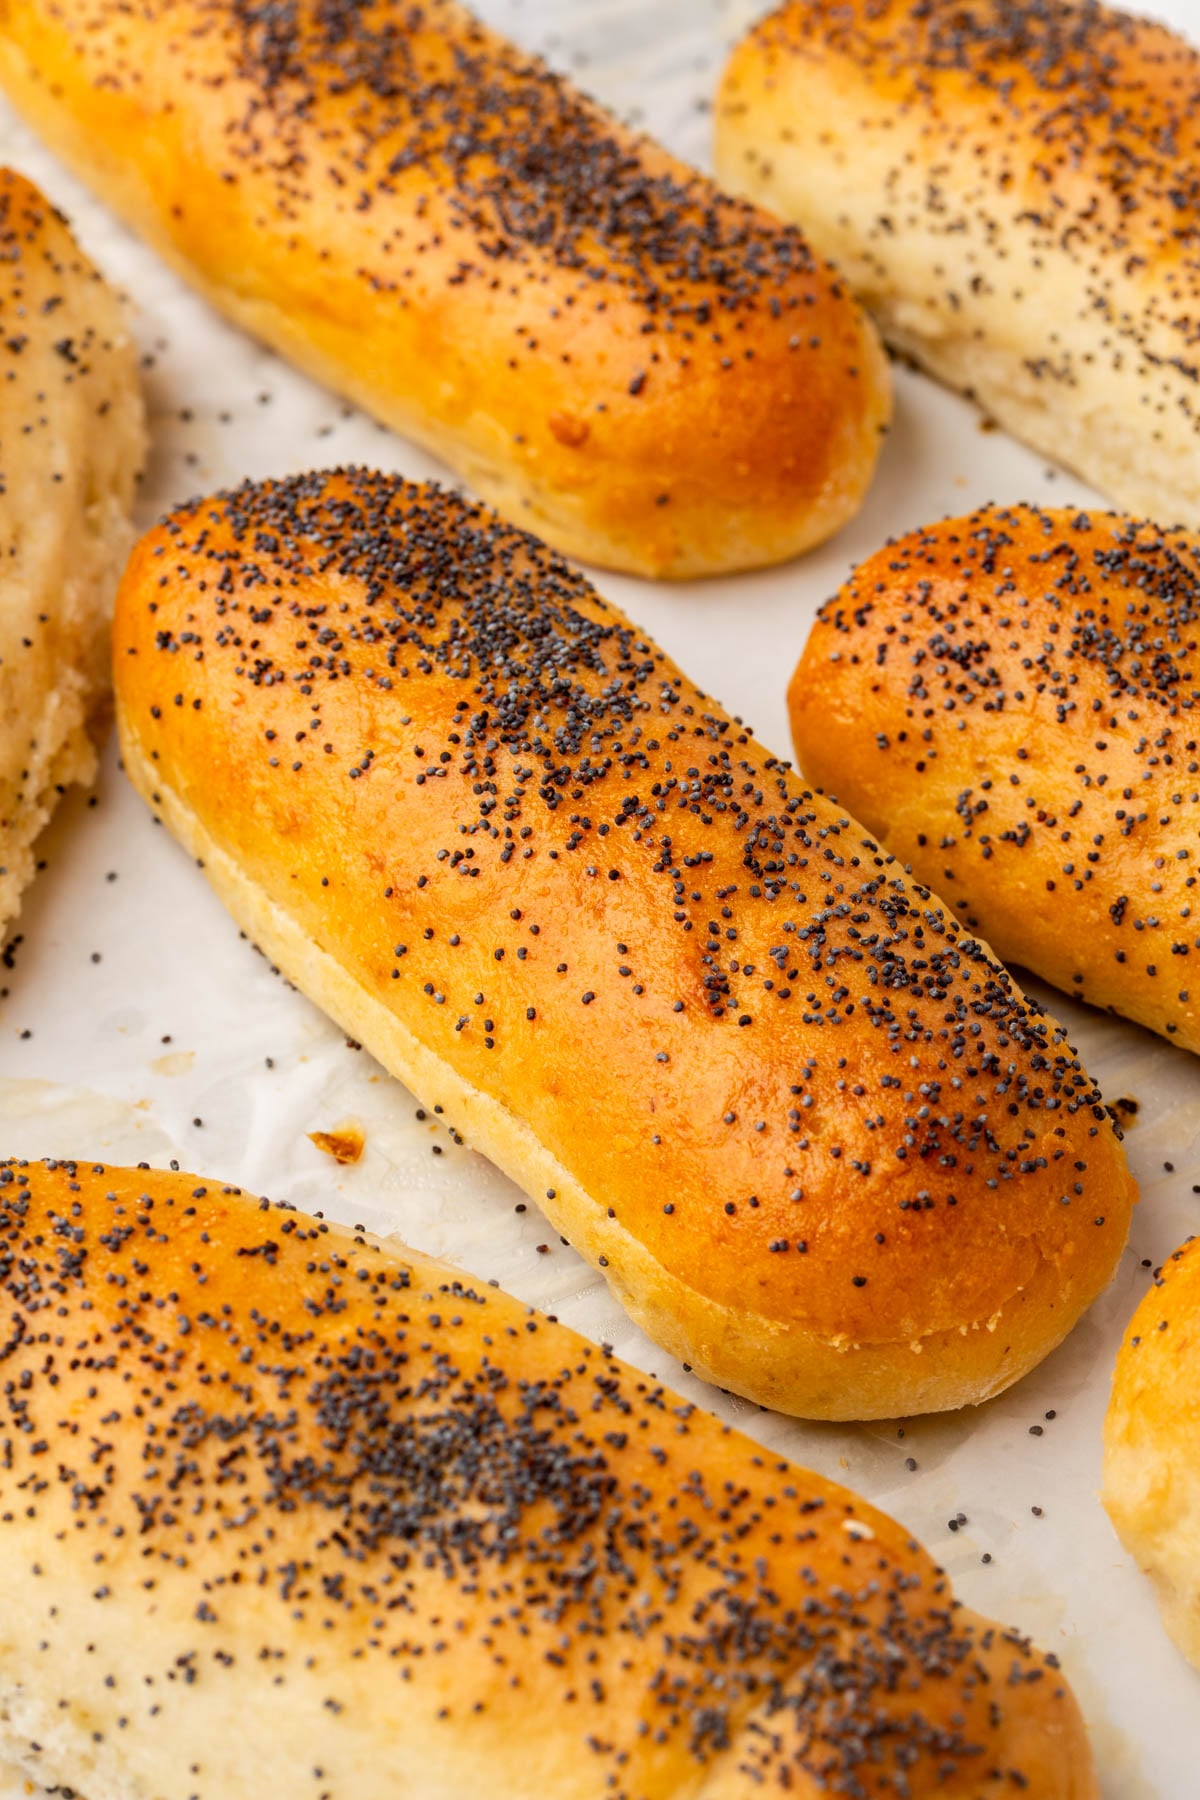
I tested with poppy seeds and plain. I kept coming back to the poppy seeds. If you’re making these for a Chicago-style dog, you already know why.
The grouping technique was something I figured out early. Placing the buns close together on the baking sheet before proofing means they rise into each other instead of spreading out. It’s a small thing but it makes a big difference in the final shape.
A Dash of Megnut is a participant in the Amazon Services LLC Associates Program, an affiliate advertising program designed to provide a means for us to earn fees by linking to Amazon.com and affiliated sites.
Ingredient Notes
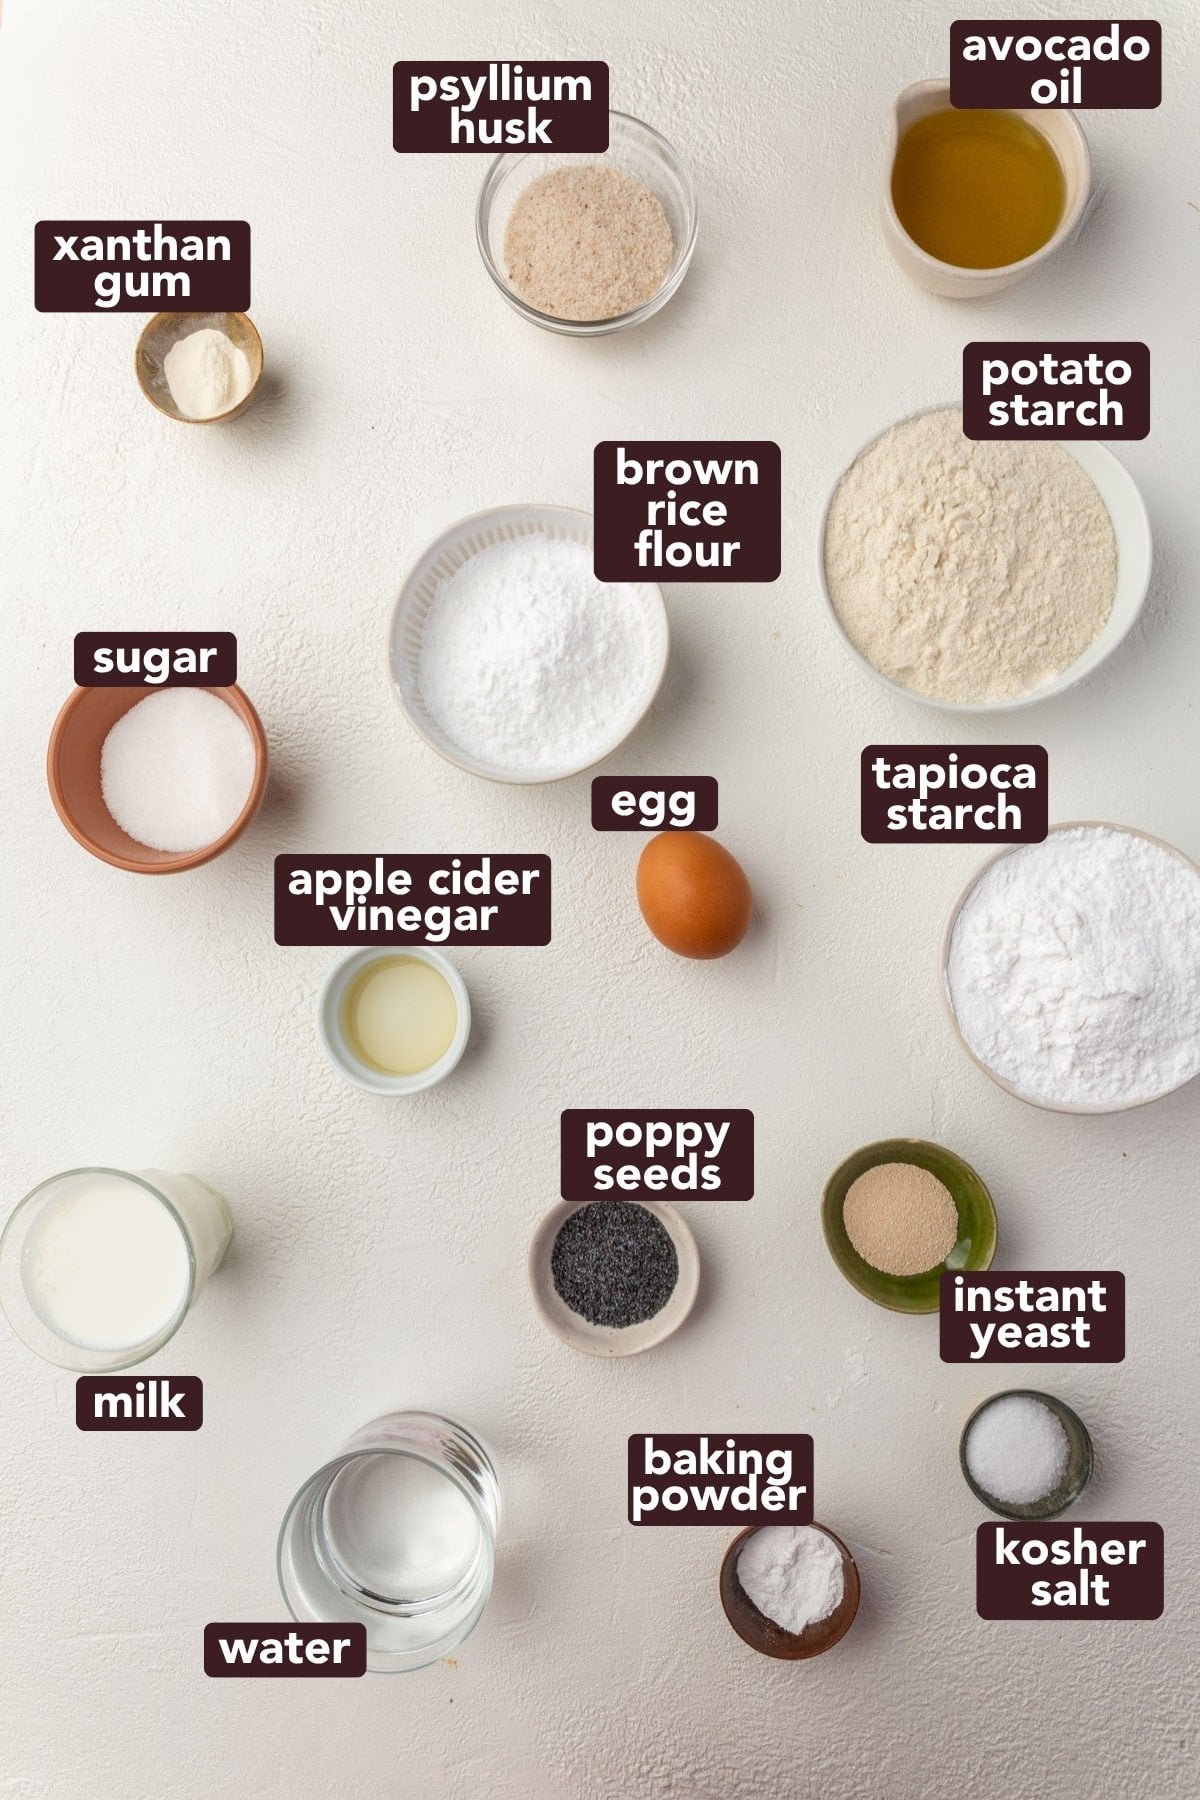
- Brown rice flour, tapioca starch, and potato starch – The same flour blend from the hamburger buns and dinner rolls. Don’t substitute with a pre-made gluten-free flour blend. Each flour plays a specific role in the dough and a blend won’t behave the same way. Measure by weight.
- Whole psyllium husk – I prefer whole psyllium husk over powder because it hydrates more easily and doesn’t clump as much. If you only have powder, use 13g instead of 16g. Either way, mix it with the warm water first to form a gel before adding it to the dough. Don’t mix it directly into the dry ingredients. I use Anthony’s Whole Psyllium Husk (affiliate link).
- Instant yeast – I use instant yeast instead of active dry yeast because it goes straight into the dry ingredients without any activating first. One less step in a recipe that already has a few. Just make sure yours isn’t expired before you start. Dead yeast is the most common reason this dough doesn’t rise. You only need one packet, but I prefer to buy a larger package since I bake with it so often.
- Avocado oil – Using oil instead of butter means the crumb stays soft longer. These buns are great fresh but they also hold up well for a few days, which makes them worth making in a bigger batch.
- Poppy seeds – Optional but worth it if you’re going for a Chicago-style dog. Brush the egg wash on first so the seeds stick to the bun instead of falling off.
Group the Buns Close Together
Place the shaped buns in two groups of four on the baking sheet, with less than half an inch between each bun. As they proof and bake, they push up against each other and rise up instead of spreading out. This is what gives you a bun that’s actually shaped like a hot dog bun rather than a flat oval.

Recipe FAQs
No. Brown rice flour, tapioca starch, and potato starch each do something specific in this dough. Swapping in a pre-made blend changes the whole equation because every blend has its own ratios, starches, and sometimes xanthan gum already added. Stick with the individual flours and weigh them.
Start by checking your yeast. If it’s past its expiration date, that’s your answer. If the yeast is fine, think about your water and milk temperatures. Even slightly too cold and the yeast just sits there. If both of those check out, your kitchen might be too cold for a good proof. A turned-off oven with the light on is the easiest fix.
How do I know when the buns are done baking?
Look for a deep golden brown color across the top of the buns. If you’re not sure, an instant read thermometer inserted into the center should read between 190°F and 195°F when they’re fully baked through.
Expert Tips
Storage Instructions
Storing: Keep the buns in an airtight container at room temperature for up to 2-3 days. For longer storage, I prefer freezing the buns so I can have hot dogs whenver I want.
Freezing: Slice the buns before freezing. Freeze in a single layer first, then transfer to a freezer bag for up to 3 months.
Reheating: Thaw at room temperature or in the microwave for about 30 seconds. You can toast the the cut side of the bun if you’d like.
Serving Suggestions
These hot dog buns were made for a summer cookout and go with so many great sides. My Dill Cabbage Coleslaw is a tangy, no-mayo slaw that goes great on the side or piled right on top of the hot dog. My Gluten-Free Pasta Salad is made with rotini, salami, fresh mozzarella, and a homemade Italian dressing, and it only gets better the longer it sits in the refrigerator. And my Watermelon Feta Salad is topped with fresh basil and a honey lime dressing for a refreshing summer side that’s always on the table at a cookout.
Gluten-Free Hot Dog Buns
Ingredients
Dry Ingredients:
- 160 g (1 cup) brown rice flour
- 115 g (1 cup) tapioca starch
- 75 g (½ cup) potato starch
- 50 g (¼ cup) granulated sugar - 1/4 cup
- 8 g (½ tablespoon) kosher salt - 1/2 tablespoon
- 7 g (2¼ teaspoons) instant yeast - one packet
- 6 g (2 teaspoons) xanthan gum
- 8 g (2 teaspoons) baking powder
Psyllium Mixture:
- 16 g (2 tablespoons) whole psyllium husk
- 160 g (⅔ cup) warm water - 100°F
Wet Ingredients:
- 160 g (⅔ cup) warm whole milk - 100° to 110°F
- 1 large egg - 50g
- 57 g (4 tablespoons) avocado oil - 4 tablespoons
- 5 g (1 teaspoon) apple cider vinegar - 1 teaspoon
For Finishing:
- 1 large egg - beaten (for the egg wash)
- 1 tablespoon poppy seeds
**Use the toggle button above to turn the instruction photos on and off!
Instructions
- Mix the dry ingredients: In the bowl of a stand mixer, combine 160 g (1 cup) brown rice flour, 115 g (1 cup) tapioca starch, 75 g (½ cup) potato starch, 50 g (¼ cup) granulated sugar, 8 g (½ tablespoon) kosher salt, 7 g (2¼ teaspoons) instant yeast, 6 g (2 teaspoons) xanthan gum, and 8 g (2 teaspoons) baking powder. Whisk to combine evenly.

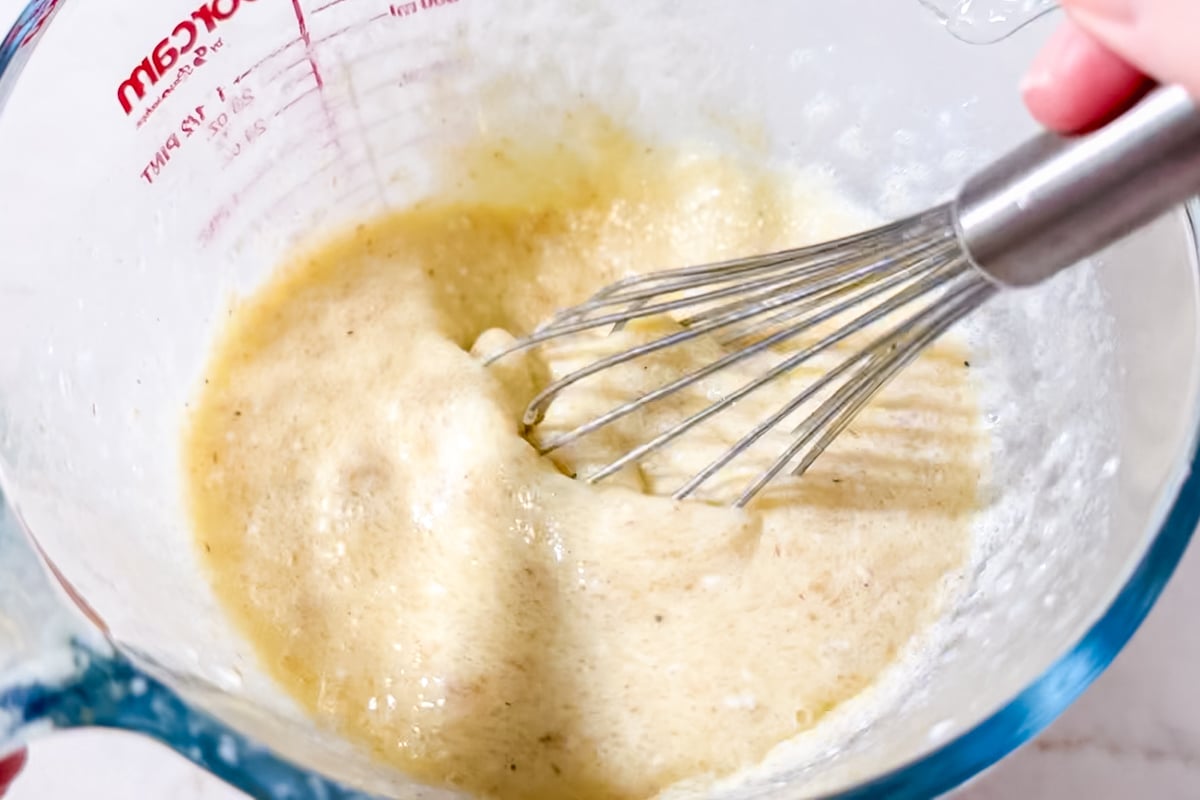
- Make the psyllium gel: In a small bowl, whisk together 16 g (2 tablespoons) whole psyllium husk and 160 g (⅔ cup) warm water until thickened into a gel. Set aside for about one minute to hydrate fully.
- Combine the wet ingredients: In a medium bowl, whisk together 160 g (⅔ cup) warm whole milk, 1 large egg, 57 g (4 tablespoons) avocado oil, and 5 g (1 teaspoon) apple cider vinegar. Add the psyllium gel and whisk until smooth and uniform.
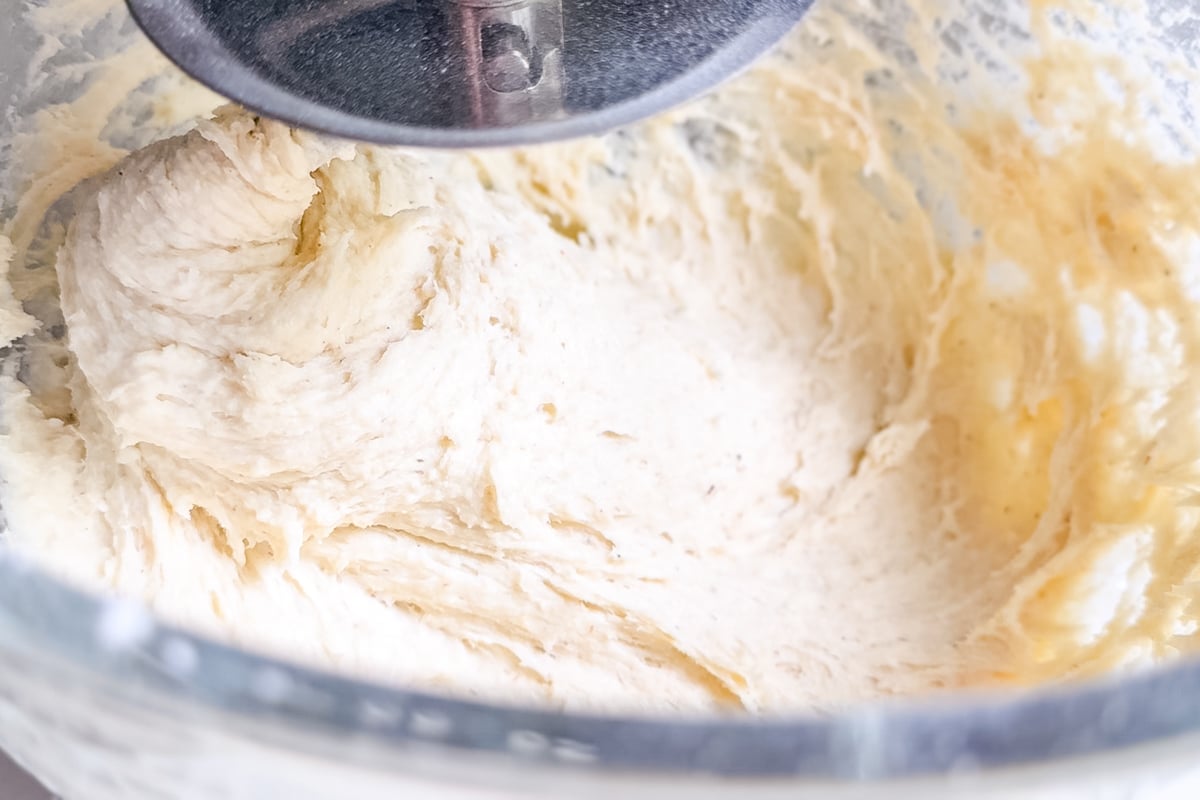
- Make the dough: Pour the wet ingredients into the dry ingredients. Using the dough hook attachment, mix on medium speed for about 5 minutes, scraping the sides and bottom of the bowl as needed. The dough should be soft, thick, and slightly sticky.
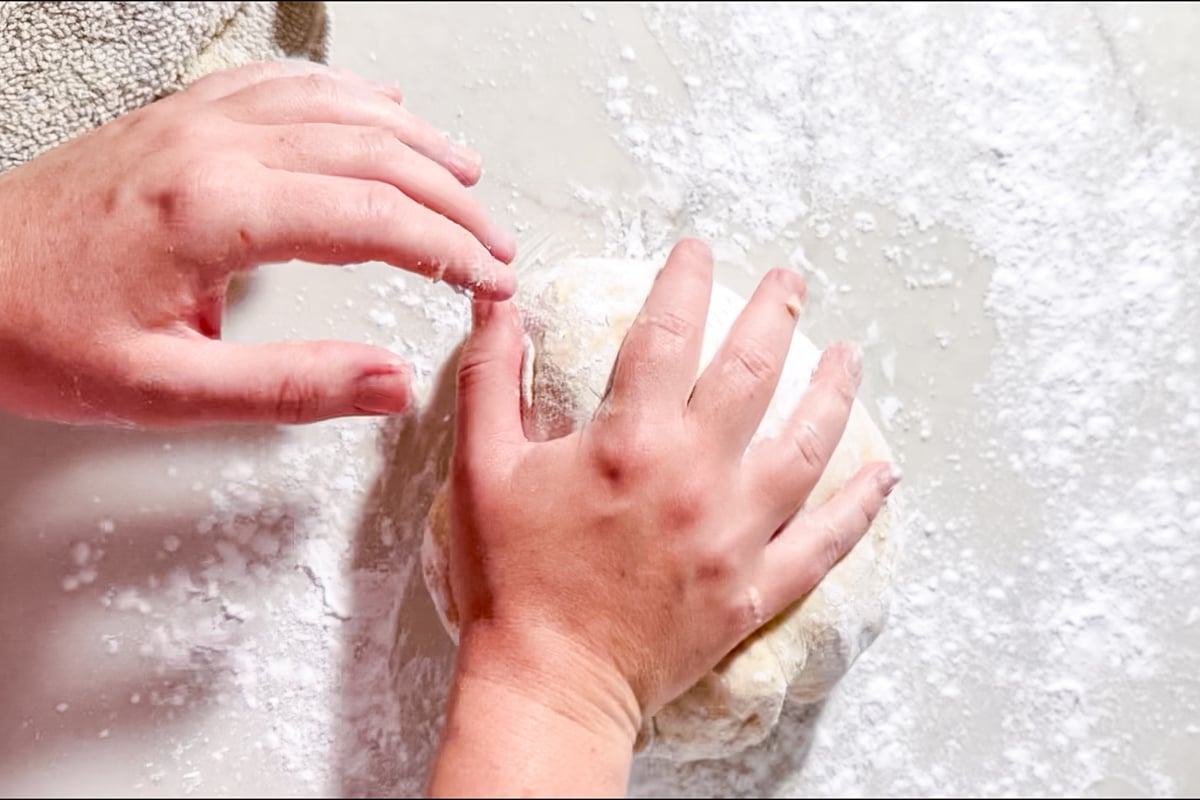
- Shape the buns: Lightly dust your work surface and hands with tapioca starch. Turn the dough out onto the surface and knead it a few times until smooth.
- Divide into 8 equal pieces, about 105g each. Pat each piece into a roughly 3×5 inch rectangle. Starting from the short side, roll the dough up tightly into a cylinder. Pinch the seams closed, then roll gently until the bun is about 5 inches long.
- Arrange the buns on a parchment lined baking sheet in two groups of four, spacing them less than half an inch apart within each group so they are almost touching. Cover loosely and proof in a warm spot at 75 to 80°F for 1.5 to 2 hours, until puffy and nearly doubled. Preheat the oven to 400°F during the last 30 minutes of the proof time.
- Brush the tops of the buns with 1 large egg and sprinkle with 1 tablespoon poppy seeds.
- Bake at 400℉ for 16-17 minutes until deep golden brown. Check the internal temperature with a thermometer. The buns are done when it reaches 190°F to 195°F.
- Let cool on the baking sheet for a few minutes before transferring to a wire rack.


Notes
- Flour Blend: Do not substitute with a pre-made gluten-free flour blend. This recipe is built around a specific ratio of brown rice flour, tapioca starch, and potato starch. A pre-made blend has different ratios and added ingredients that will change how the dough behaves. Measure by weight.
- Psyllium Husk: Whole psyllium husk is what I use and recommend for this recipe. It hydrates more evenly than the powder. If powder is all you have, reduce the amount to 13g. Either way, always mix it with the warm water first to form a gel before it goes into the dough.
- Proofing: The buns need 1.5 to 2 hours to proof fully. If your kitchen is cold, place the baking sheet in a turned-off oven with just the oven light on to create a slightly warmer, draft-free environment.
- Freezing: Let the buns cool completely, then slice before freezing. Freeze in a single layer first, then transfer to a freezer bag for up to 3 months.
Nutrition
I made this tonight for my 4 kids. My son is 10 years old and has celiac. We have tried every gluten free store brand hotdog bun I could find and they were horrible. I cried tonight when I saw how much they enjoyed these buns. It’s so important to us that we make him all the things he once enjoyed and tonight I succeeded at that because of this recipe! I can’t wait to try your other recipes.
I’m so glad you and your family enjoyed these! Your comment made my day!
It’s do delicious 😋
I’m so glad you enjoyed them!
These came out so soft and delicious!
Absolutely perfect! They were delicious fresh. I can’t wait to try them from the freezer as well.
I made 6 instead of 8 as I have a hotdog pan and it only holds 6.
Hi! I can’t seem to pass the stage of making it smooth anough to actually shape it. I followed the recipe to the T lol. I tried handmixer and hook. They’re just sticky and impossible to be kneaded by hand to make it smooth.
Can you send me a picture? It’s quite sticky until you knead it by hand. So you’ll mix it with the mixer hook attachment for 5 min and then turn it out onto a surface dusted with tapioca starch. I cover my hands with some tapioca starch as well and then i give it a knead for 1-2 minutes. It will be easier to shape then. It’s also possible that your kitchen is warm this time of year, so you can refrigerate the dough for maybe 20 minutes to make it easier to work with. The flours will hydrate more by that point too.
Thank you for sharing! Can you sub almond milk for whole milk?
Hi! I haven’t tested it but others have used anything from water to plant-based milk with success.
Absolutely amazing💗
I just made these. Followed exactly, weighed everything. It was so sticky I could barely handle it and just plopped on the baked tray and shaped as best as I could using wet hands. What did I do wrong? I’m not just saying I followed the recipe and changed things out. I really did follow it 😭😭
Hmm I haven’t had anyone have an issue with this yet. A few questions to help figure this out, was your kitchen really warm? Also, did you use whole psyllium husk and what brand did you use? Did you mix using a stand mixer with the dough hook and for how long?
I’ve tried several gluten free bun recipes but this one is it! Simple to make, tastes great and the texture is perfect. Thank you for the recipe. It’s a keeper.
Hola saludos desde Argentina. Tenemos tal vez diferencias en nombres, levadura en polvo se refiere a lo que aqui llamamos polvo de hornear o levadura quimica? Y levadura que utiliza seria la seca sin hidratar? Lo demas super claro. Gracias
Hello! I’m not sure how it translated, but I mean “baking powder” which is polvo de hornear. For the yeast, I use instant dry yeast (levadura seca instantánea), which does not need to be hydrated and activiated in water.