
Gluten-Free Christmas Cookies
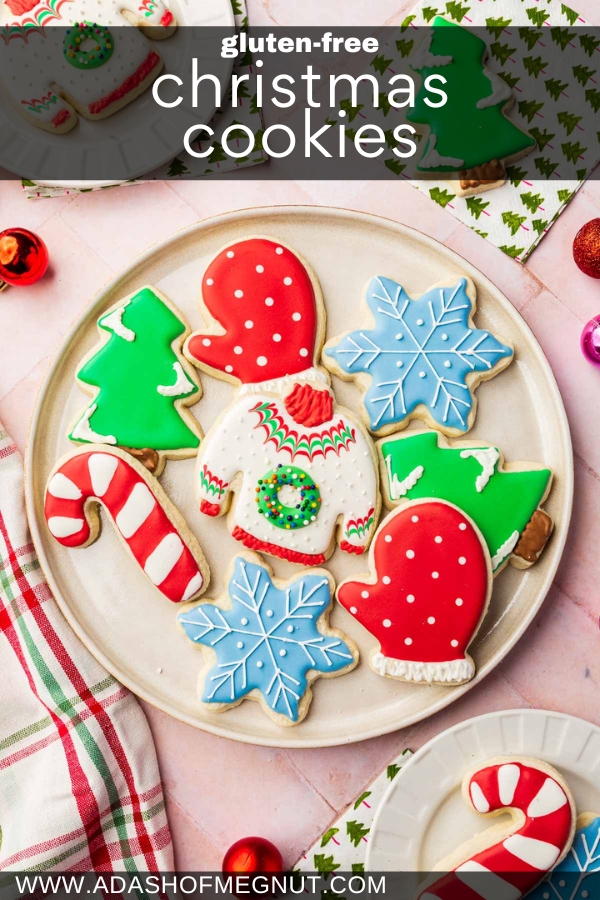


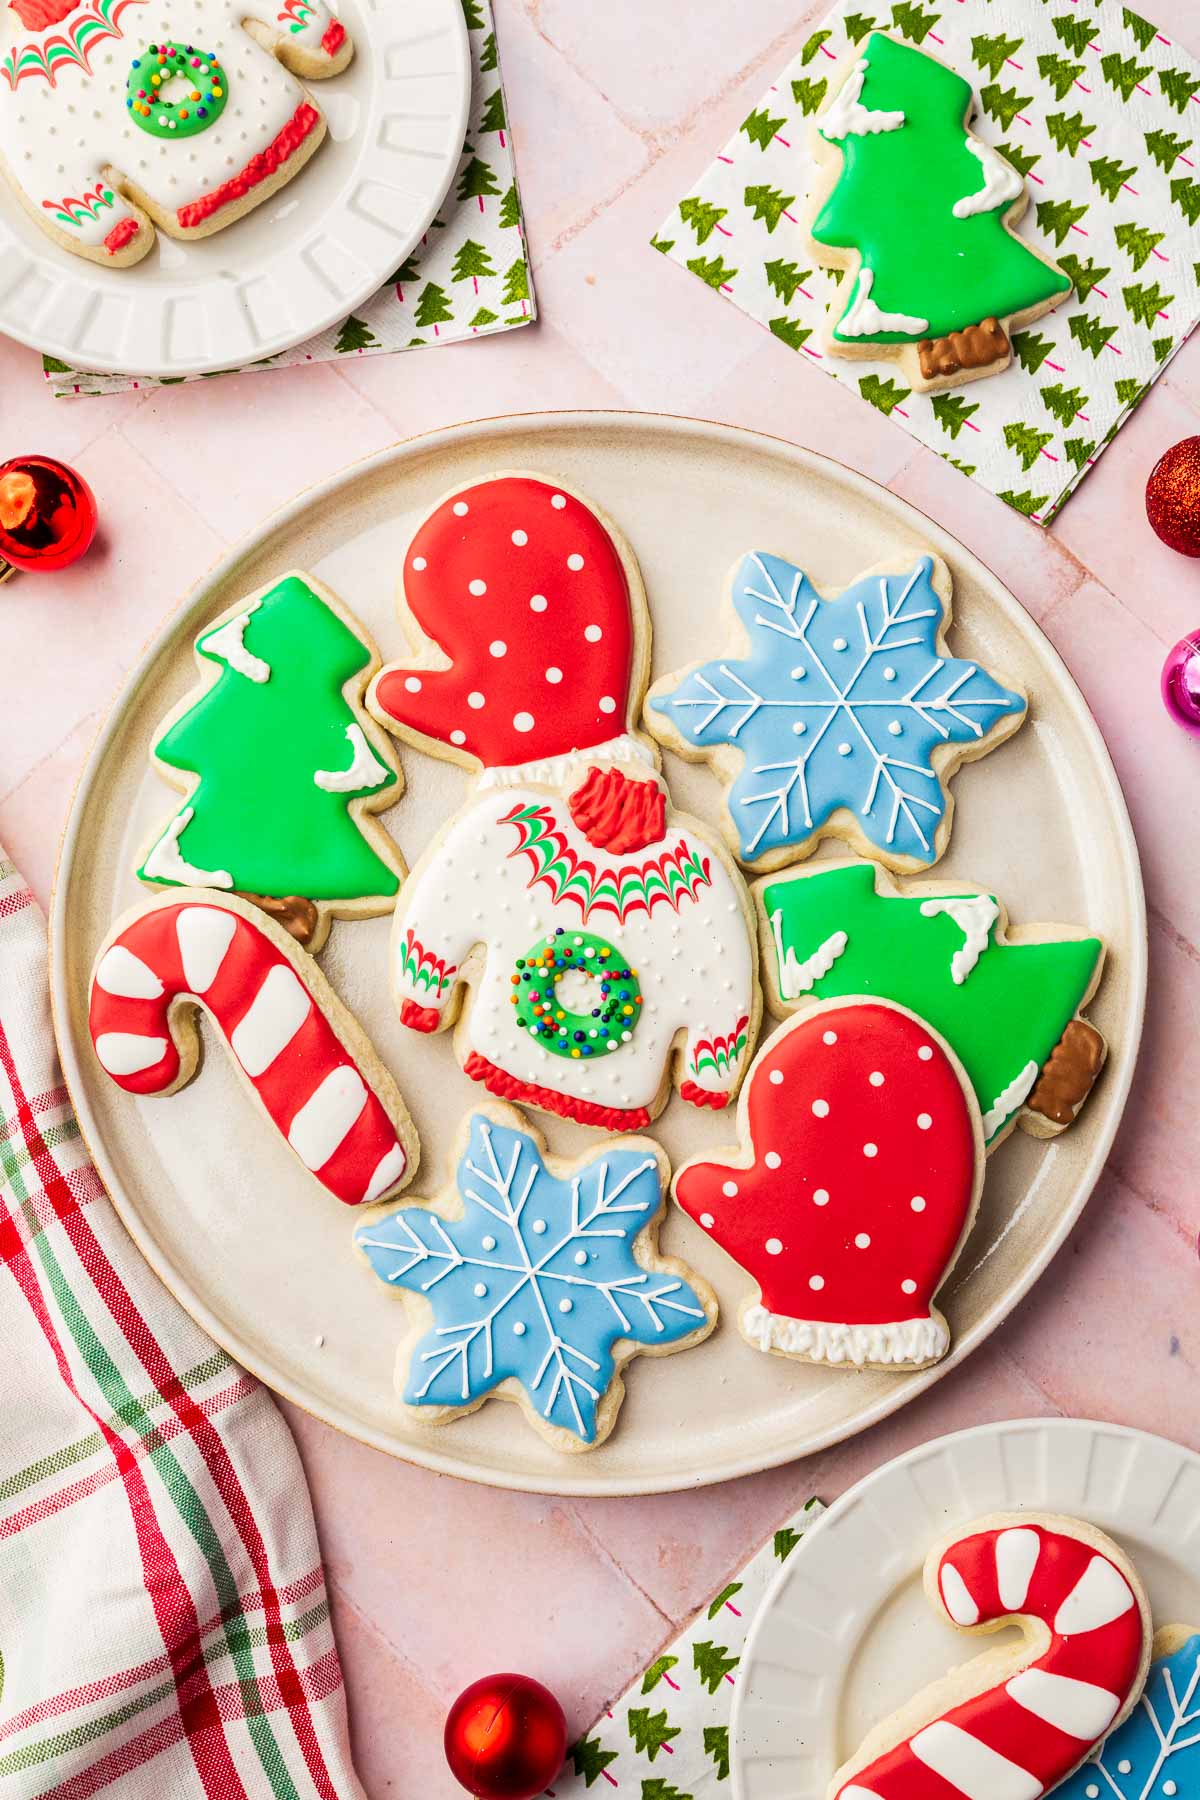
If you ask me, it’s not really Christmas until you bake and decorate some of these gluten-free Christmas cookies. Whether you’re hosting a Christmas party and need an impressive dessert for your dessert table or are looking for that special recipe for a plate of Christmas cookies for Santa, these adorable designs are just what you are looking for.
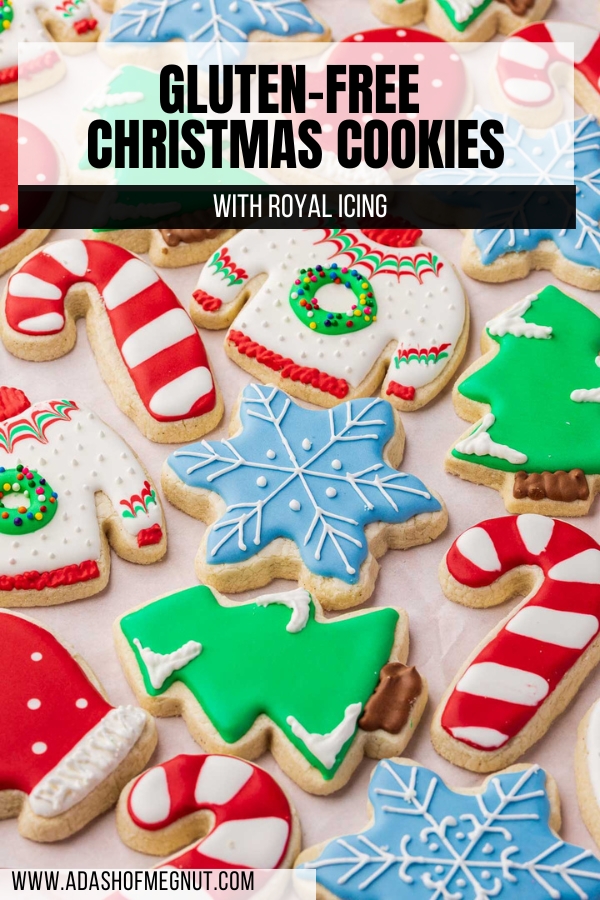
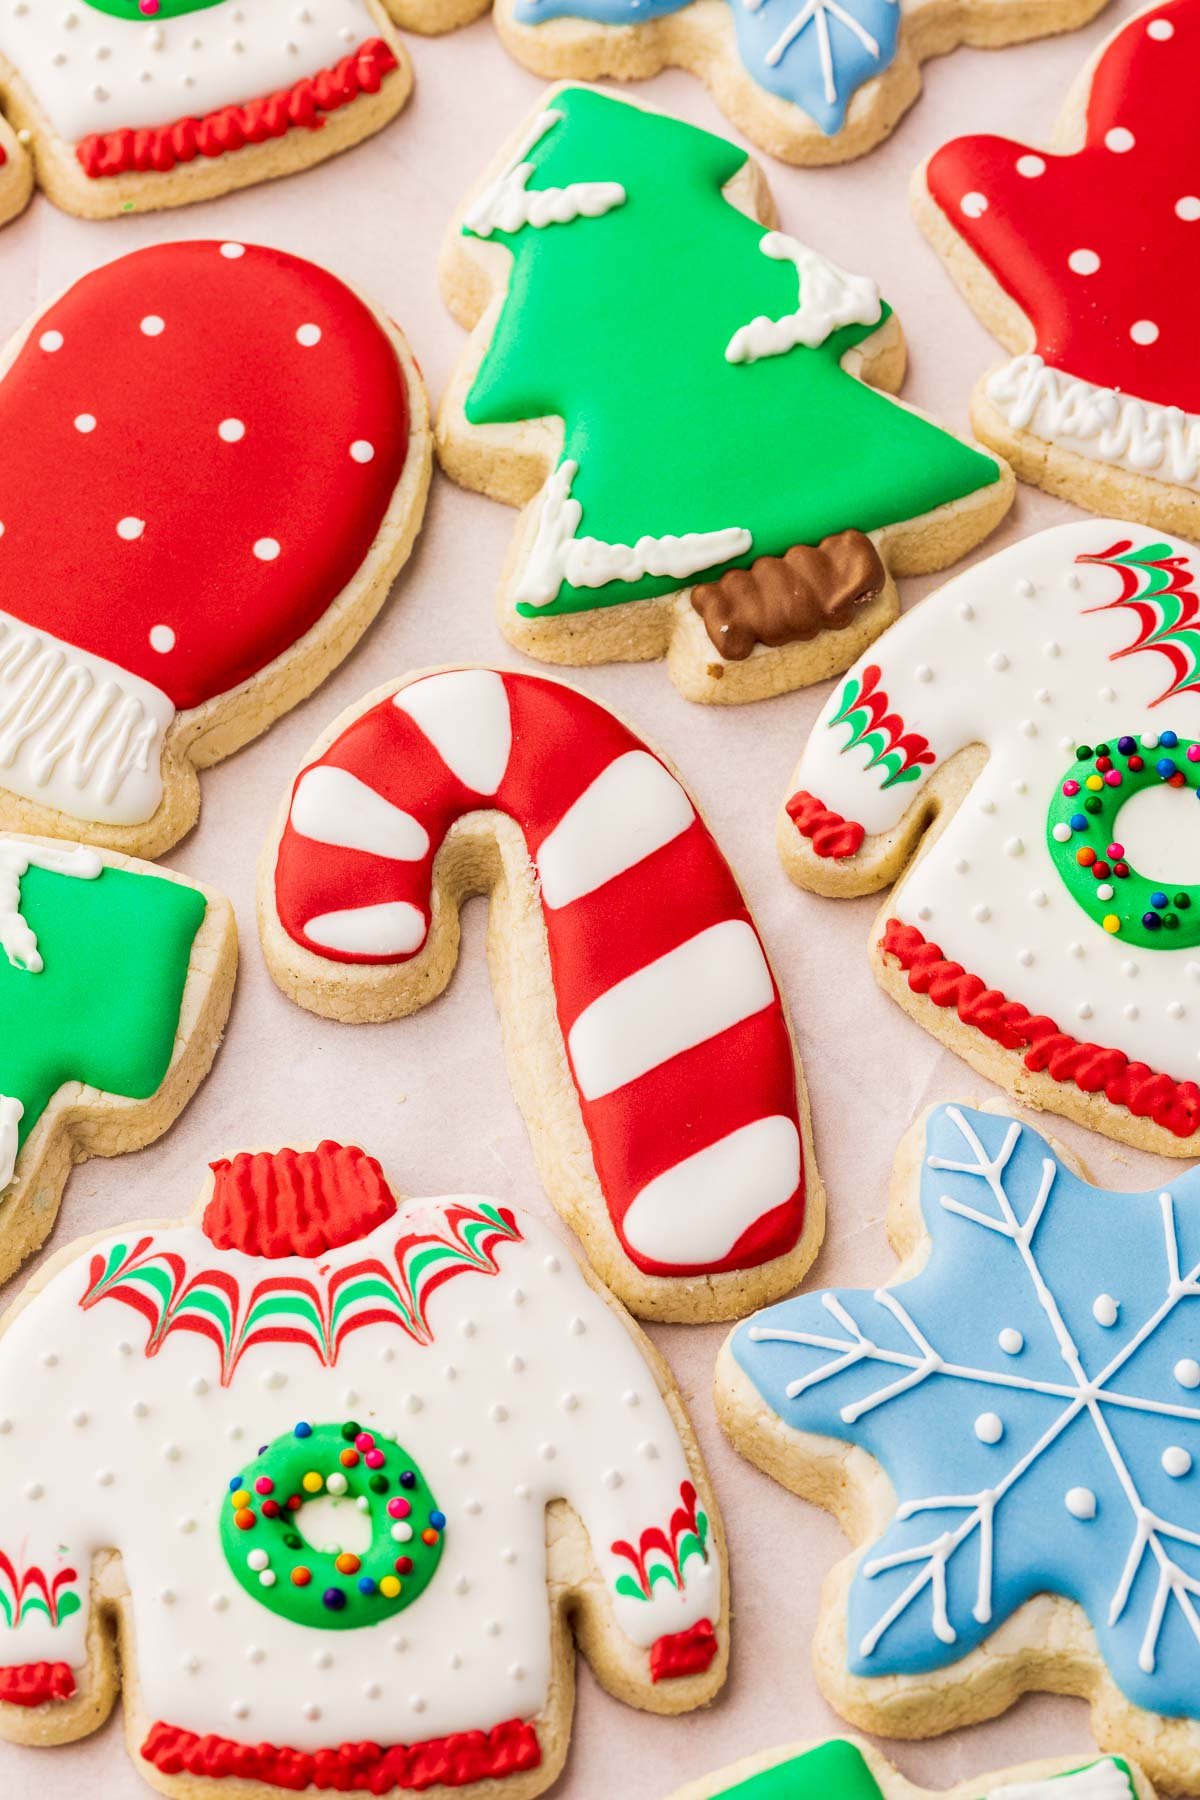
The versatility of this recipe shines through in the array of shapes and decorations you can create. From the whimsy of ugly sweaters to the elegance of snowflakes, each shape lends itself to a unique canvas for decoration. Whether it’s the intricate piping on the Christmas trees, the playful designs on the mittens, or the classic stripes on the candy canes, the process of decorating these cookies is as enjoyable as eating them.
They’re perfect for holiday parties, as thoughtful homemade gifts, or as a fun baking project with kids. Each cookie adds a personal touch to your festive spread, making this recipe not just about the taste, but also about creating lasting memories.
You’ll love this recipe because:
Table of Contents
Ingredients
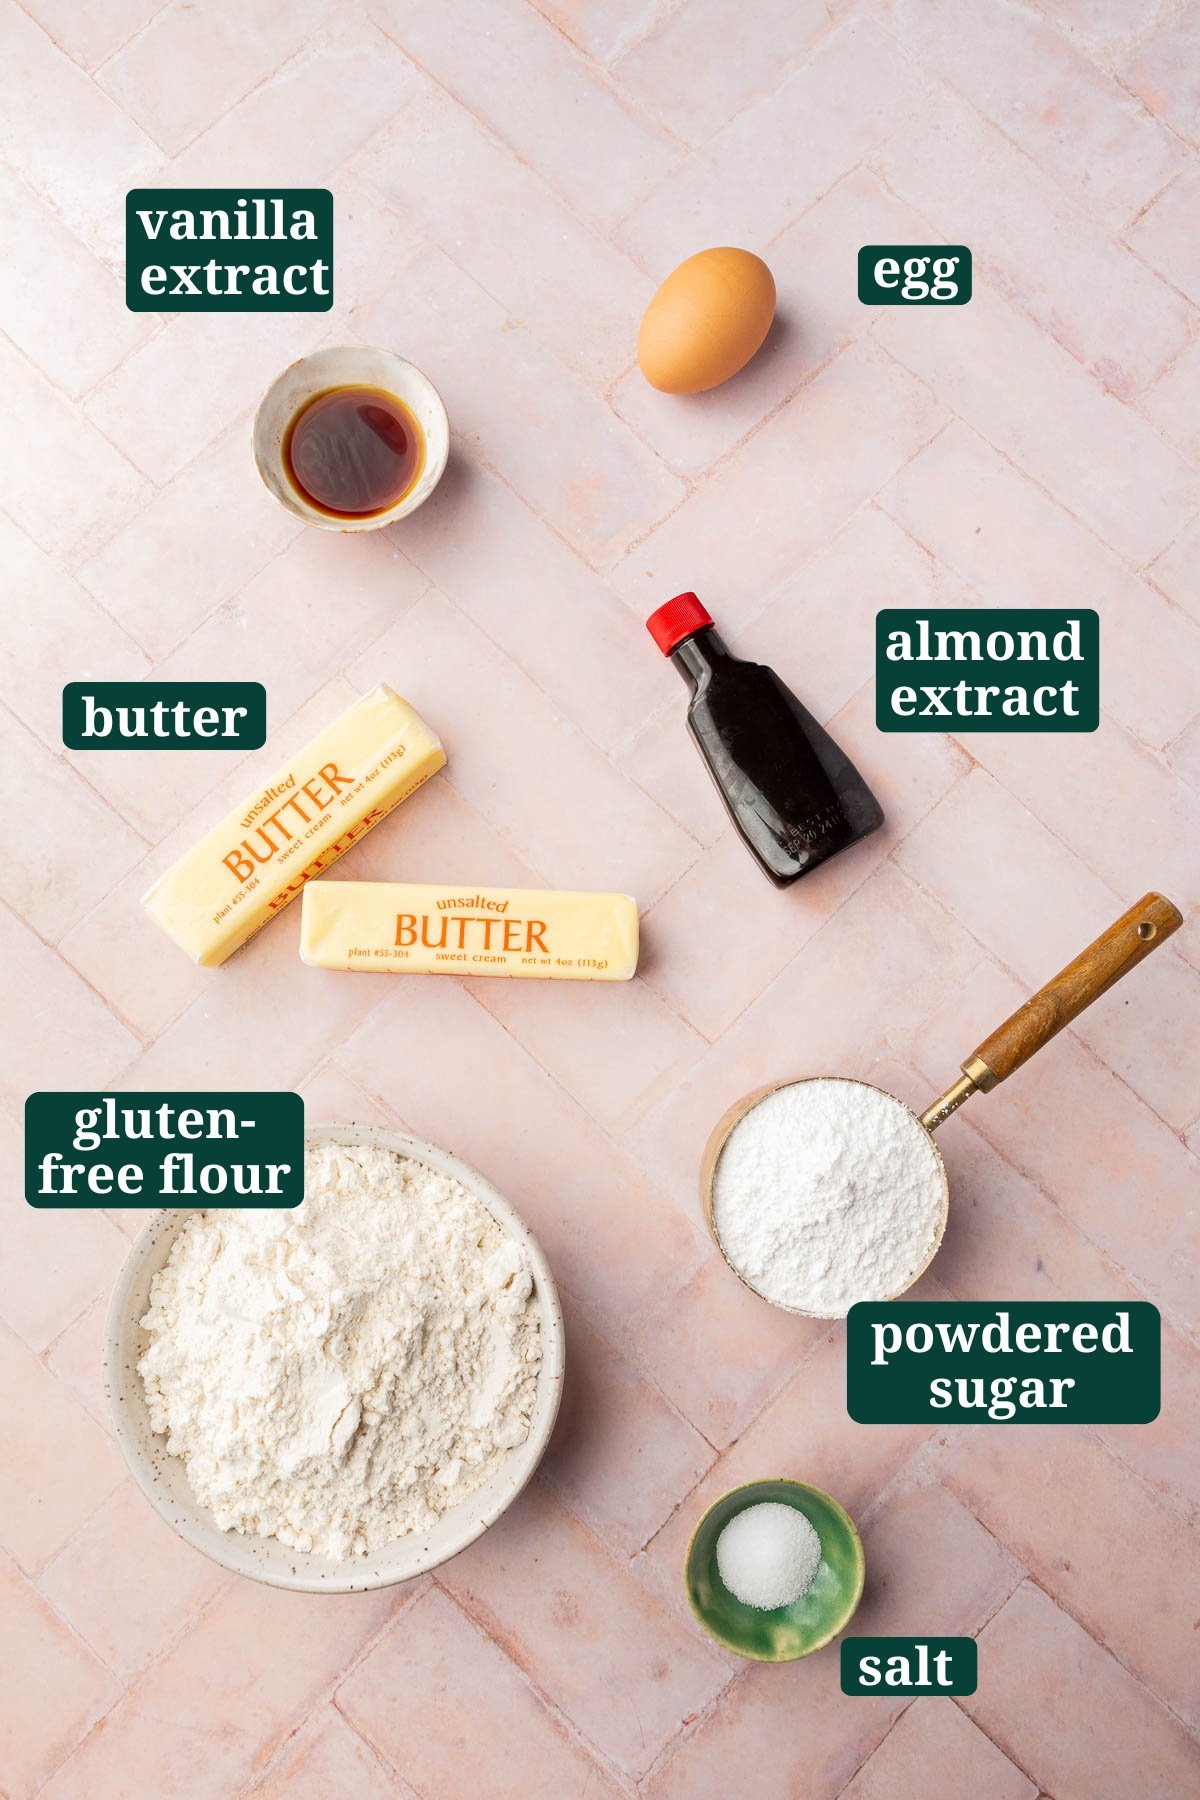
Ingredient Notes
- Unsalted butter – For this recipe, it’s key to use butter that’s been allowed to soften to room temperature. This makes creaming it with sugar much simpler. Opt for unsalted butter to have full control over the level of saltiness in your cookies.
- Confectioners’ sugar – Also known as powdered sugar, this ingredient lends a delicate sweetness and smooth texture to your cookies. Its fine consistency is crucial for achieving that signature tender, melt-in-your-mouth quality in the cookies.
- Almond extract – Almond extract imparts a nutty essence to the cookies. I find if you add too much, you’ll start to get an artificial taste in the cookies, so a little goes a long way. If you don’t like almond extract, just omit it or use a different extract in its place.
- Vanilla extract – A staple in cookie baking, vanilla extract brings a traditional, sweet note that complements the almond flavor. For best results, use pure vanilla extract or vanilla bean paste.
- Salt – Regular table salt, with its fine texture, is ideal for this recipe, but I’ve also used kosher salt before and it’s worked well.
- Egg – I use a large egg, around 50 grams. Be aware that using eggs of different sizes could slightly alter the dough’s consistency. Also, be sure your egg is at room temperature so it incorporates into the dough easier.
- Gluten-free flour blend – For this recipe, I recommend Bob’s Red Mill 1-to-1 Gluten-Free Baking Flour, found in the blue bag. It includes xanthan gum, essential for mimicking gluten’s binding properties in gluten-free baking. This particular blend is designed to substitute wheat flour seamlessly, available at most grocery stores and major retailers, like Target and Walmart.
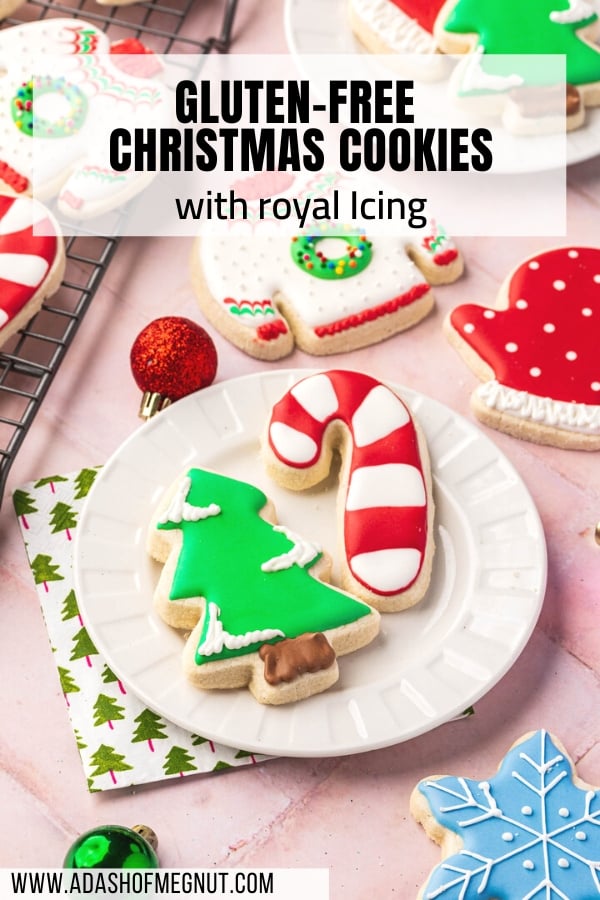
- Royal icing – To achieve the designs in these tutorials, you’ll want to use royal icing. I have a simple royal icing recipe that is so easy and delicious, perfect for decorated sugar cookies!
- Gel food coloring – It’s best to use gel food coloring to color your royal icing as it is more concentrated than water-based food colorings, which can mess with the consistency of your royal icing. Gel food coloring will help you get those vibrant colors that will make your sugar cookies “wow” your guests. I use Americolor Gel Food Coloring, which you can buy on Amazon. It’s labeled gluten-free!

Butter should be softened but not melted or overly warm. Ideally, it should yield slightly to pressure but still hold its shape. This consistency helps to properly cream the butter with sugar, creating a light and fluffy base that contributes to the texture and rise of your cookies. If the butter is too hard, it won’t cream well; if it’s melted, your cookies may spread too much and lose shape.
Decoration Ideas
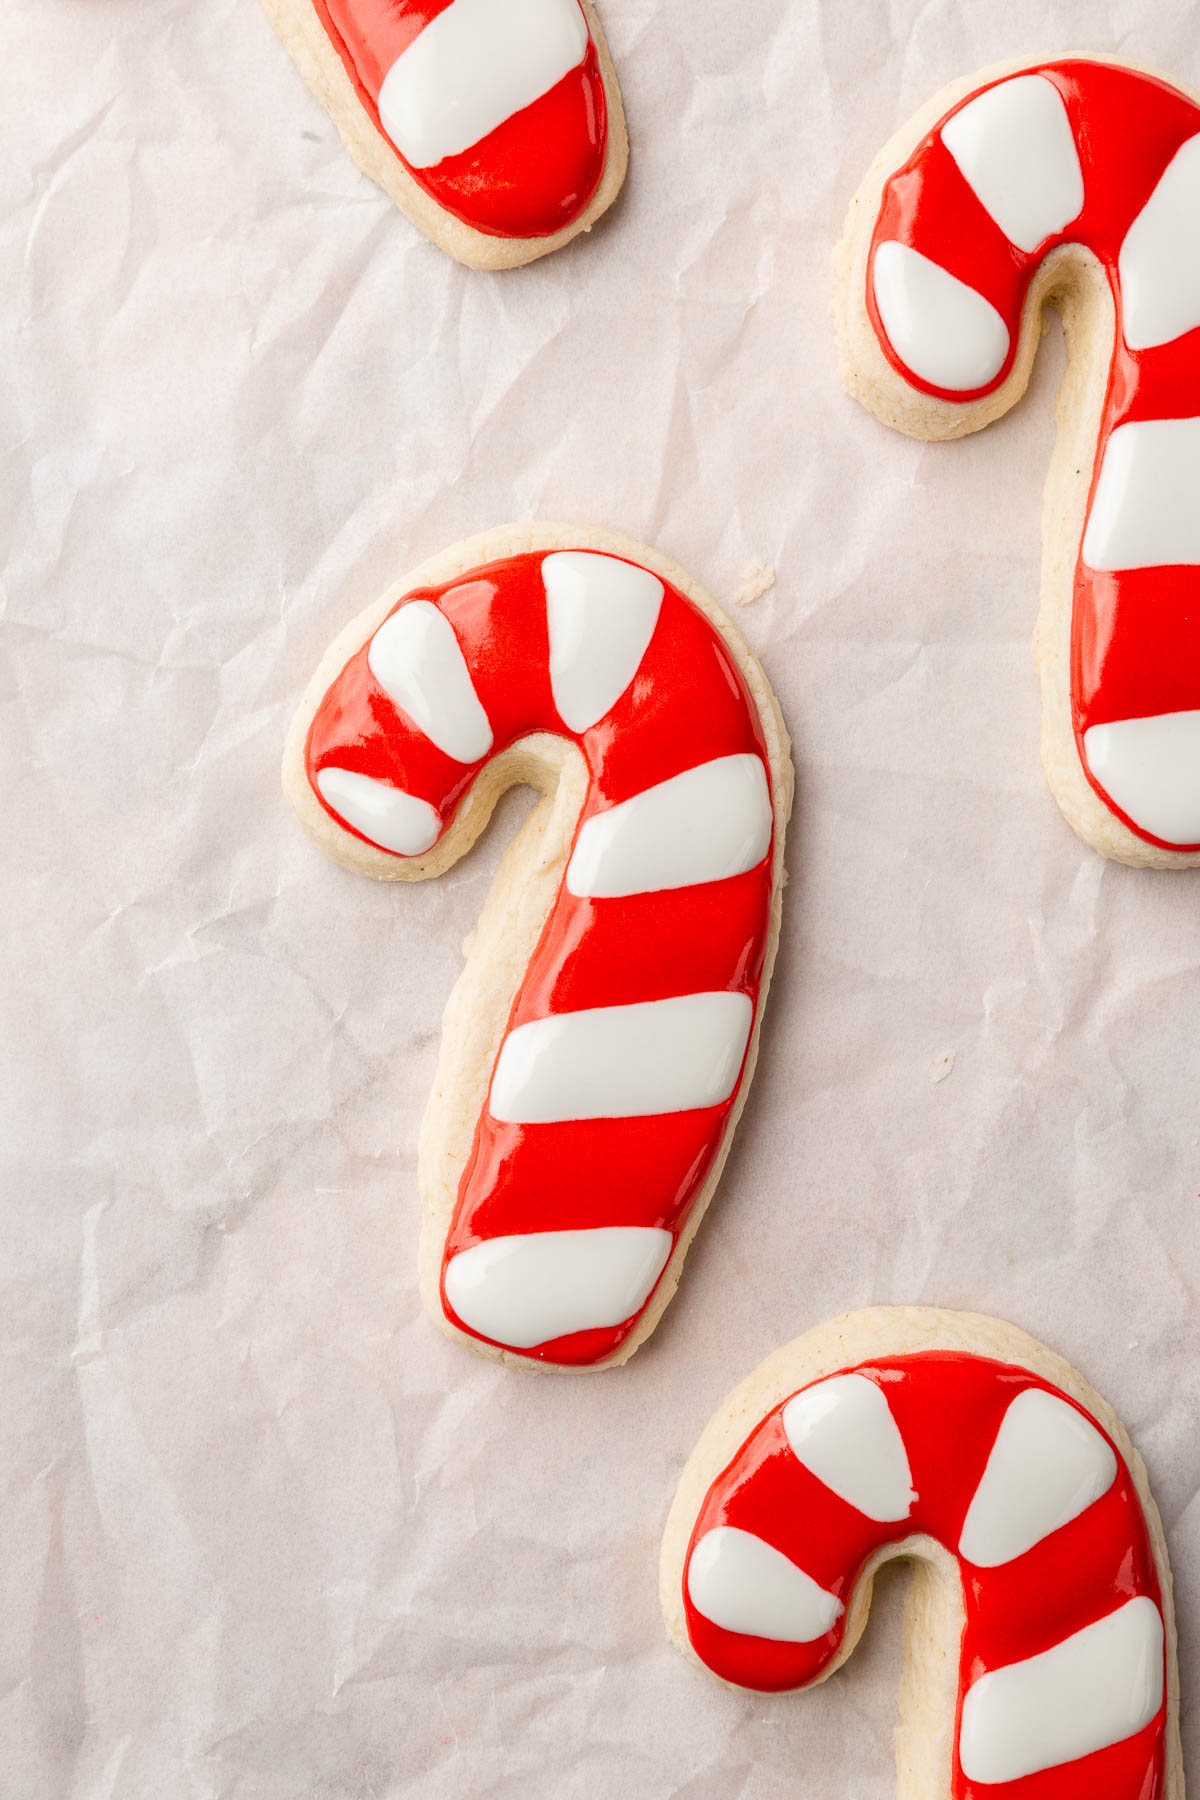
- Candy canes: Use white and red icing to create the classic candy cane stripes. You can add a bit of sparkle with edible glitter, sprinkles or sanding sugar.
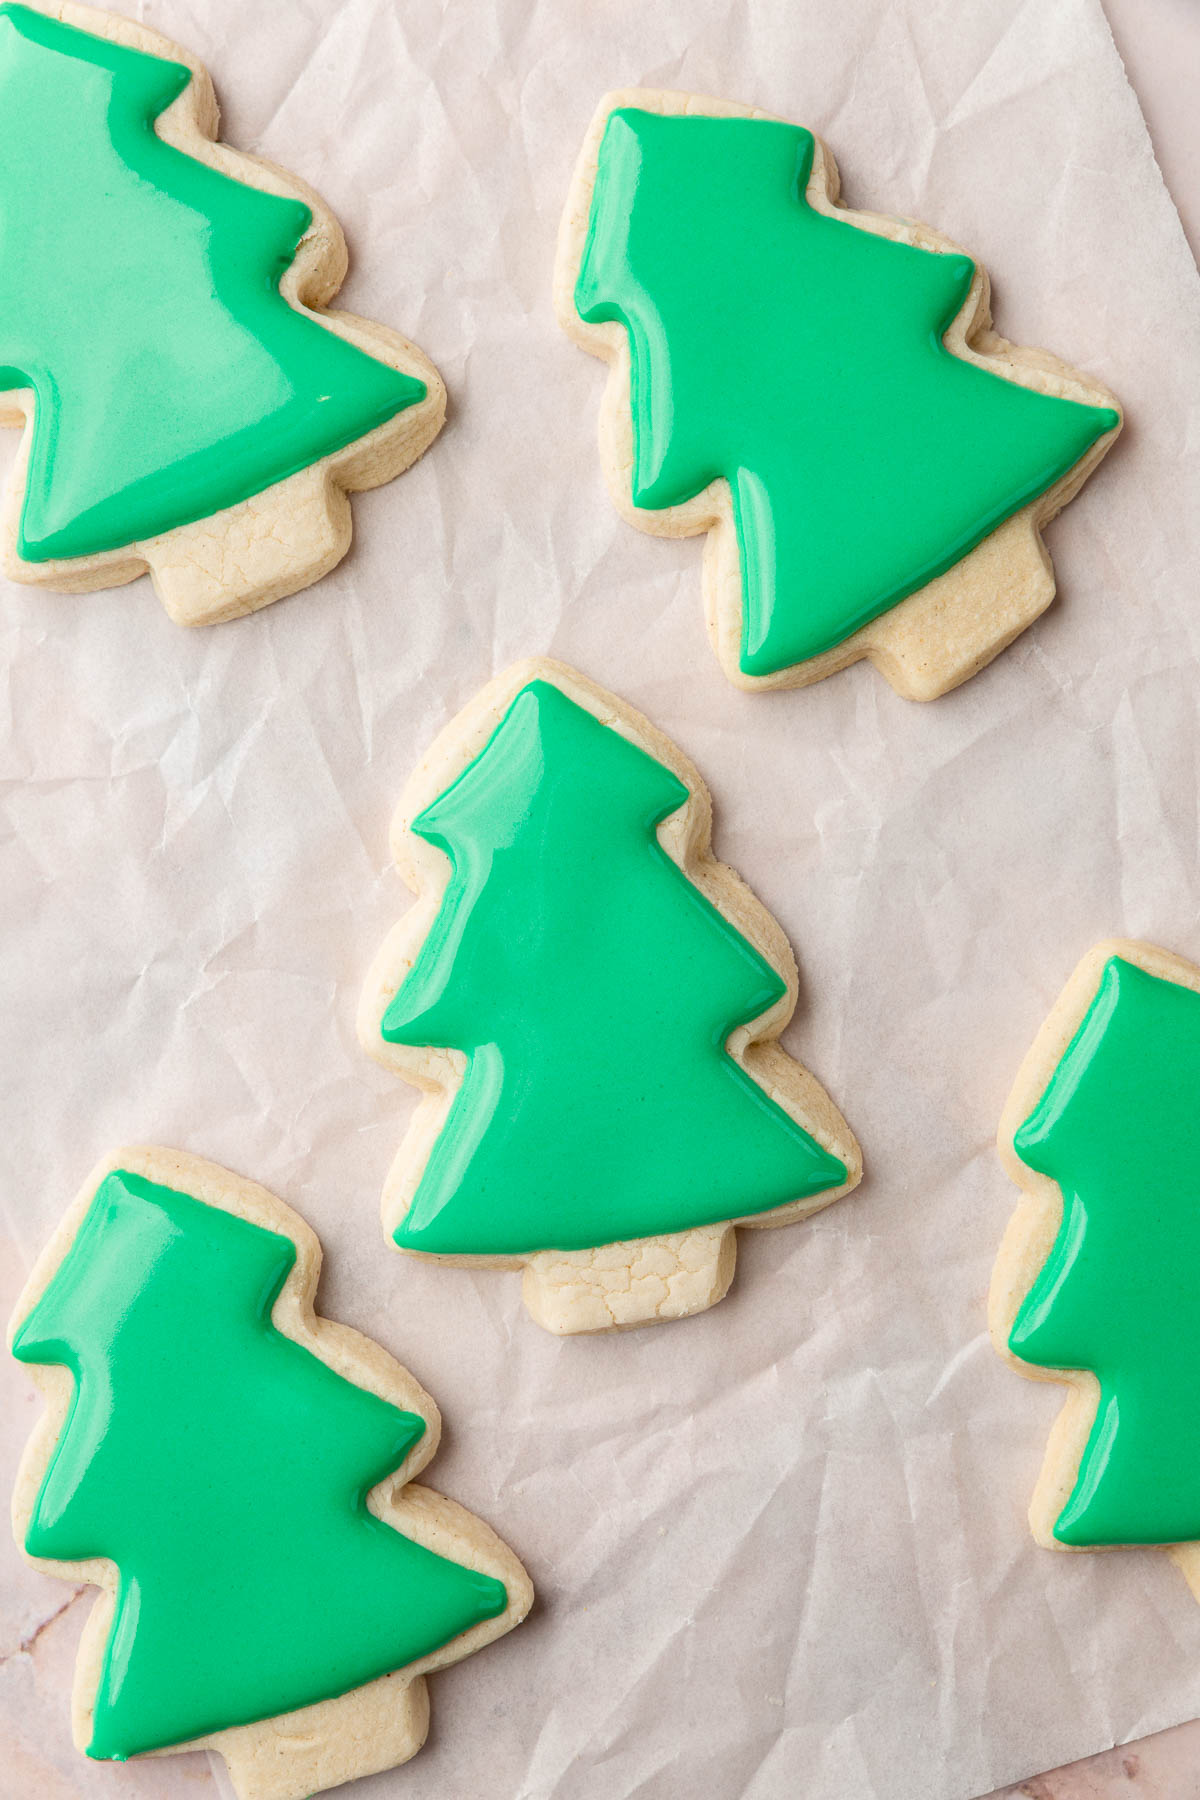
- Christmas trees: Green icing is a must, and you can add white royal icing to create snow caps on the branches like I did. If you want to get more detailed, sprinkle on decorations like a candy star on top or colored sprinkles to mimic lights or ornaments while the green icing is still wet.
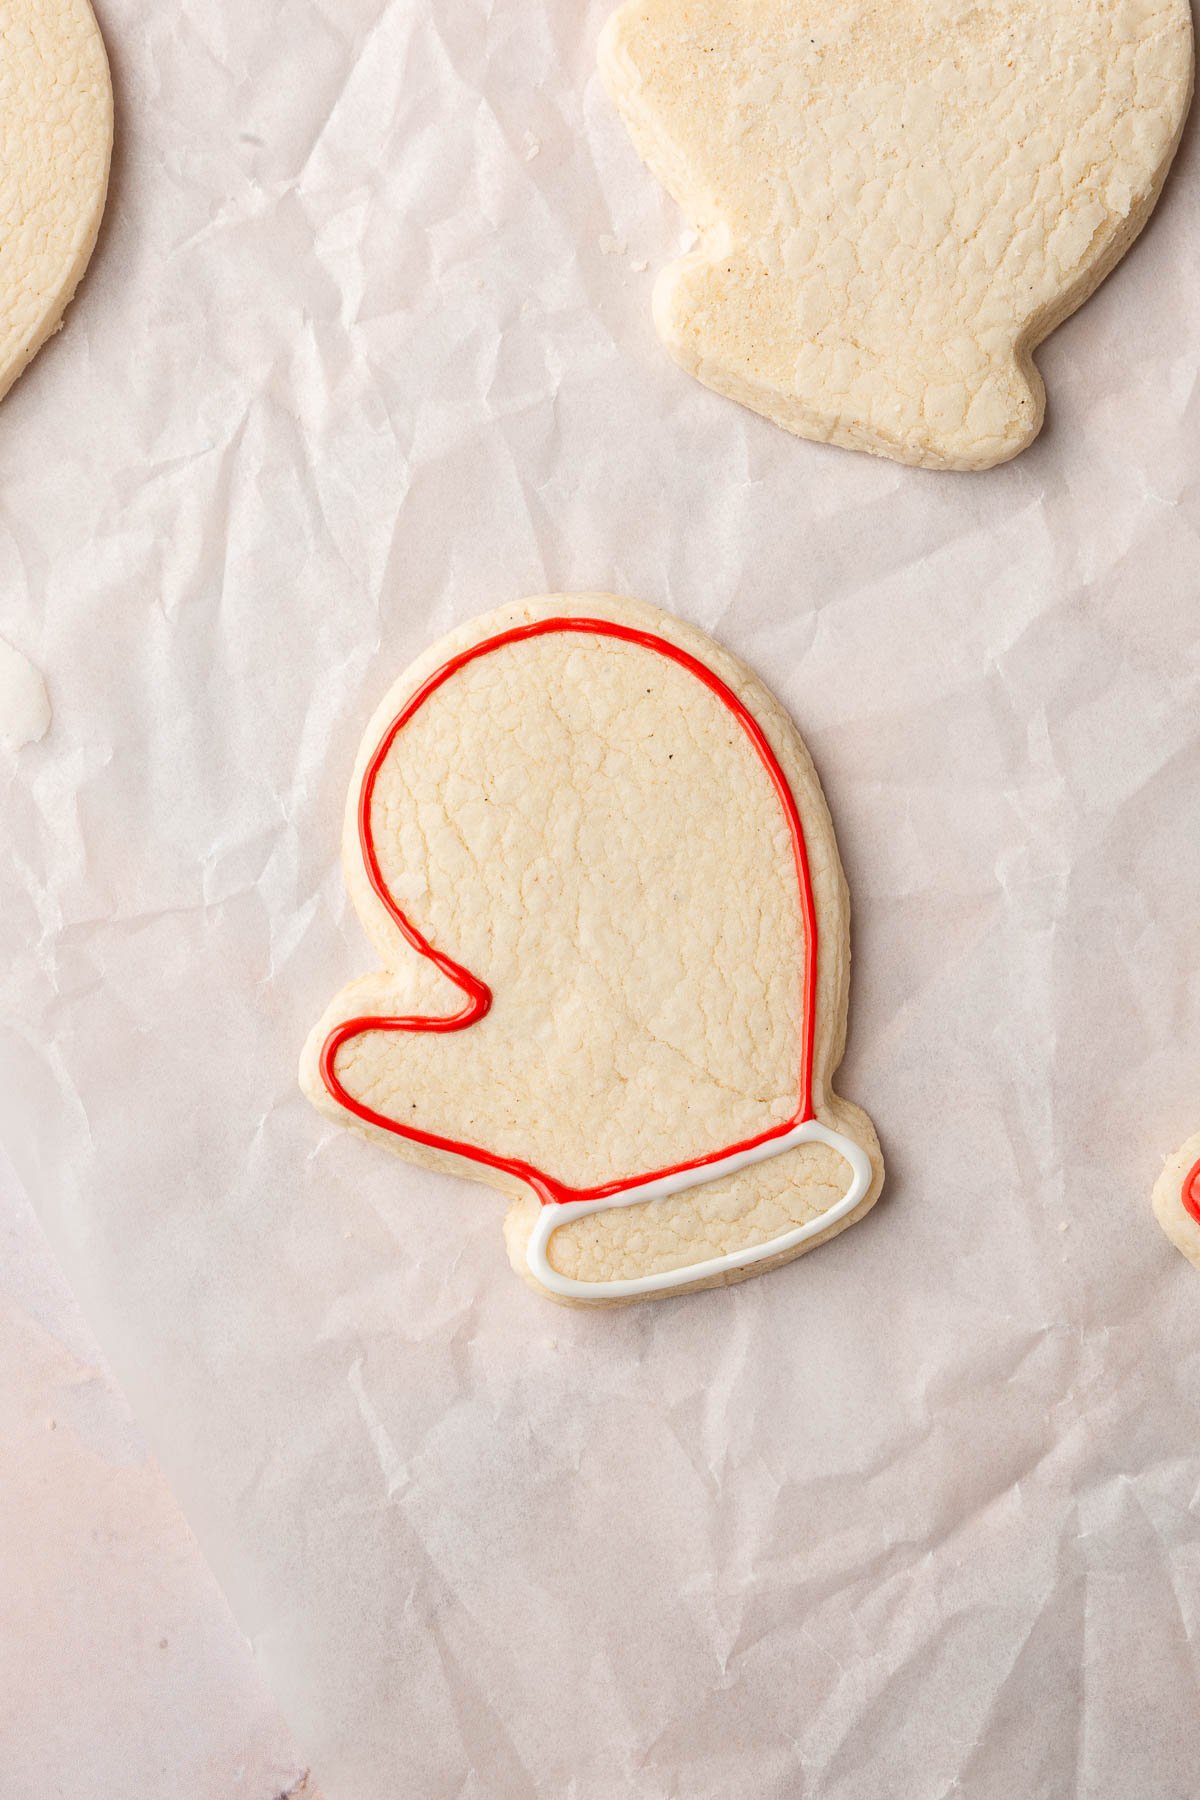
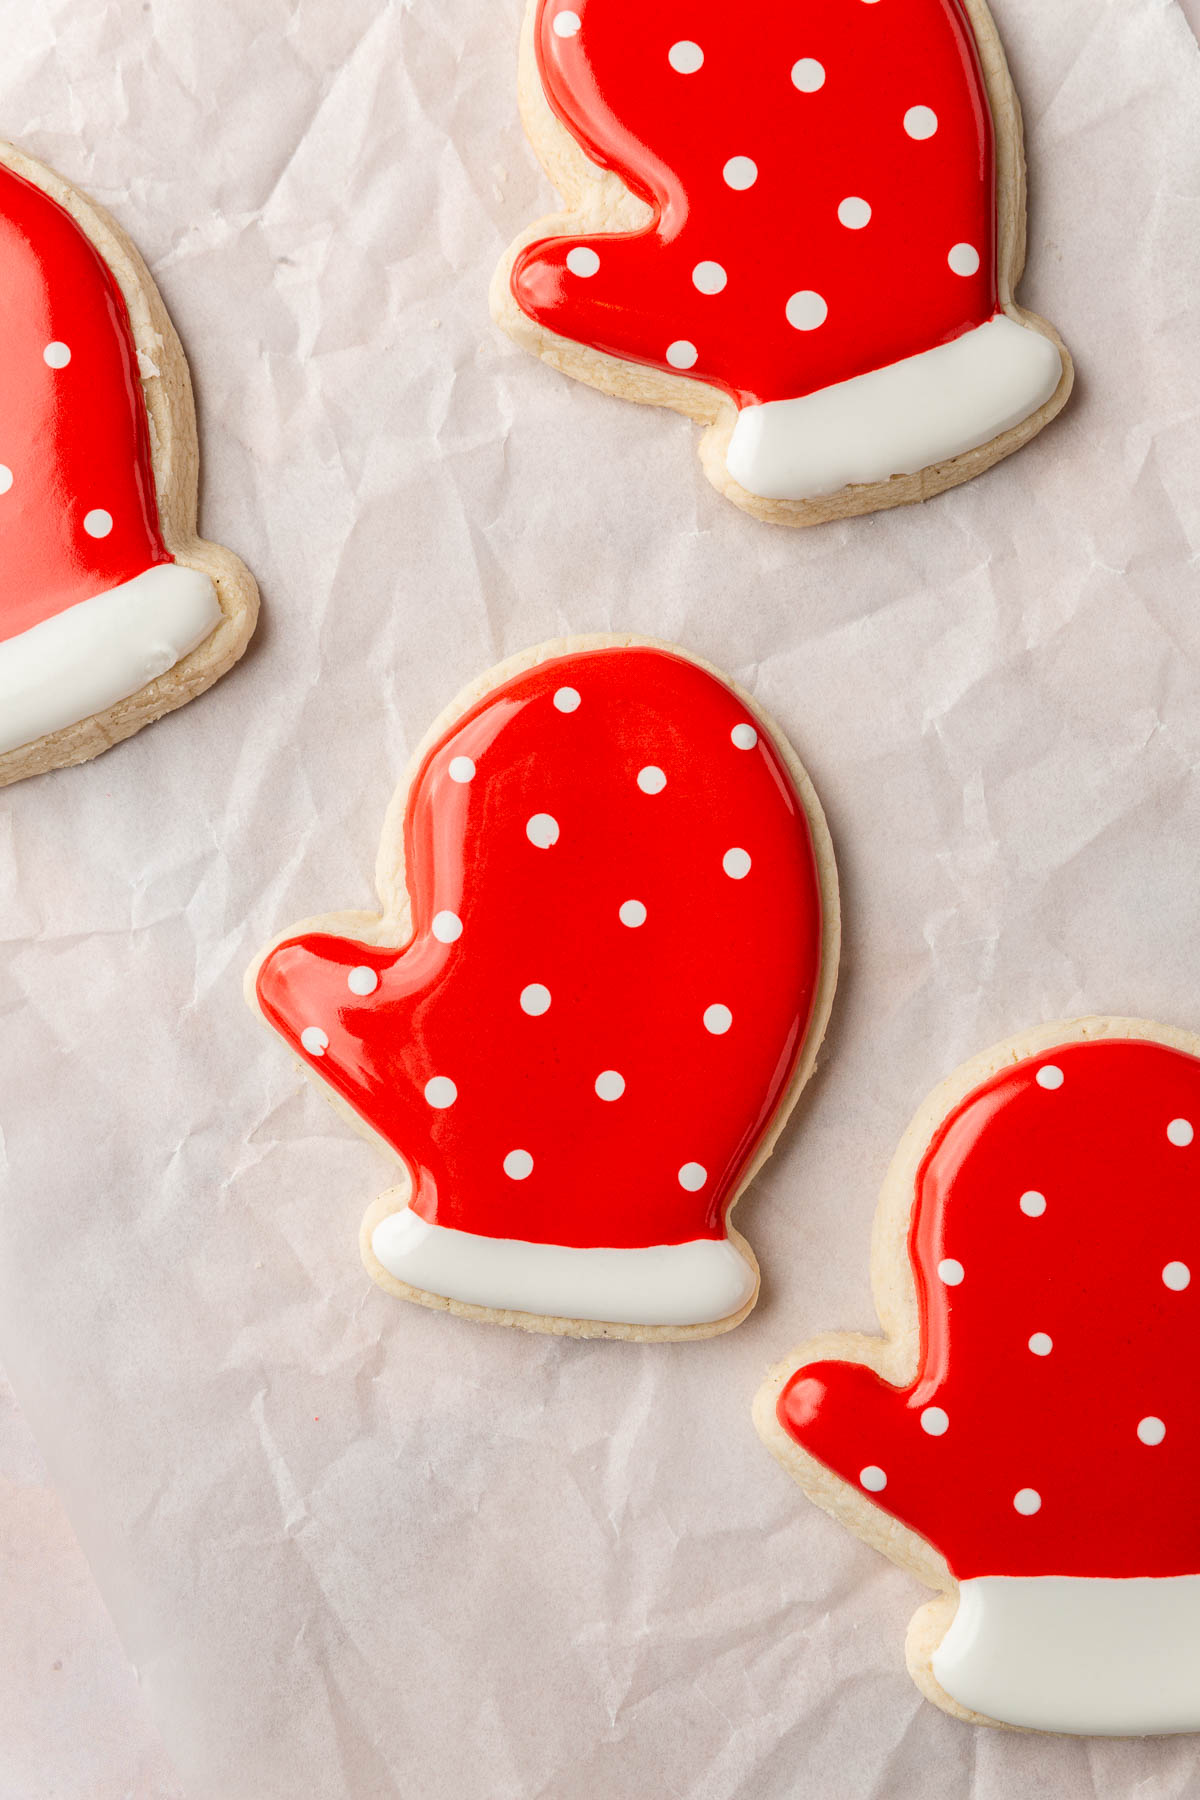
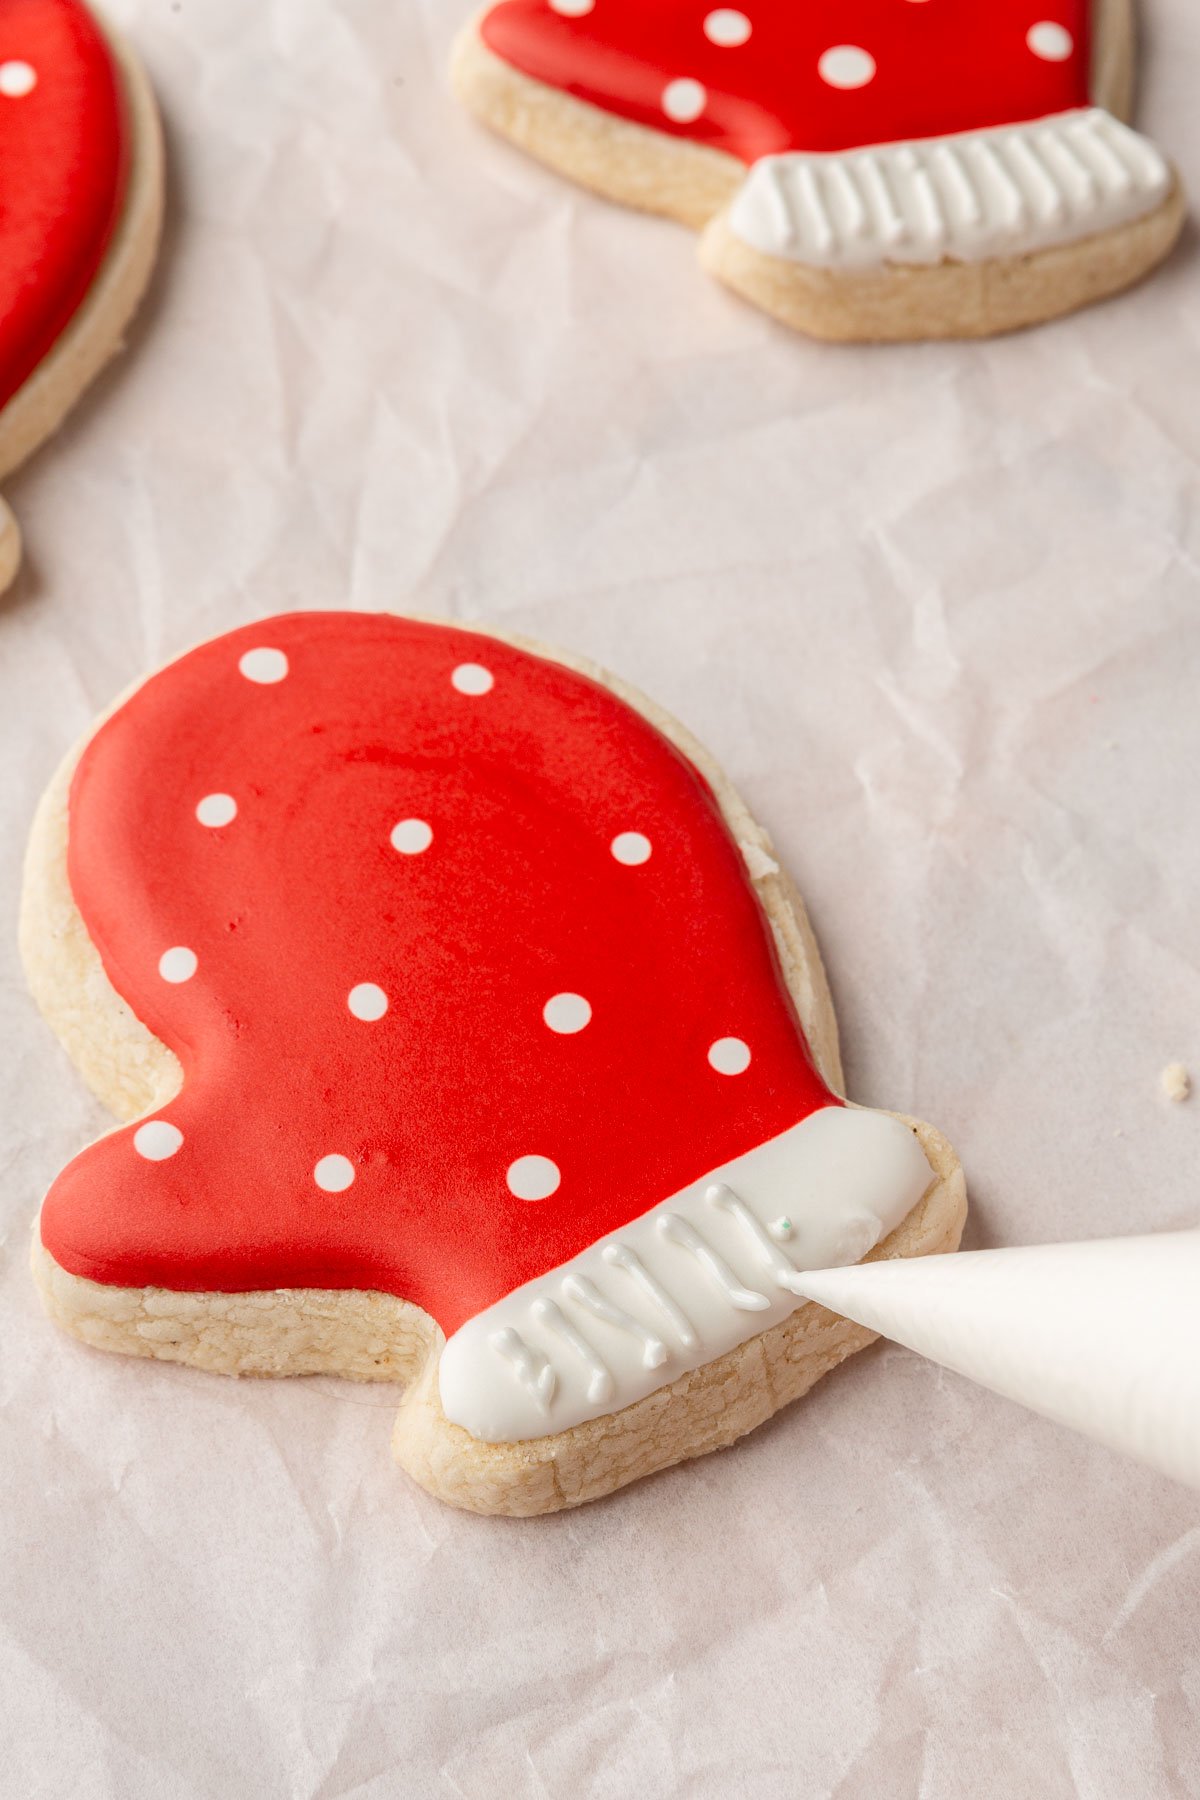
- Mittens: These can be decorated in various patterns and colors. Adding small details like lines for the cuffs or different colors for the thumbs can make them look more realistic. I used a wet-on-wet royal icing technique to create a polka dot pattern on my mitten cookies. It’s a fun and easy way to decorate these cookies!
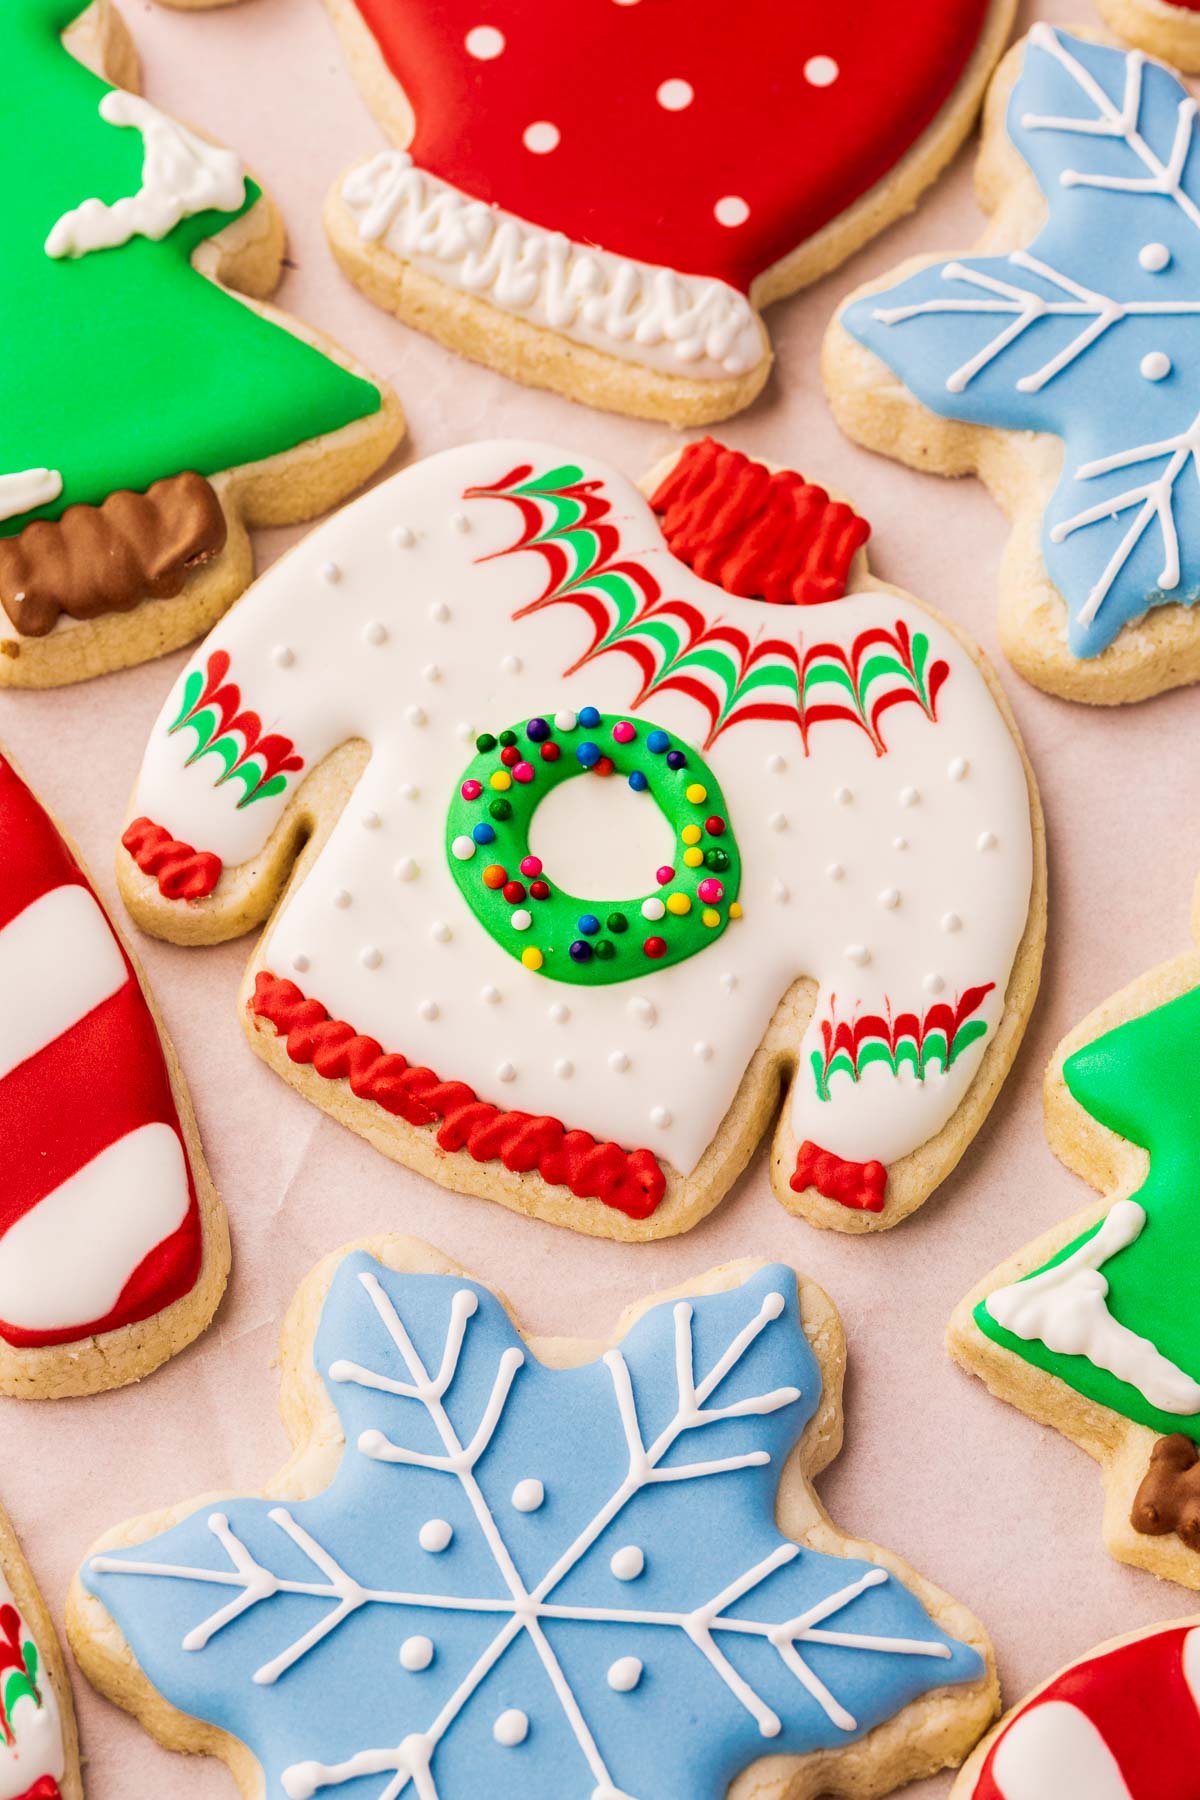
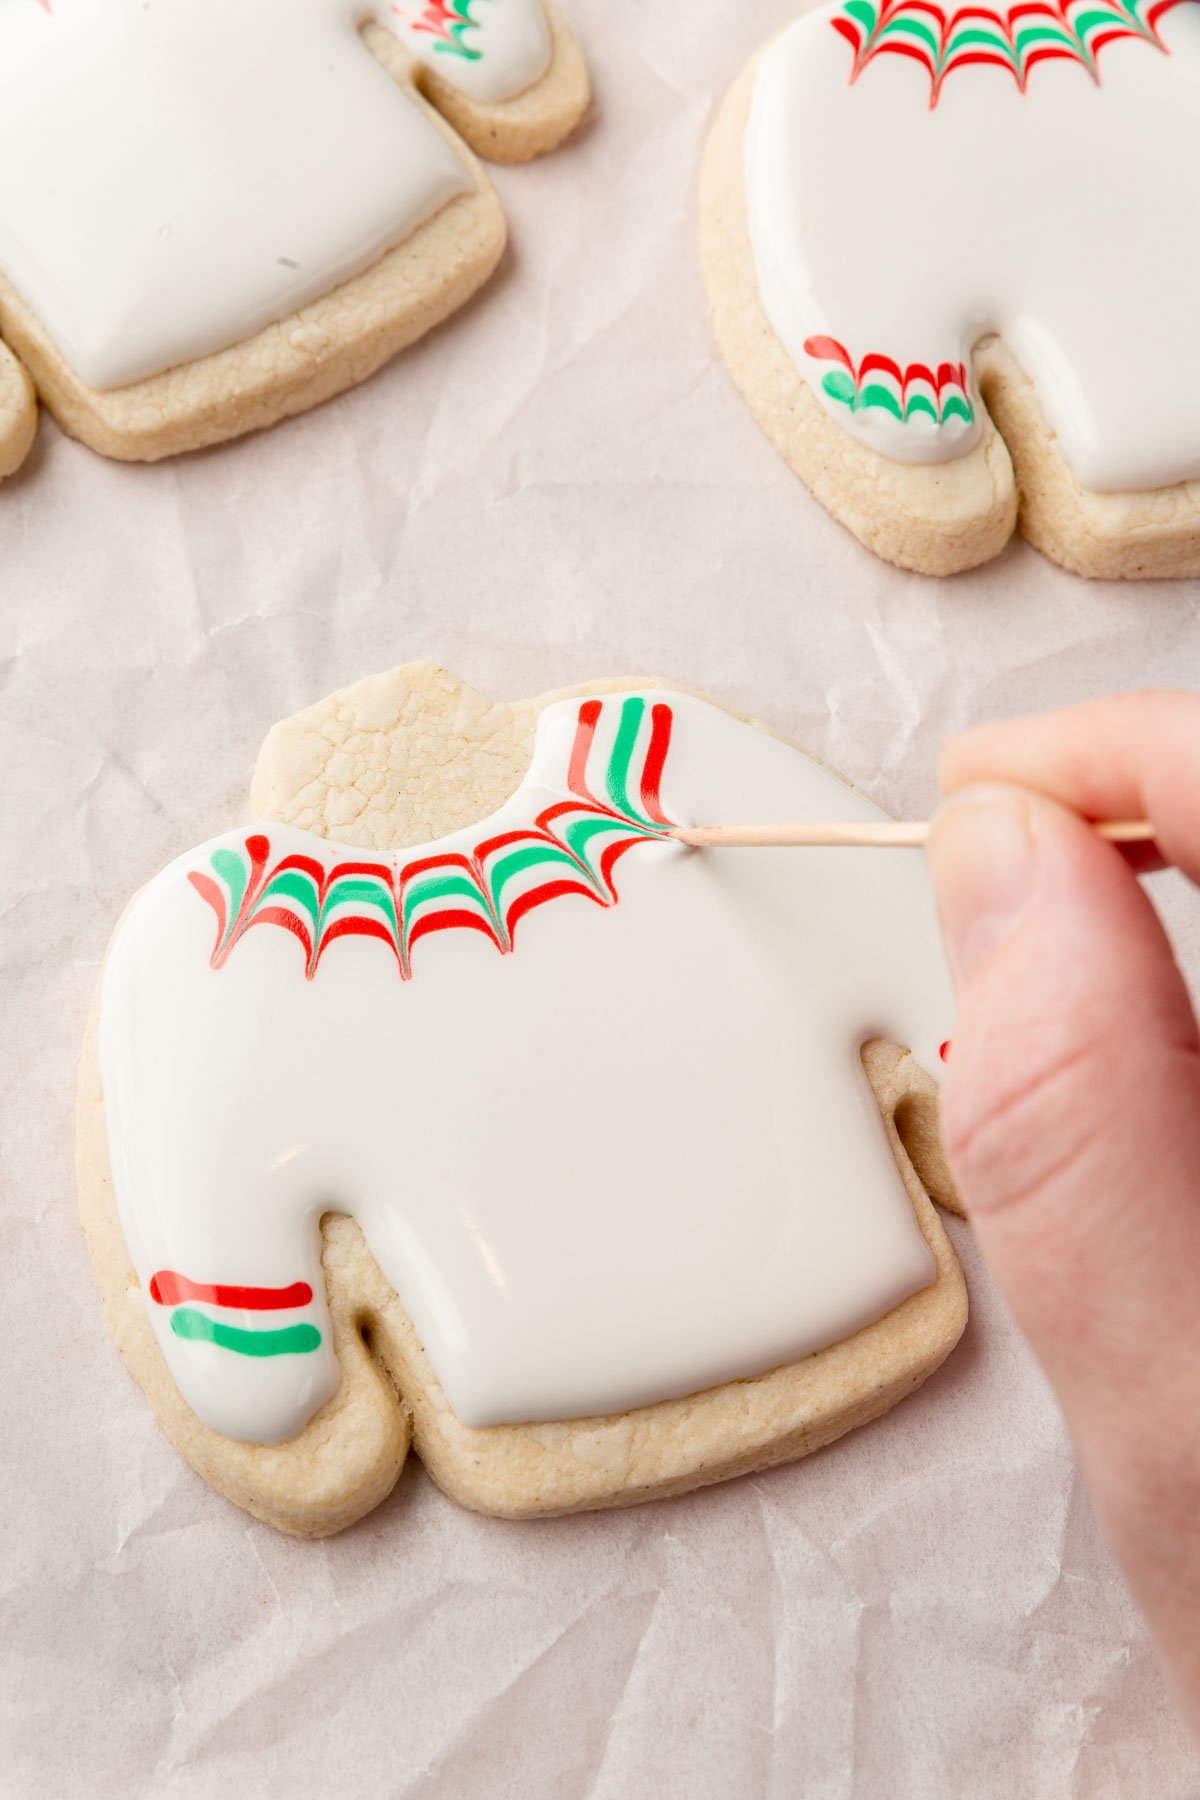
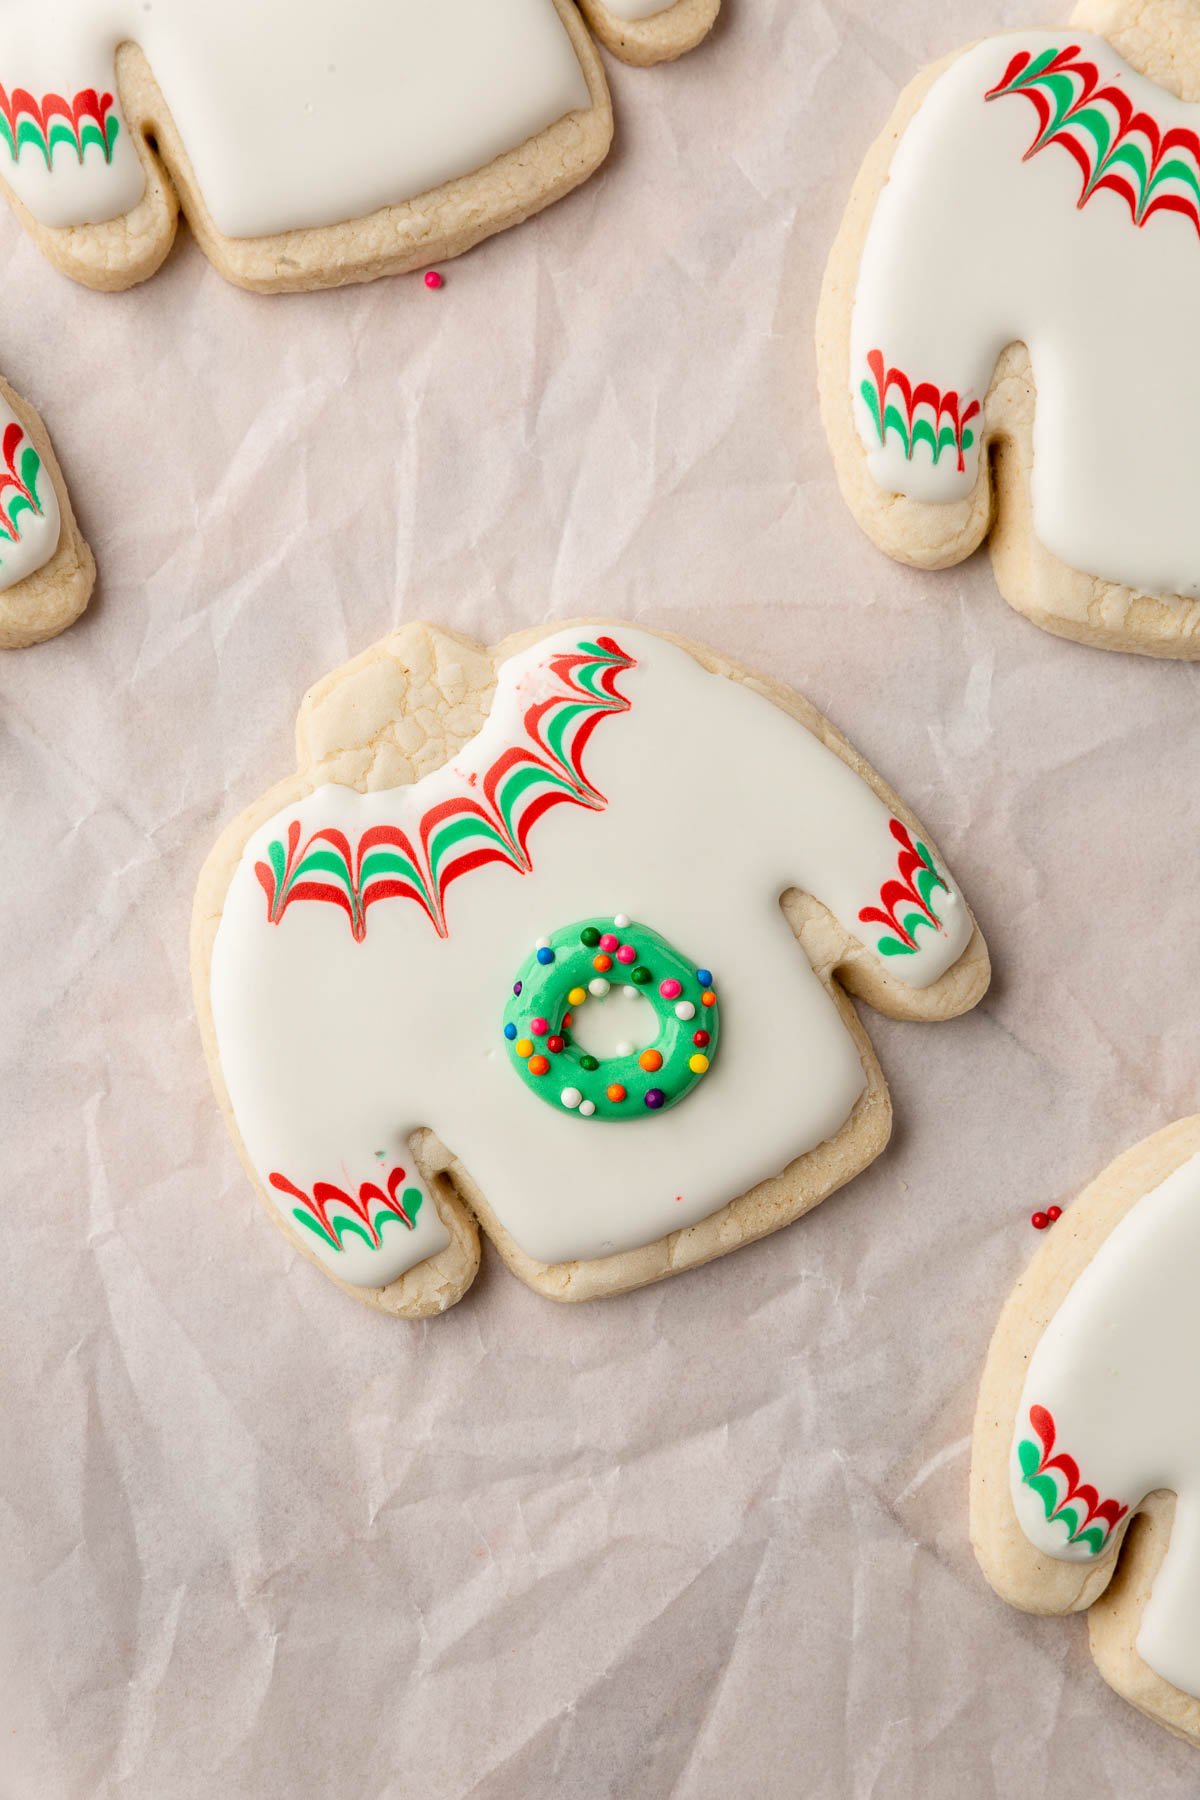
- Ugly sweaters: This is where you can get really creative. Use an array of colors and patterns – think stripes, polka dots, and even tiny reindeer or Christmas tree shapes. For my ugly sweater cookies I did a white sweater with wet-on-wet chevron design to mimic sweater details and then topped it with a wreath. You can see more of my ugly sweater cookie designs here for inspiration!
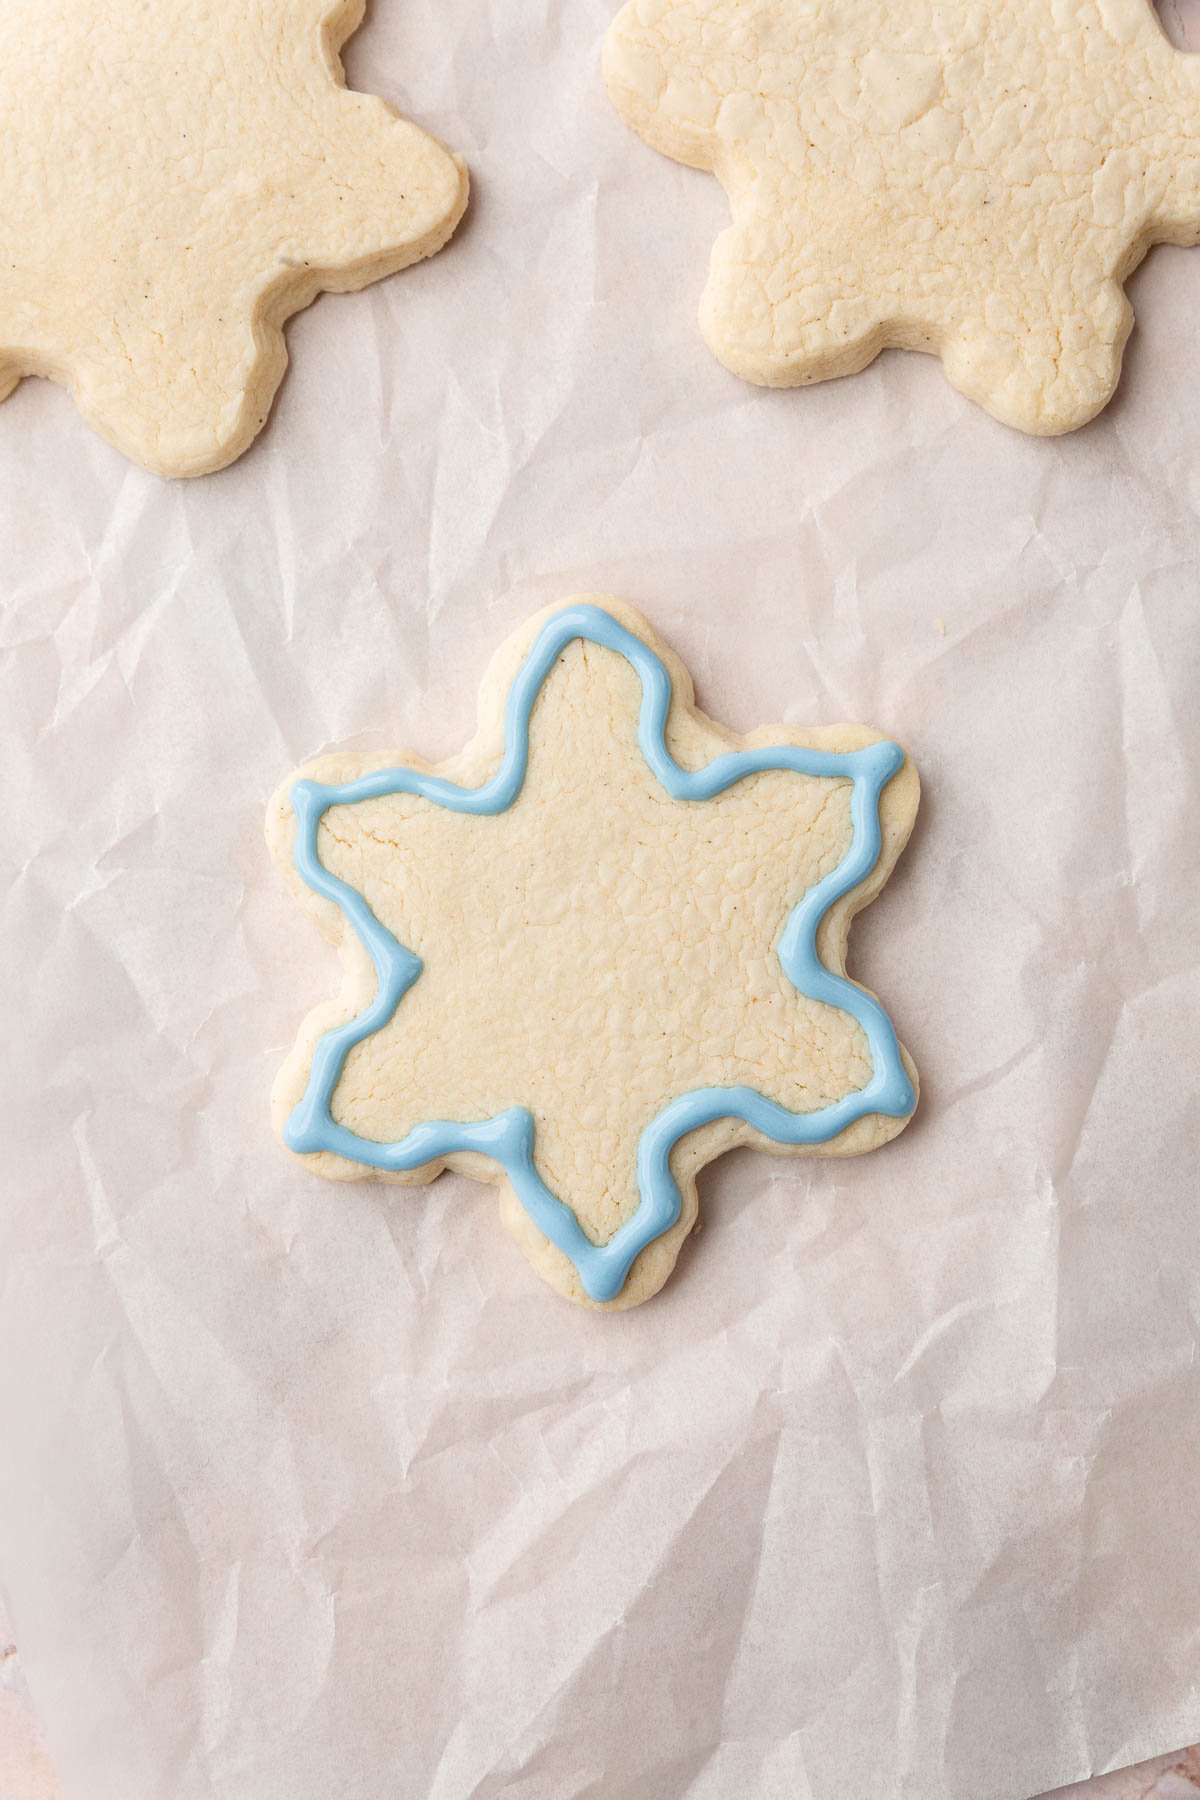
- Snowflakes: I like to do a background color of blue for my snowflakes, but you could do various colors of blue, grey, purple, off-white or even pink. You can create intricate patterns using a stiff white icing. While the white icing is still wet, you can also dip the cookie in white sanding sugar to get a shimmery look if you’d like!
Candy cane cookies step-by-step Instructions
For the ingredient list with measurements, full instructions, printable recipe, and additional notes, please scroll down to the recipe card.
Mittens cookies step-by-step instructions
Ugly sweaters cookies step-by-step instructions
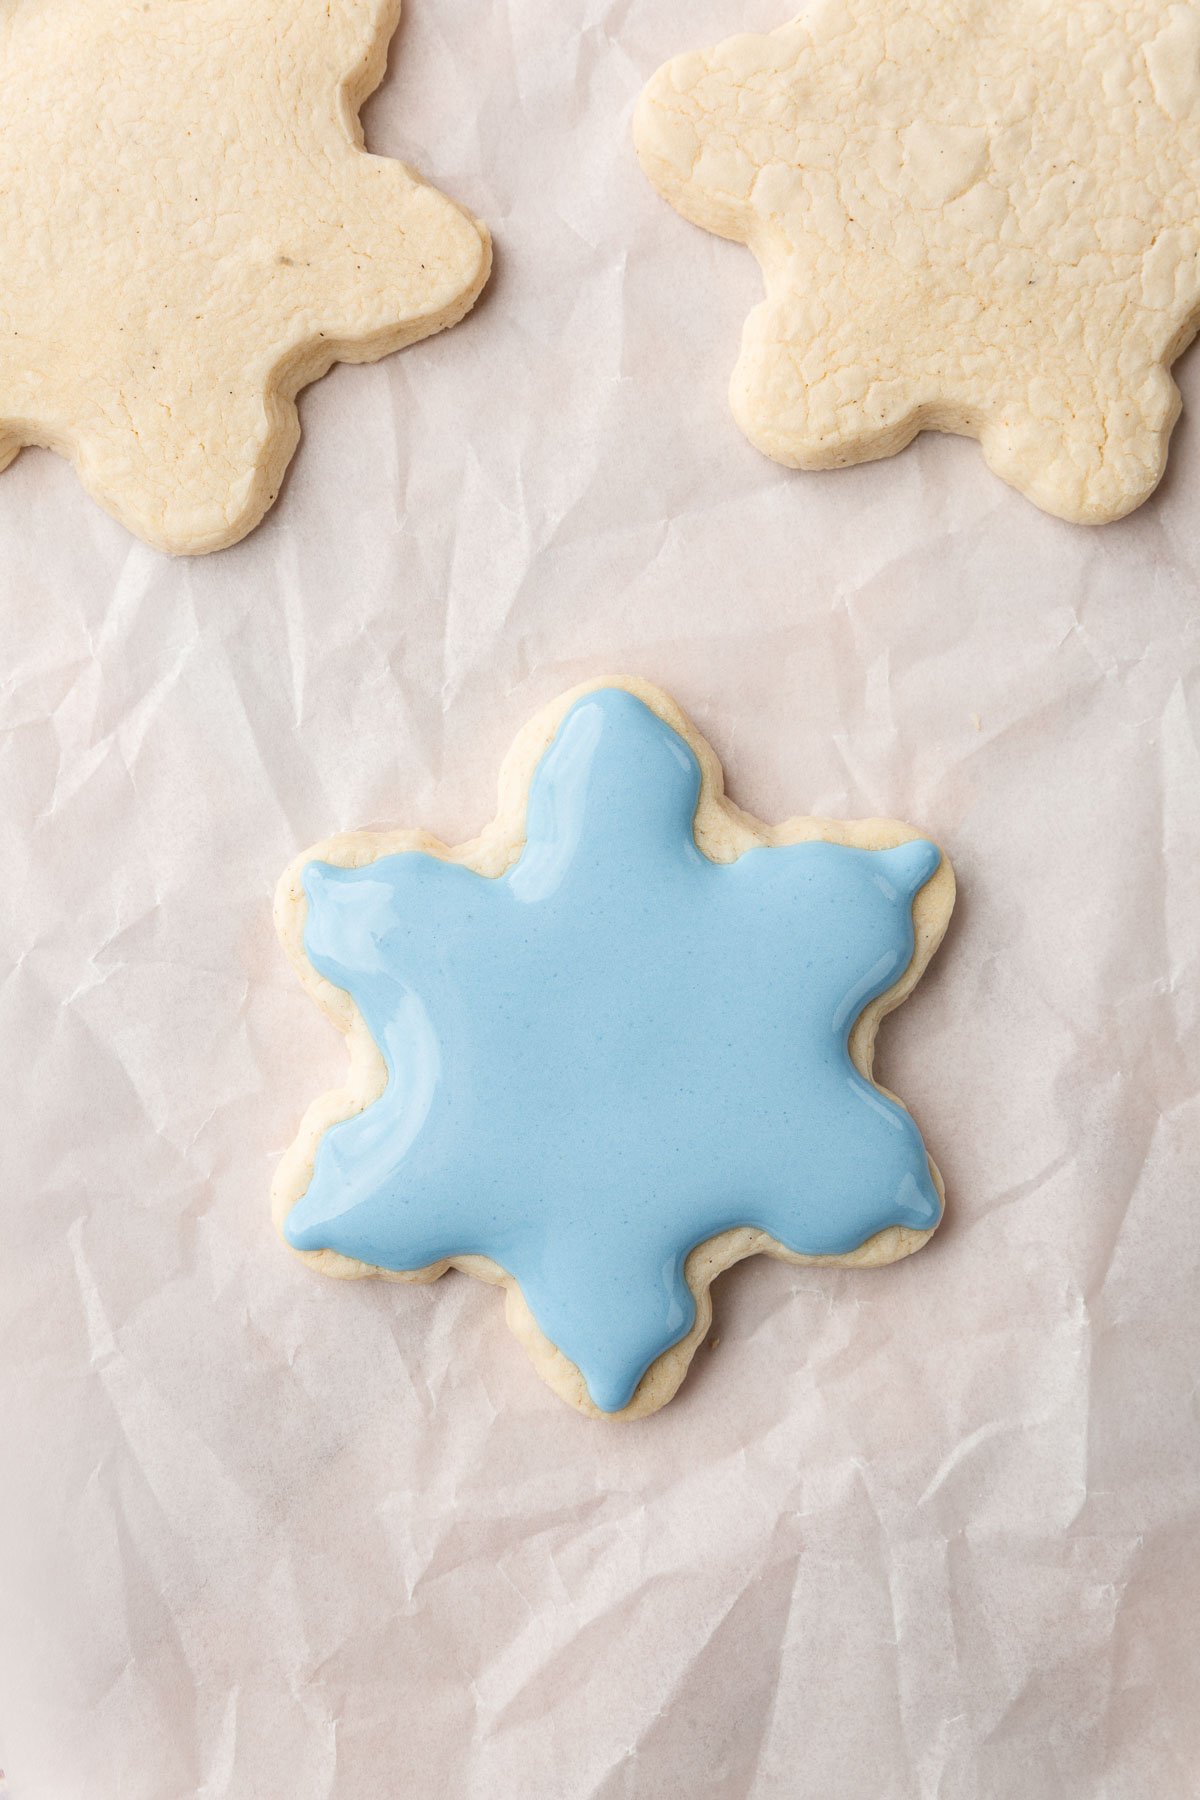
Snowflake cookies step-by-step instructions
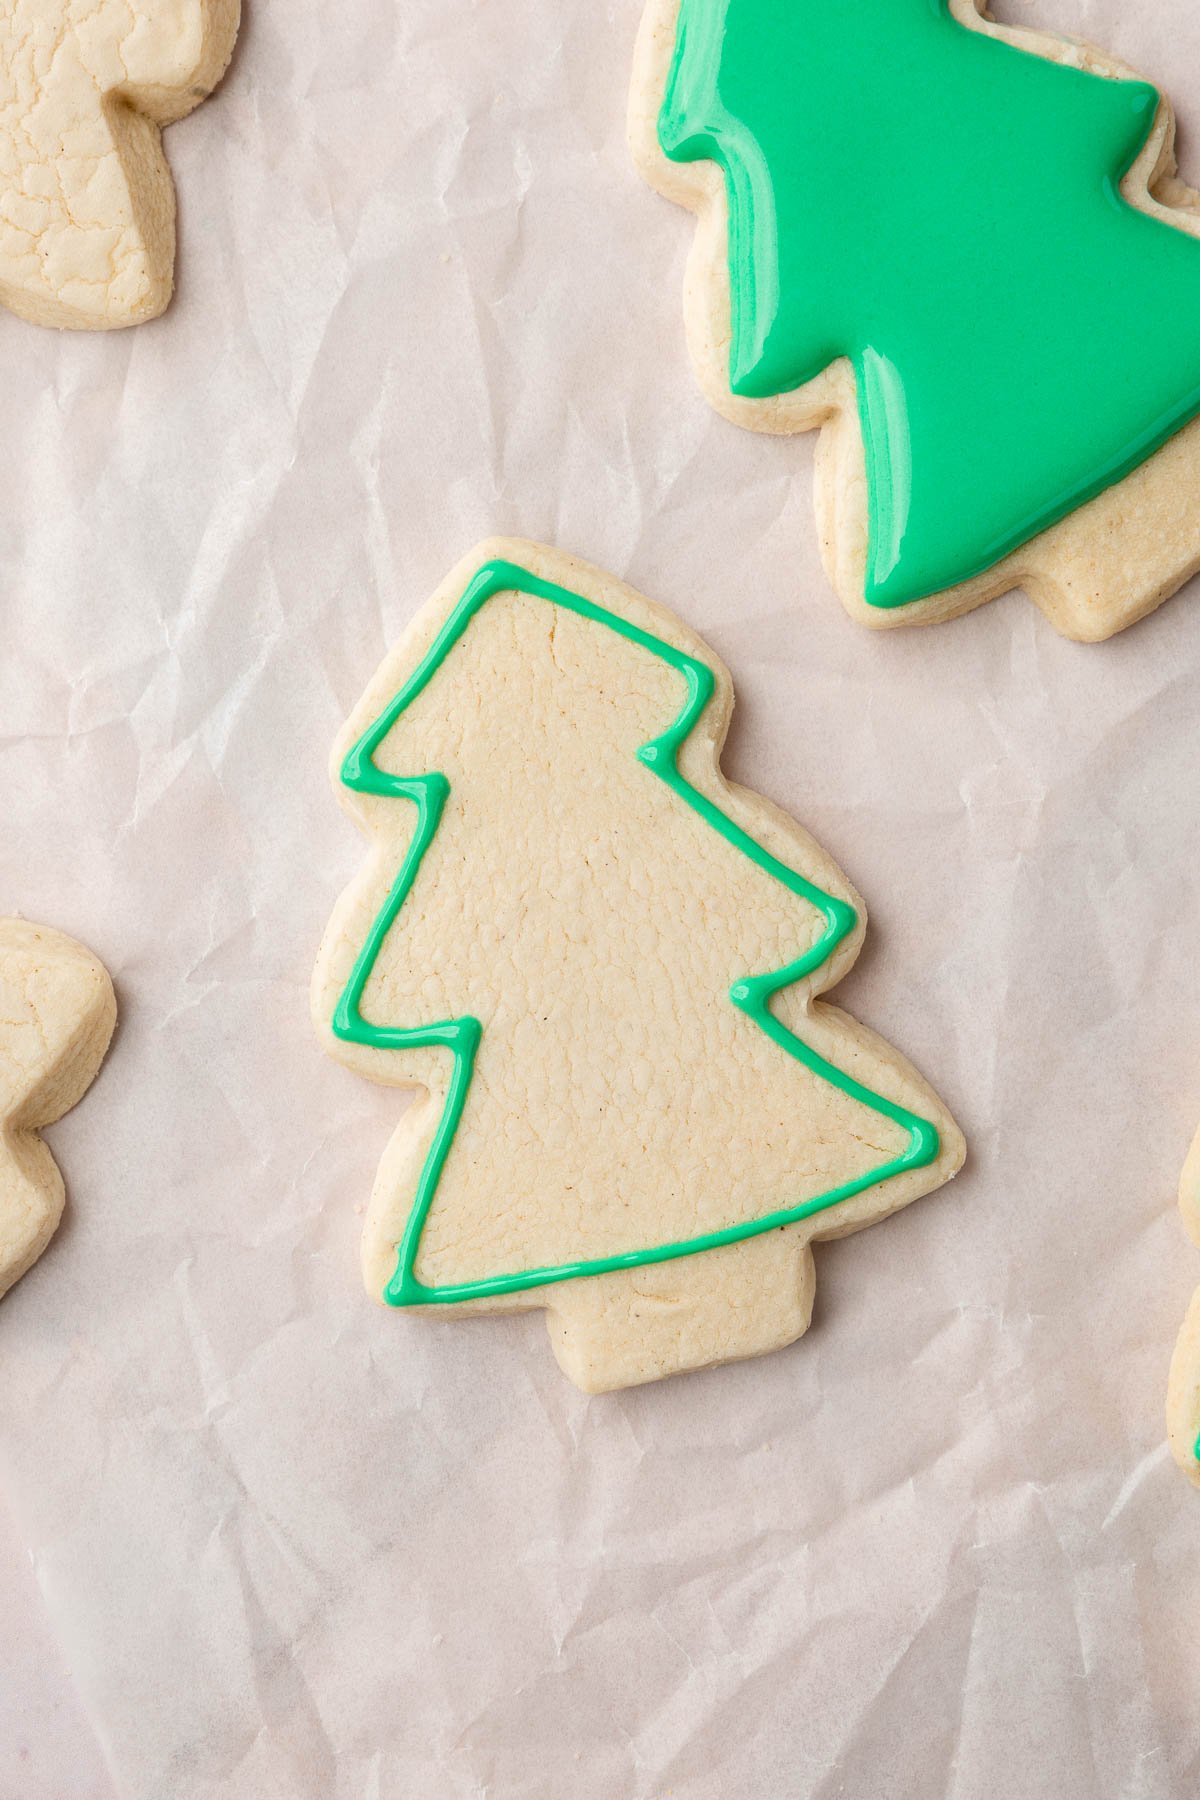
Christmas tree cookies step-by-step instructions

Sugar cookie tips
Recipe FAQs
These cookies are done when the edges are lightly browned and the center looks matte, not shiny. They should not be completely browned. It’s important to keep an eye on them as baking times can vary slightly depending on your oven.
This can happen if the dough is too warm or the butter was too soft. Make sure to chill the dough as directed in the recipe. Also, avoid placing the dough on a warm baking sheet.
Once baked and cooled, these cookies can be stored in an airtight container at room temperature for about 2 weeks, or they can be frozen for longer storage. However, I prefer to freeze undecorated cookies to ensure that the dye in the royal icing does not bleed once defrosted from the freezer.
Cookie decorating tips
Storage instructions
Room temperature storage
After your cookies have completely cooled down, place them in an airtight container and keep them at room temperature. They’ll stay fresh for about a week when undecorated. If you’ve used royal icing for decoration, the cookies can remain fresh for up to two weeks, as the royal icing helps to preserve their freshness.
Freezer option
You can freeze both the baked cookies and the unbaked cookie dough.
- To freeze baked cookies, ensure they are completely cool, then place them in a freezer-safe bag or container, separating layers with parchment paper. They can be stored in the freezer for up to 3 months. You can freeze undecorated or decorated sugar cookies, but I prefer to freeze undecorated cookies and let them thaw and decorate them closer to when I need them.
- You can choose to freeze the whole batch of dough in a 1-inch thick circle or roll out the dough, cut into shapes using cookie cutters, and then freeze the individual shapes. If freezing shapes, first place them on a baking sheet and freeze for about an hour, then transfer them to a freezer bag. The dough can be kept frozen for up to three months. When baking from frozen, add an extra 2-3 minutes to your baking time. If you’ve frozen the entire batch of dough, let it thaw in the refrigerator until it’s easy to roll out.
More gluten-free cookies to try
Did you make this recipe?
I’d love to know! Please rate it and leave a comment below. You can also share your pictures and tag @adashofmegnut on Instagram.
Gluten-Free Christmas Cookies
Equipment
- Disposable Tipless Piping Bags
- Candy Cane Cookie Cutter
- Mitten Cookie Cutter
- Snowflake Cookie Cutter
- Ugly Sweater Cookie Cutter
- Tree Cookie Cutter
Ingredients
For the cookies:
- 1 cup unsalted butter (softened (227g))
- 1 cup powdered sugar (120g)
- 1 teaspoon almond extract
- 2 teaspoons pure vanilla extract
- 1 teaspoon salt (5g)
- 1 egg (50g)
- 2 1/4 cups gluten-free flour blend (315g)
For the royal icing:
- 4 cups powdered sugar (480g)
- 3 tablespoons meringue powder (20g)
- 6-10 tablespoons water (90-150g)
- 1 teaspoon vanilla extract (or almond extract)
- Americolor gel food coloring (for decorating)
Instructions
To make the cookies:
- Preheat the oven to 375°F (190°C). Line a baking sheet with parchment paper. Set aside.
- In a large bowl, cream butter and powdered sugar with an electric mixer for 2-3 minutes, until light and fluffy.
- Then, add egg, vanilla extract, almond extract, and salt; beat until smooth, about another minute.
- Gradually mix in the gluten-free flour blend, half a cup at a time, mixing until no more streaks of flour remain.
- Scoop the dough out onto a piece of parchment paper and pat into a circle about 1 inch thick. Chill the dough in the refrigerator for at least an hour to firm up for rolling.
- Lightly dust your work surface and rolling pin with powdered sugar. Roll out the dough to 1/4 inch thickness and cut with cookie cutters.
- Place cookies on the prepared baking sheet, leaving 2 inches in between each cookie. If you really want the cookies to hold their shape when baking, you can freeze them for 10-15 minutes or refrigerate for another 30 minutes.
- Bake cookies at 375°F (190°C) for 8-10 minutes until they are lightly browned on the edges and the center of the cookie is matte and no longer shiny. The cookies will not be browned completely.
- Allow cookies to cool on the baking sheet for 5 minutes before transferring to a wire rack to finish cooling.
- Cool completely before frosting with royal icing as directed below.
To make the royal icing:
- In a bowl of an electric mixer fitted with the whisk attachment, combine the powdered sugar, meringue powder, 5 tablespoons of water, and vanilla extract.
- Mix for 1-2 minutes on low speed, scraping down the sides to make sure everything has been incorporated.
- Turn the speed to medium-high, and mix an additional 3-4 minutes until the ingredients are well blended, the volume has increased, and the icing is very white and thick. This is what I consider the base consistency.
- I usually add about 1 teaspoon more of water for a good outline icing (I use a 15-second rule, meaning if you drizzle the icing with a spoon or spatula over the bowl of icing it will melt back into the icing in 15 seconds. Depending on how thin your icing needs to be you can add anywhere from 1-4 more tablespoons of water, as needed. Go slowly as it's easier to thin out your icing than it is to make it thicker again.
- Add gel food colorings a little at a time as needed to color the icing. Keep a wet paper towel over any icing that you are not currently working with to prevent a skin from forming over the top.
Notes
- I tested this recipe with Bob’s Red Mill 1-to-1 Gluten-Free Baking Flour in the blue bag, which already contains xanthan gum. I cannot verify that other flour blends will work in this recipe as I have not tested them.
- I like Americolor meringue powder, which is labeled as gluten-free.
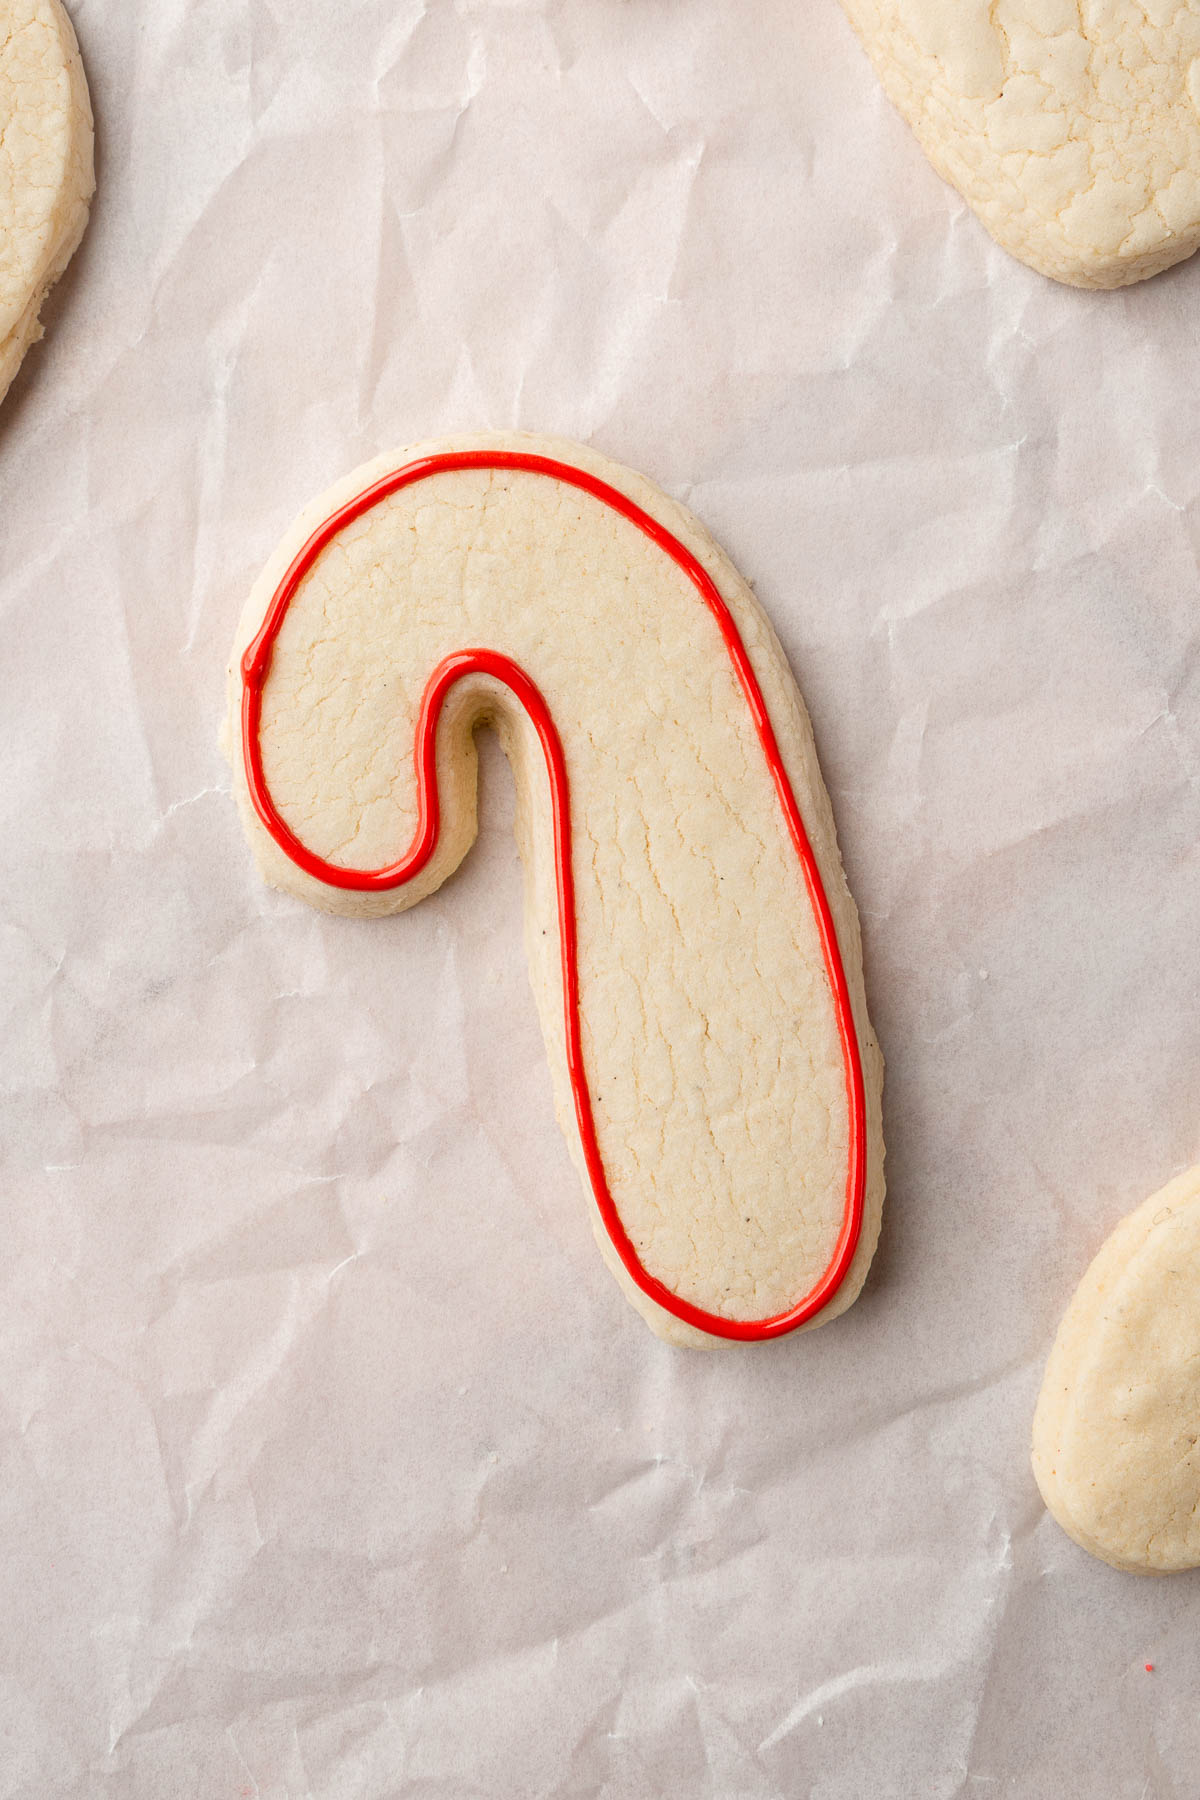
- Outlining: Begin by outlining the candy cane shape on the cookie with 15-second red royal icing for a defined edge.
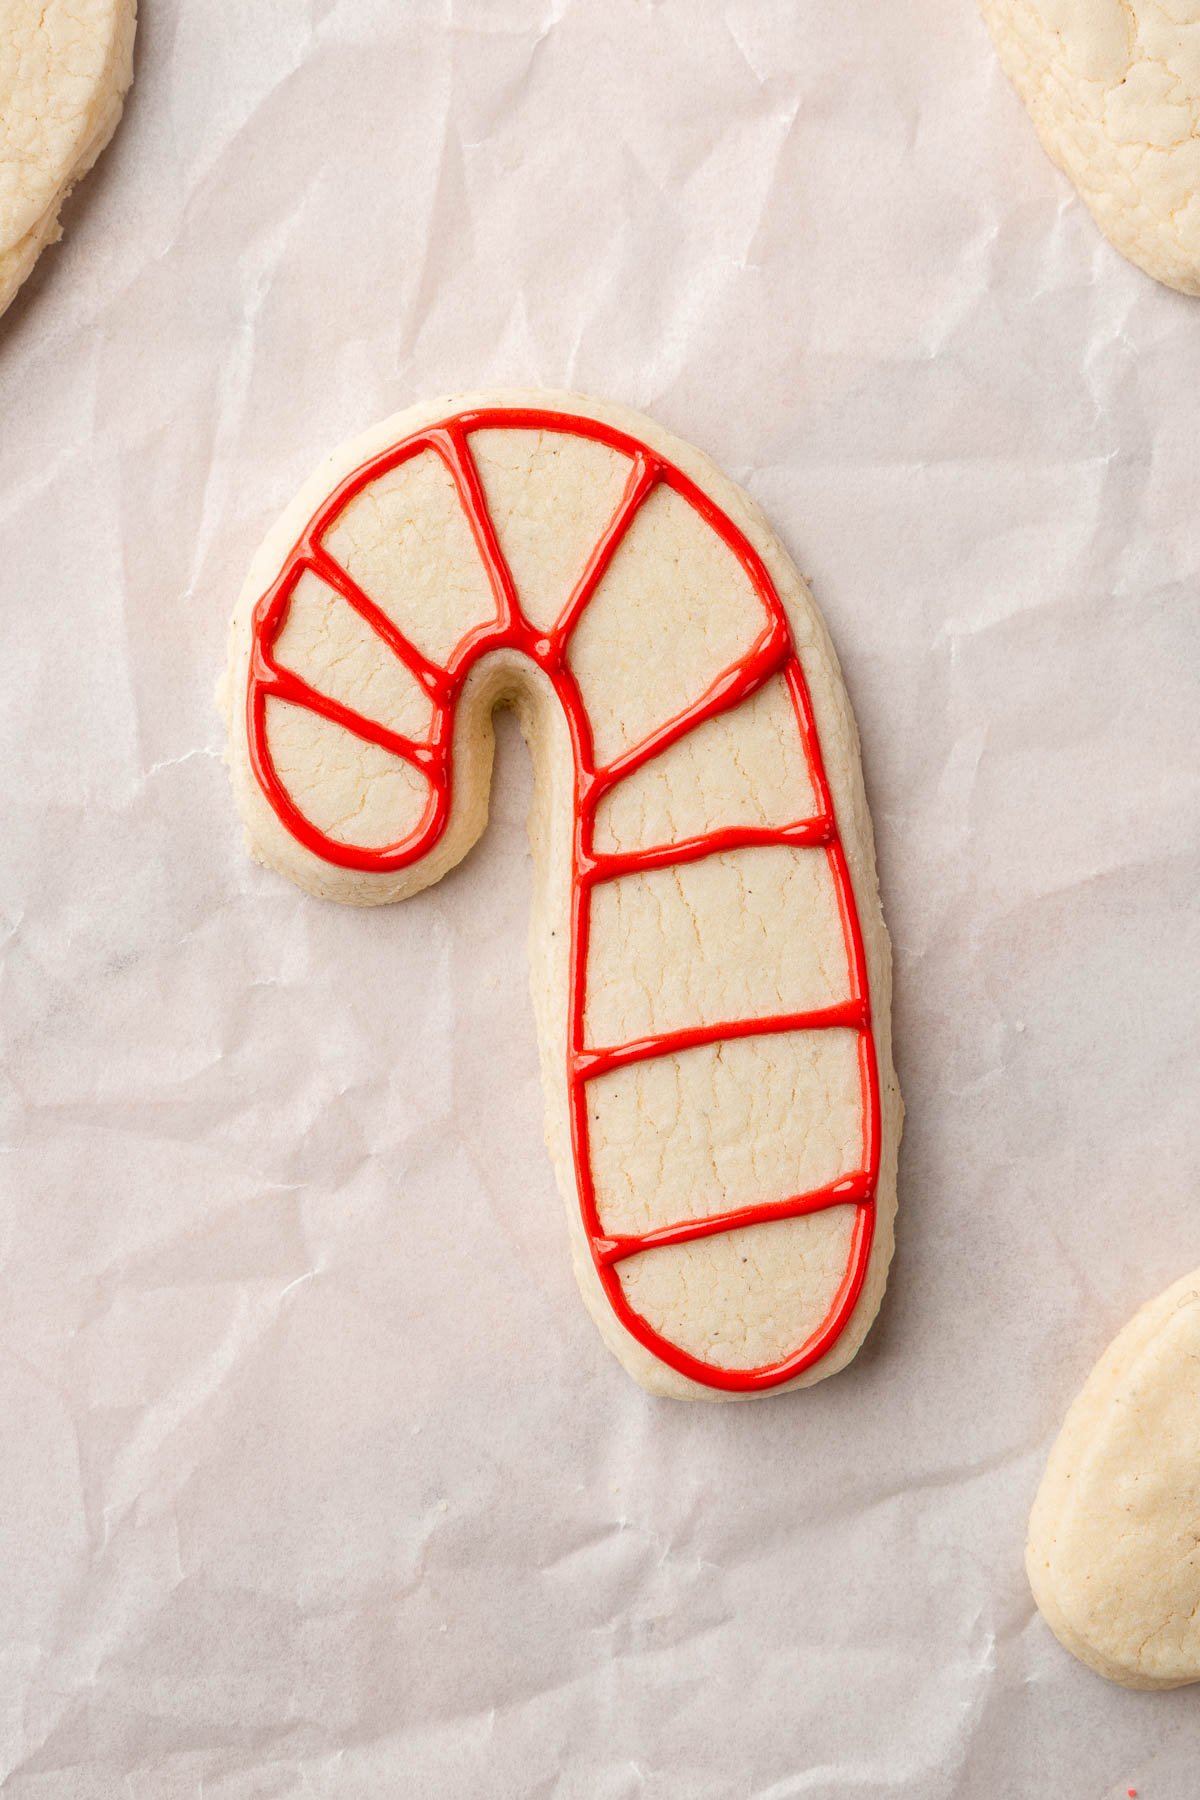
- Striping: Next, create the candy cane’s iconic stripes using the same red icing.
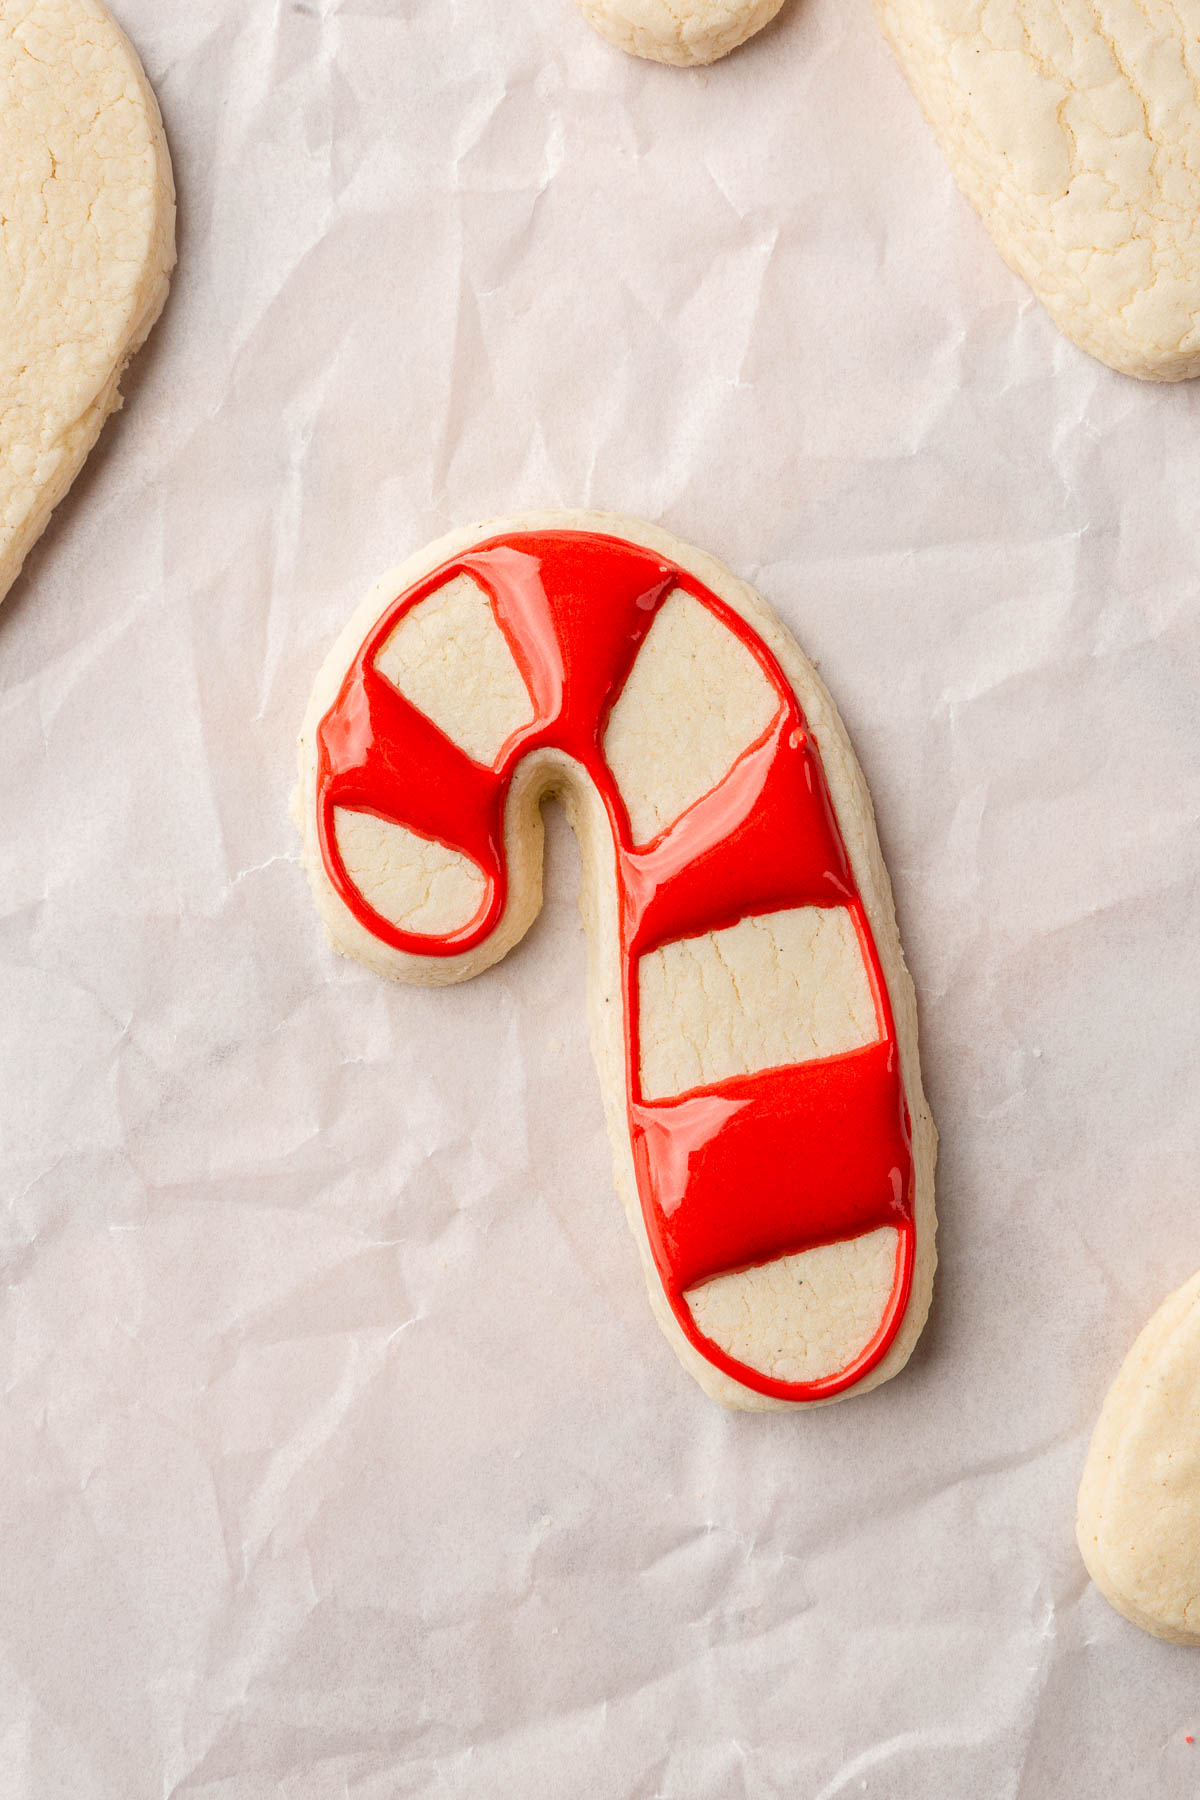
- Filling Stripes: Fill alternate stripes with the 15-second red icing, spreading it to the edges with a toothpick or scribe tool.
- Finishing Stripes: Complete the pattern by filling the remaining stripes with 15-second white royal icing and let them dry thoroughly.
- Outlining Mittens: Outline the mittens using both red and white 15-second icing for a crisp boundary.
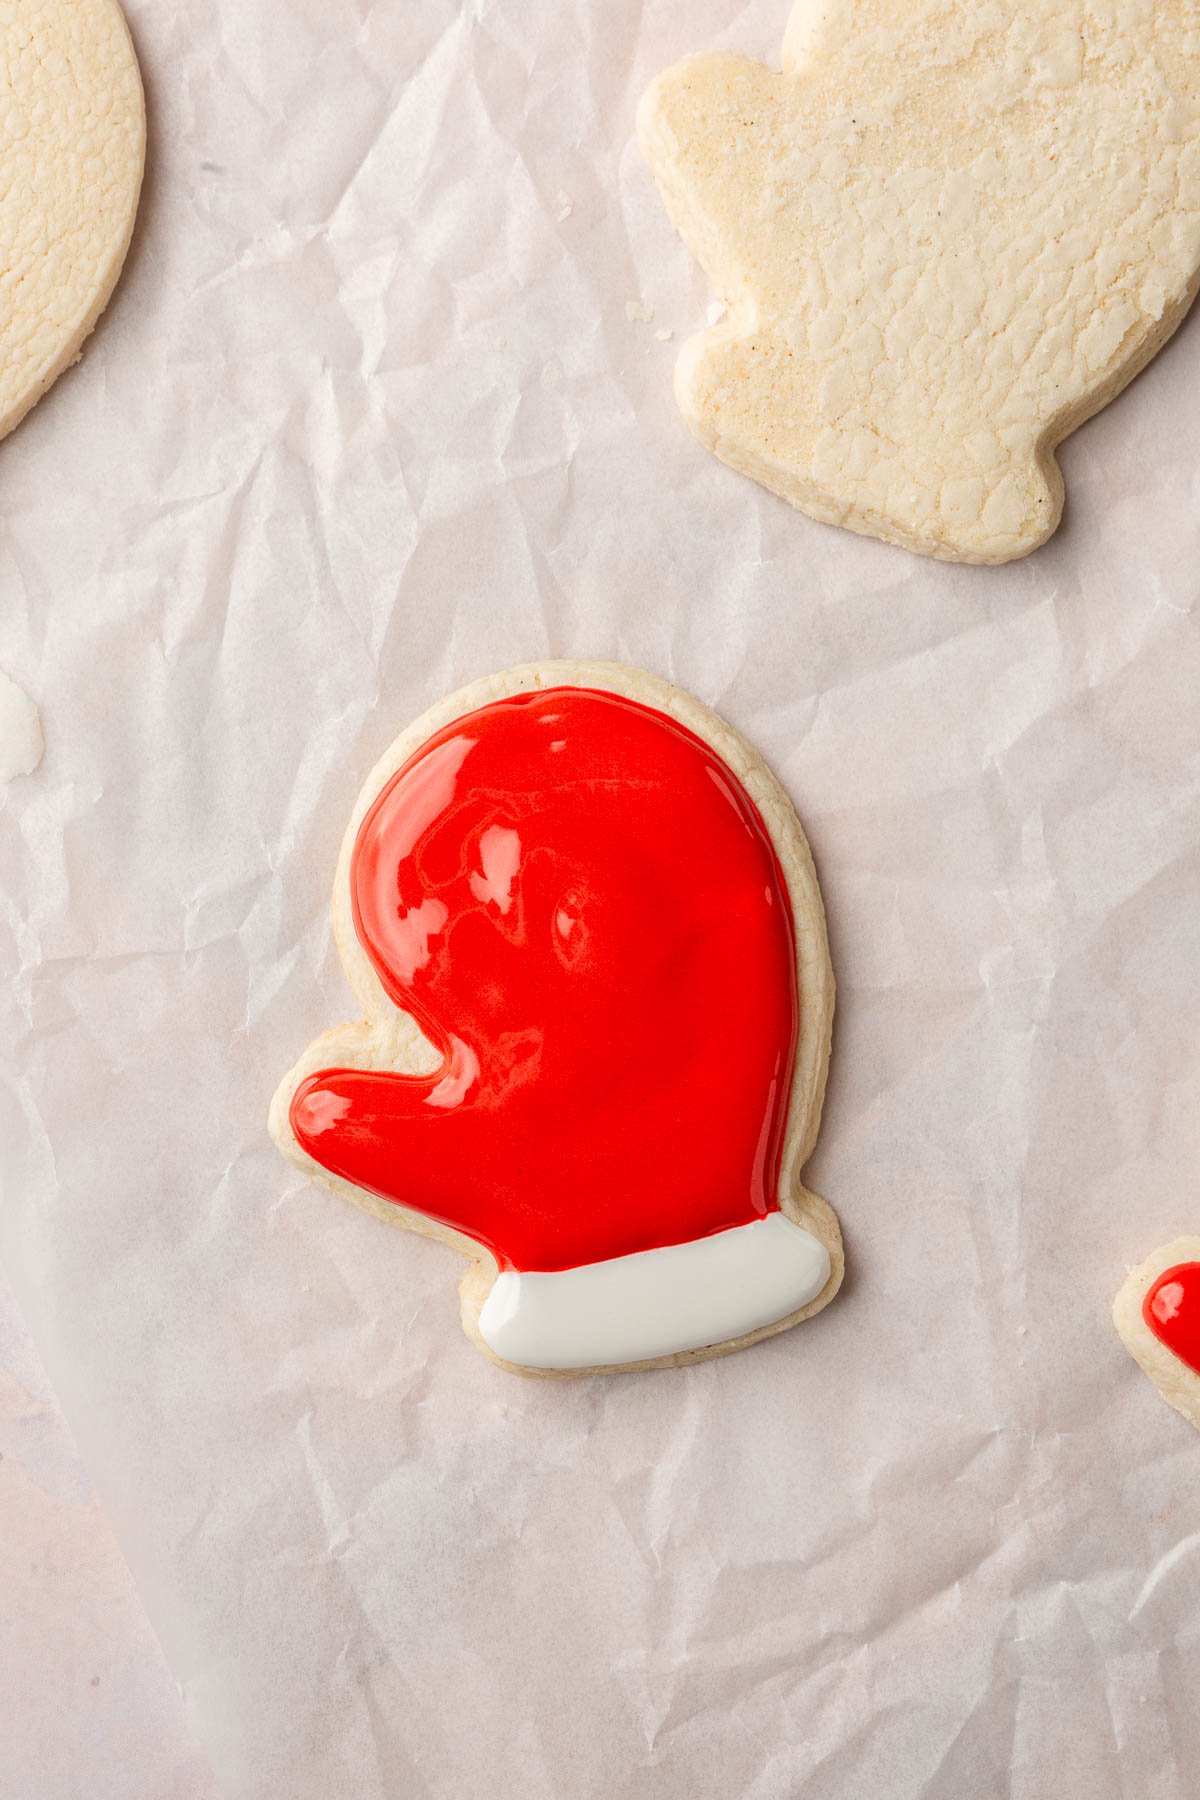
- Filling: Carefully fill the outlined mittens with the same icing, taking care not to overfill. Use a toothpick or other tool to spread the icing to the edges evenly.
- Polka Dots: Add white dots to the red icing using the wet-on-wet technique, keeping the icing tip clean and not touching the red base.
- Cuff Detailing: After drying completely, use 25-second icing to add white textured details to the mitten cuffs. Allow to dry fully.
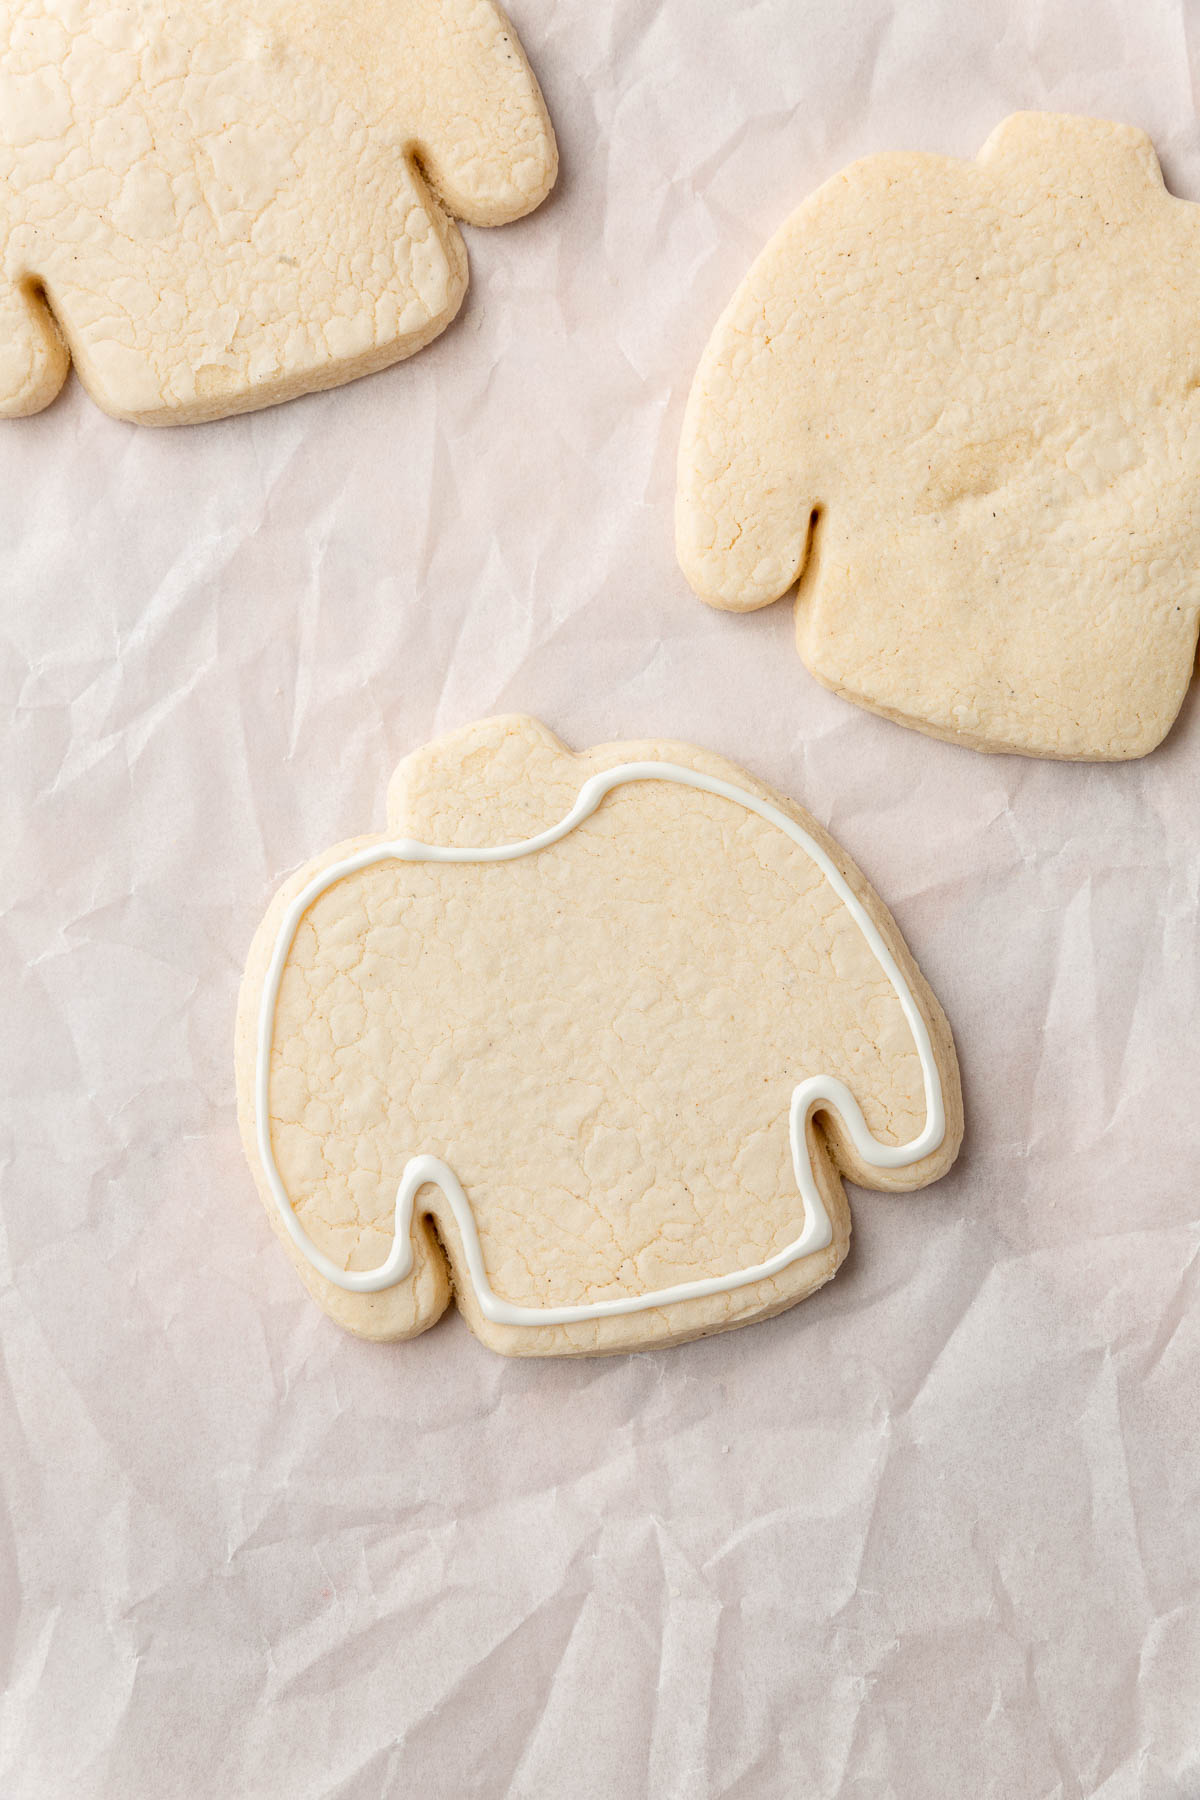
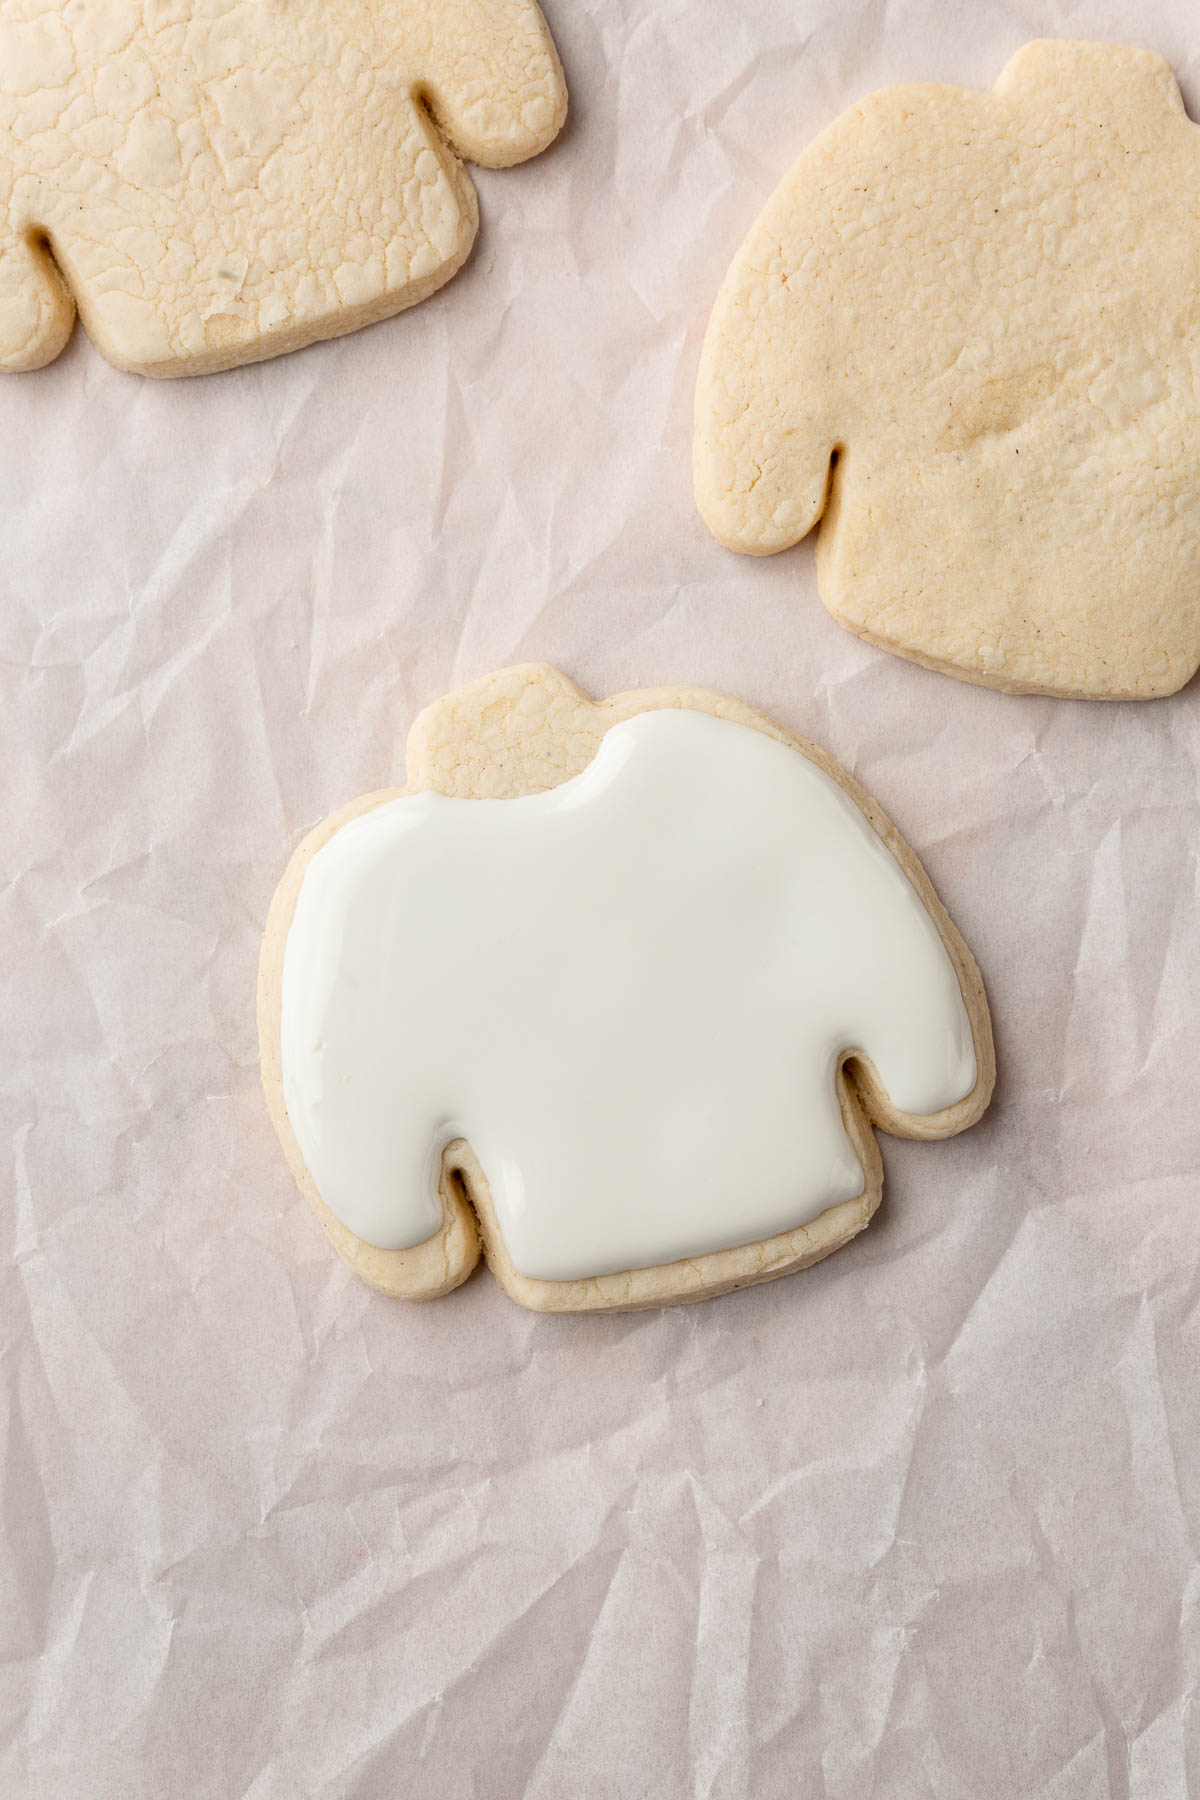
- Sweater Outline: Outline the sweaters with 15-second white icing, leaving the sleeve ends, sweater bottom, and neck for later.
- Sweater Filling: Fill in the main body of the sweater with the same white icing.
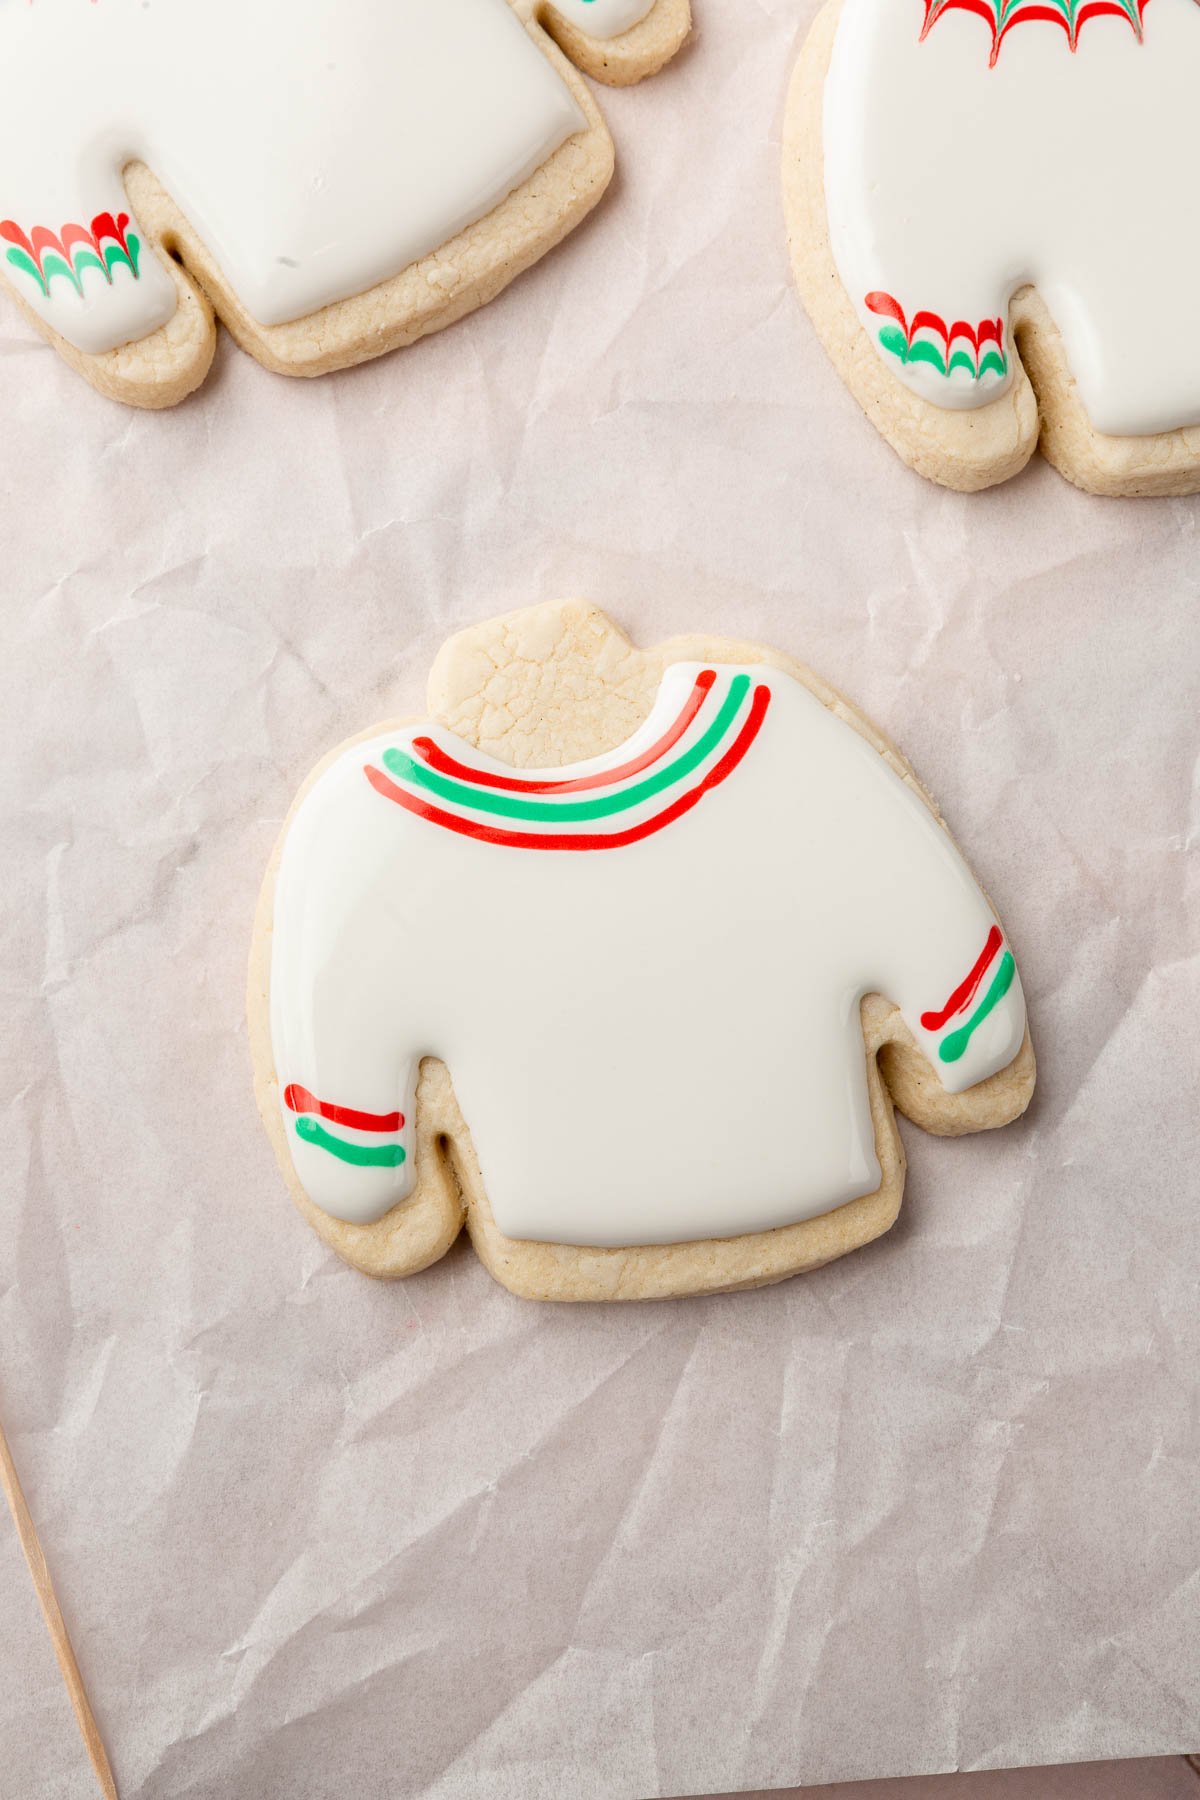
- Stripe Creation: Quickly add red and green stripes to the neck and sleeves using the wet-on-wet technique for seamless integration.
- Chevron Pattern: Drag a toothpick through the stripes to create a chevron design, cleaning the toothpick between each drag.
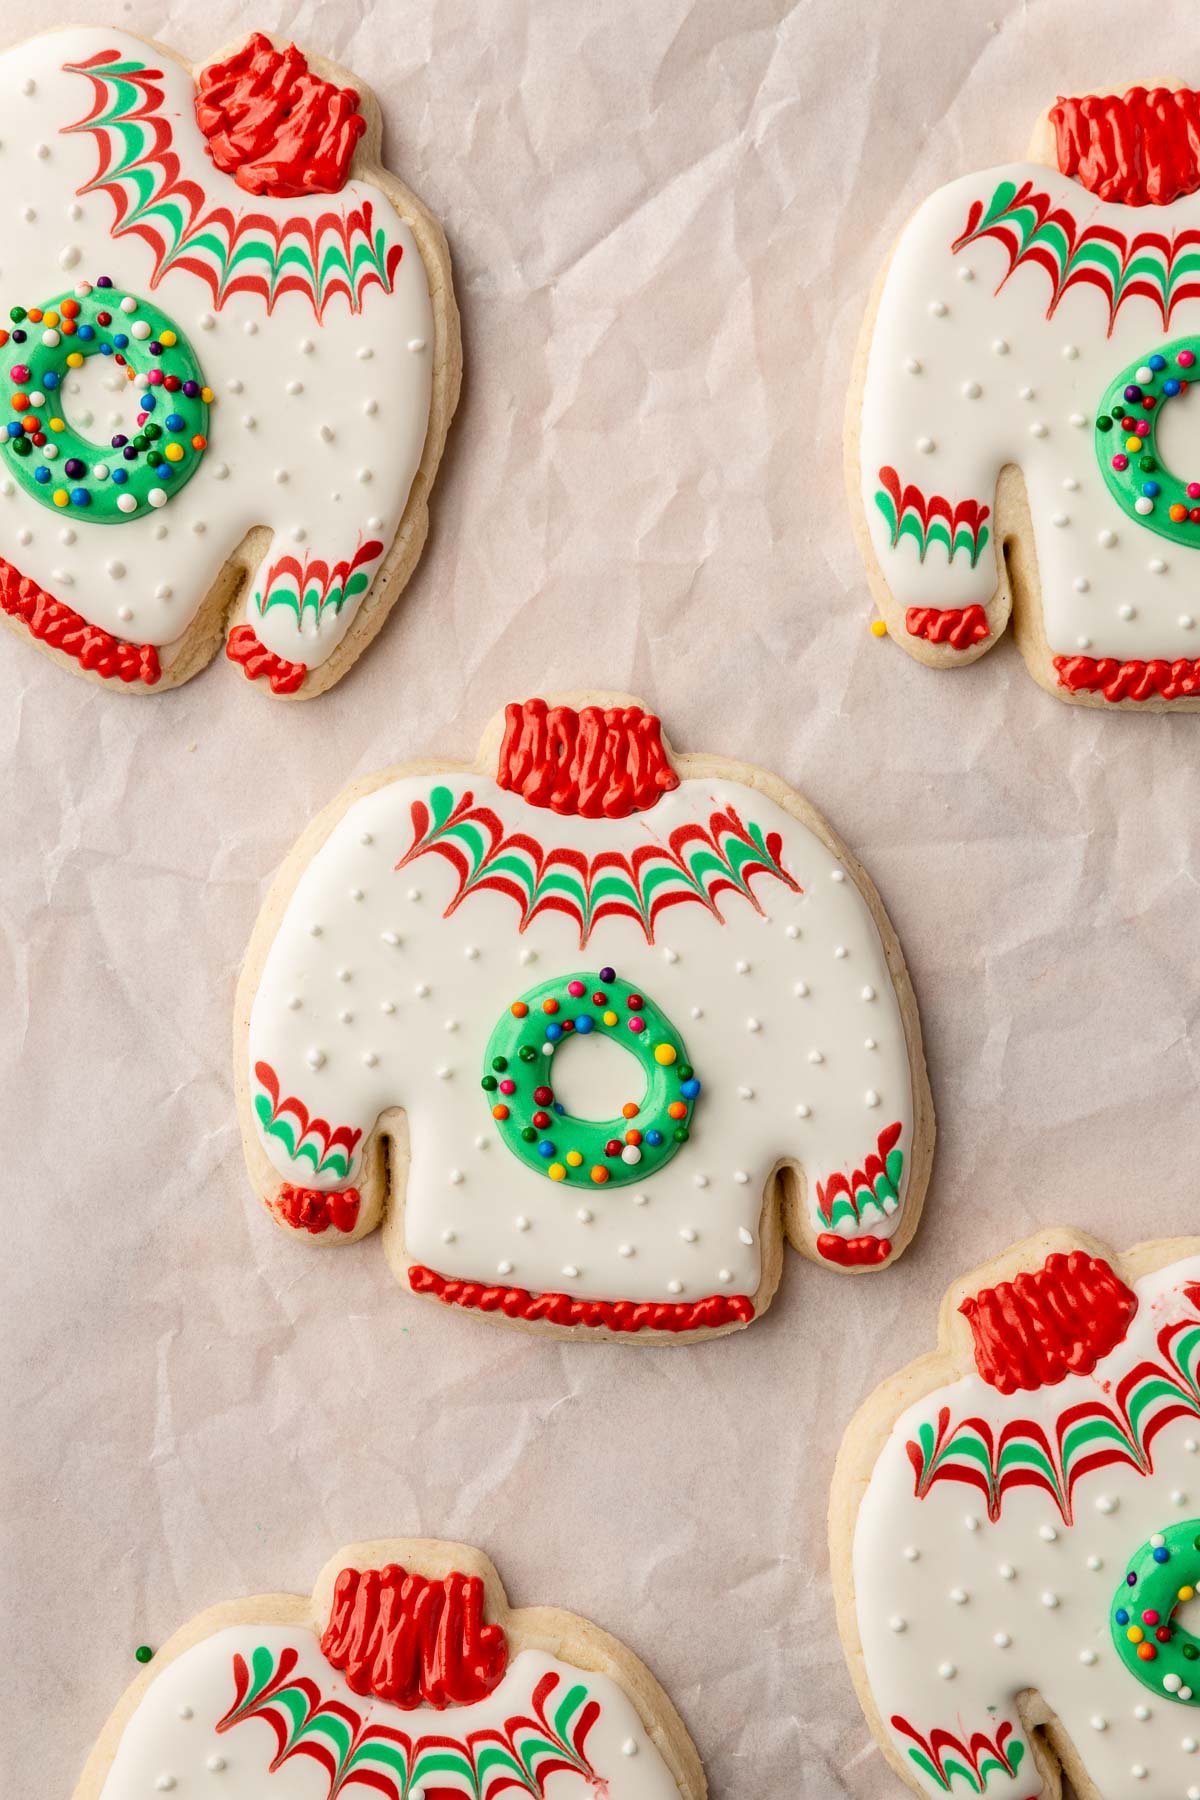
- Wreath and Detailing: Add a wreath with green 25-second icing and rainbow nonpareils for ornaments. Finish with red 25-second icing on the edges of the sweater hem and the turtleneck and white dots with white 25-second icing all over the sweater for detail.
- Snowflake Outlining: Outline the snowflake cookies with 15-second light blue icing for a base shape.
- Filling: Fill in the center of the snowflake with the same blue icing and let it dry completely.
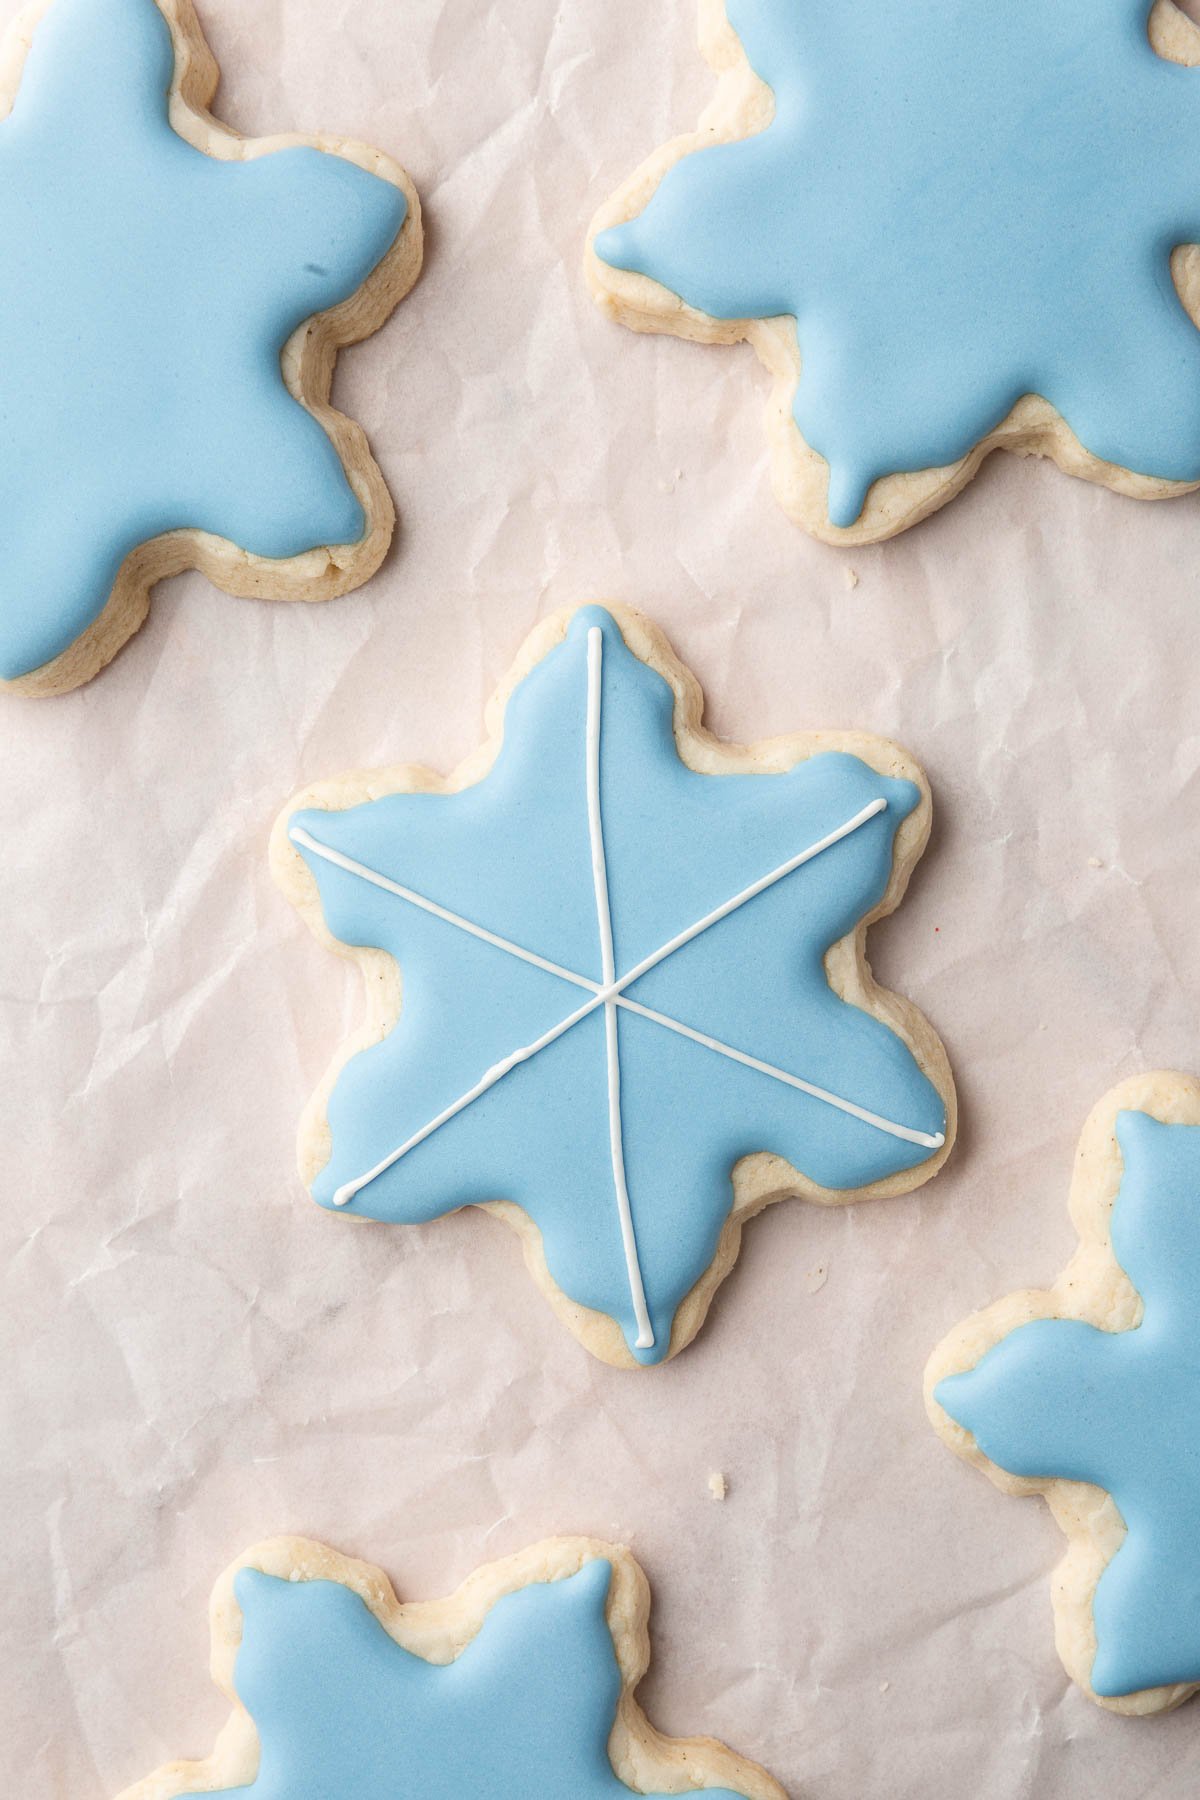
- Adding Details: Use 25-second white icing to draw straight lines across the snowflake, keeping the bag elevated for precision.
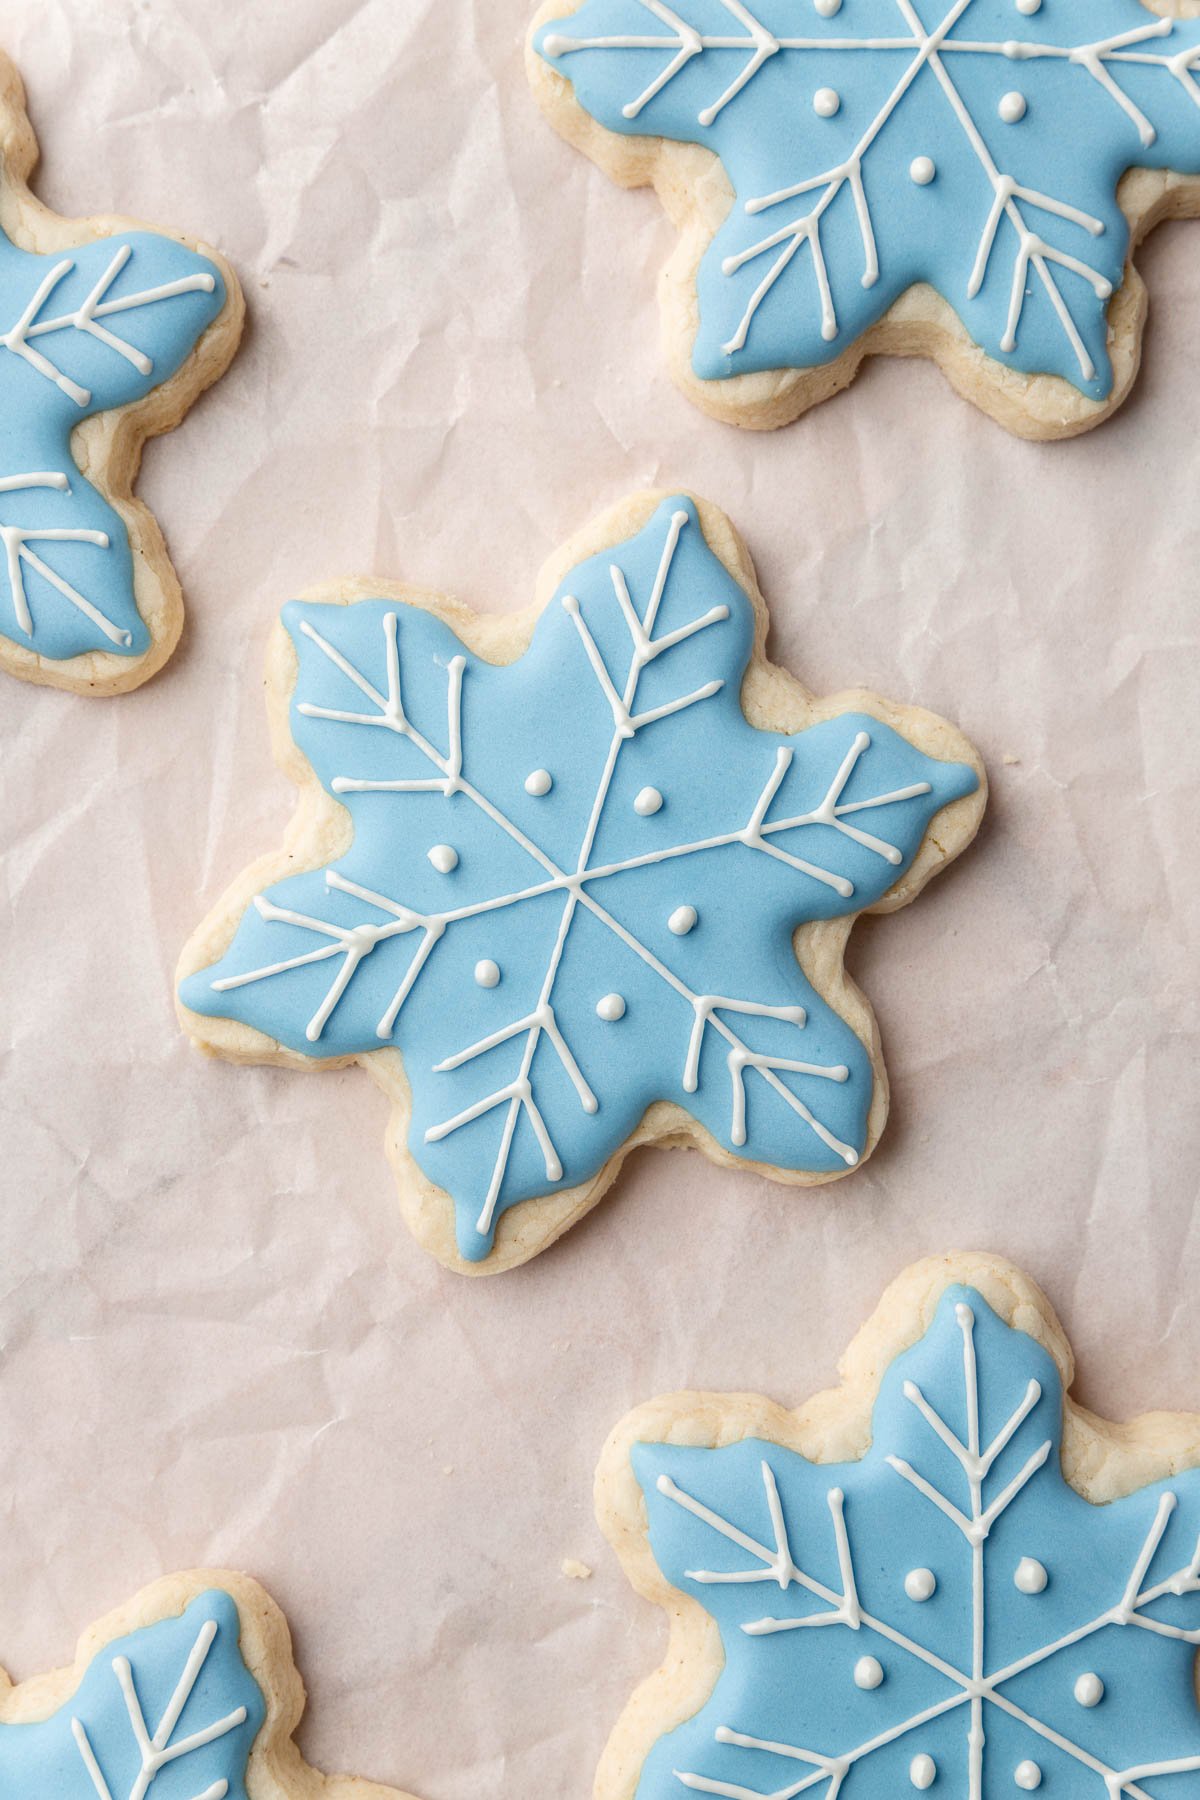
- Final Touches: Add ‘V’ shapes and dots with the same white icing to enhance the snowflake design. Allow complete drying before serving.
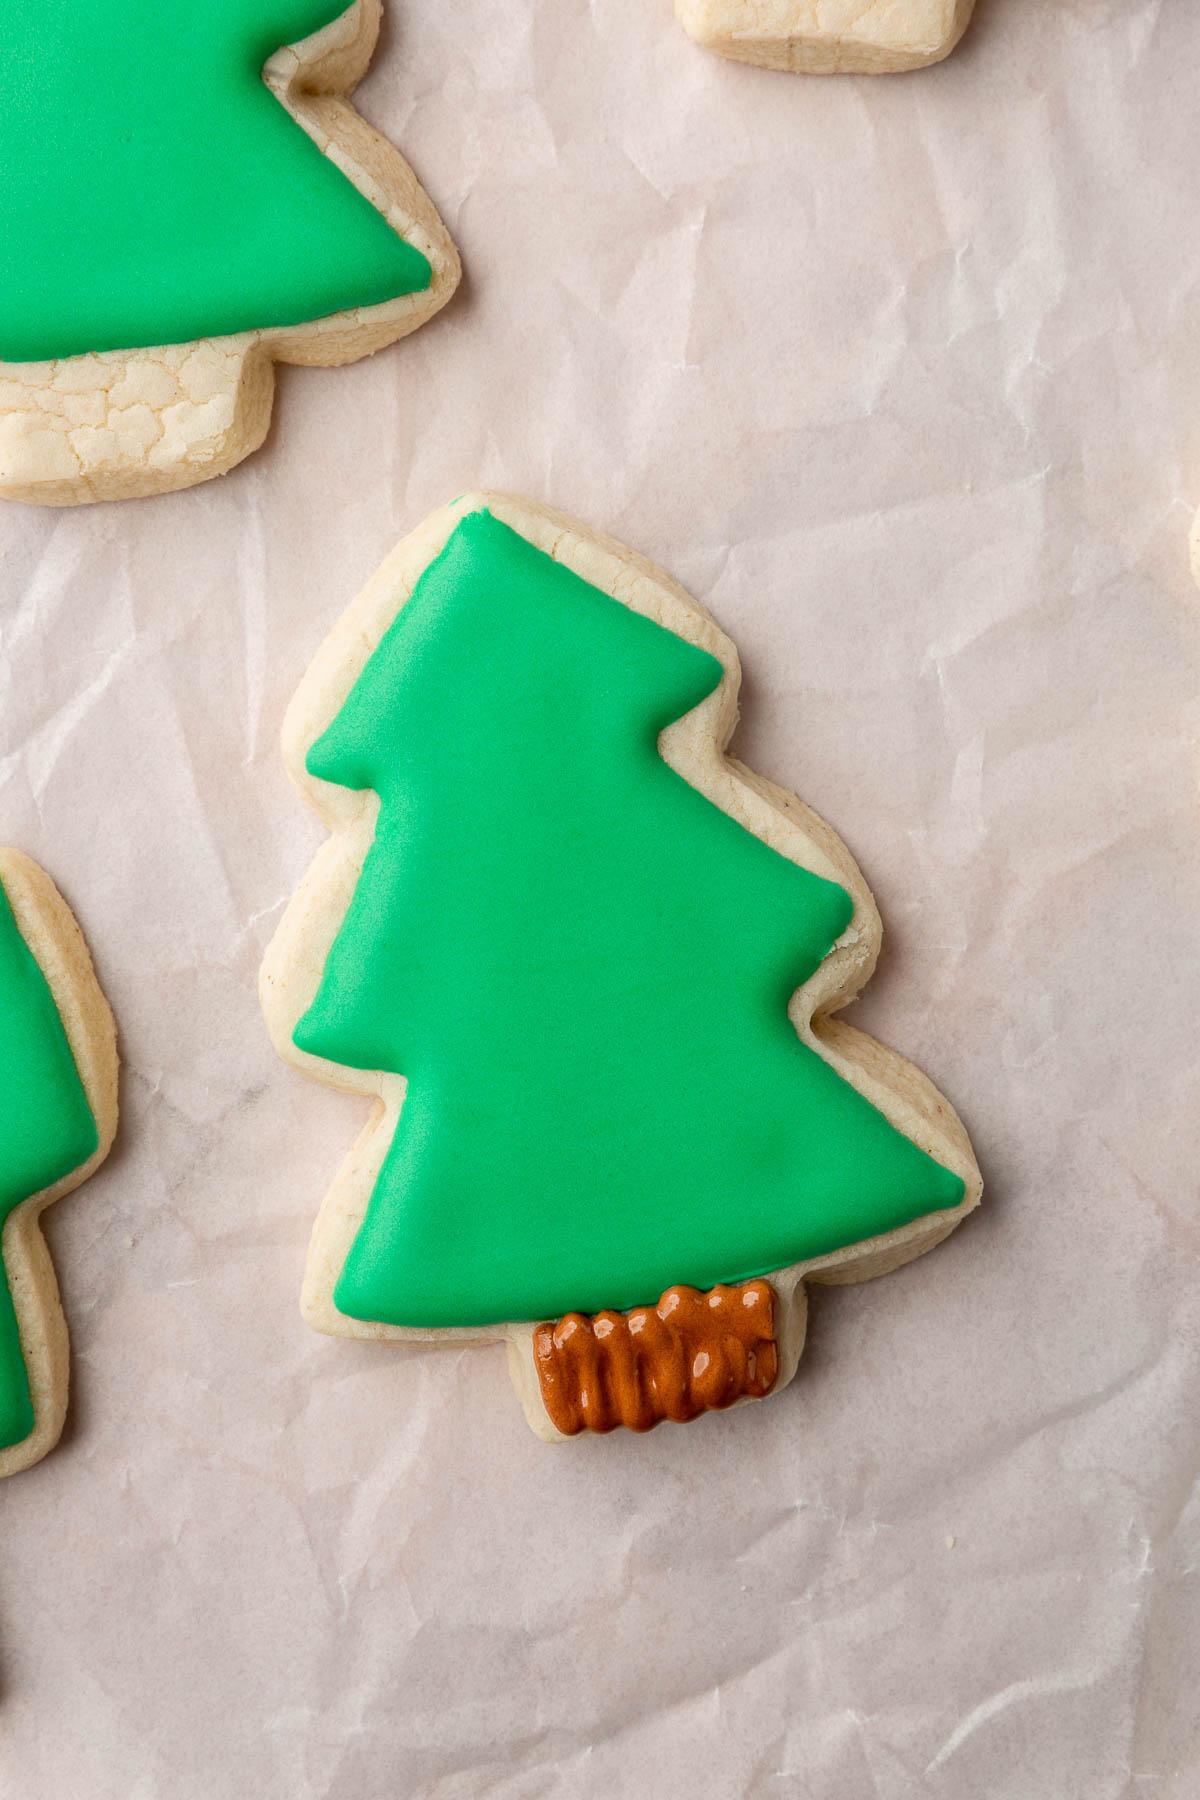
- Tree Outline: Start by using 15-second green royal icing to trace the outline of the tree portion of your cookies, saving the stump for later.
- Filling the Tree: Next, promptly fill the body of the tree with the same green icing, ensuring it’s evenly spread. Allow this to dry fully before adding further details.
- Creating the Stump: For the tree’s stump, switch to brown royal icing with a consistency of 20 to 25 seconds. Apply it in vertical motions to mimic the texture of a tree stump.
- Snow Cap Details: Finish off by adorning the tree branches with white snow caps using thick 25-second icing, then let the cookies dry completely to set the design.
Nutrition

I’m Megan
A gluten-free food blogger from Chicago and lover of all things food, showing you gluten-free can be easy and delicious, too. Let’s make gluten-free stress free together! Read more…


